

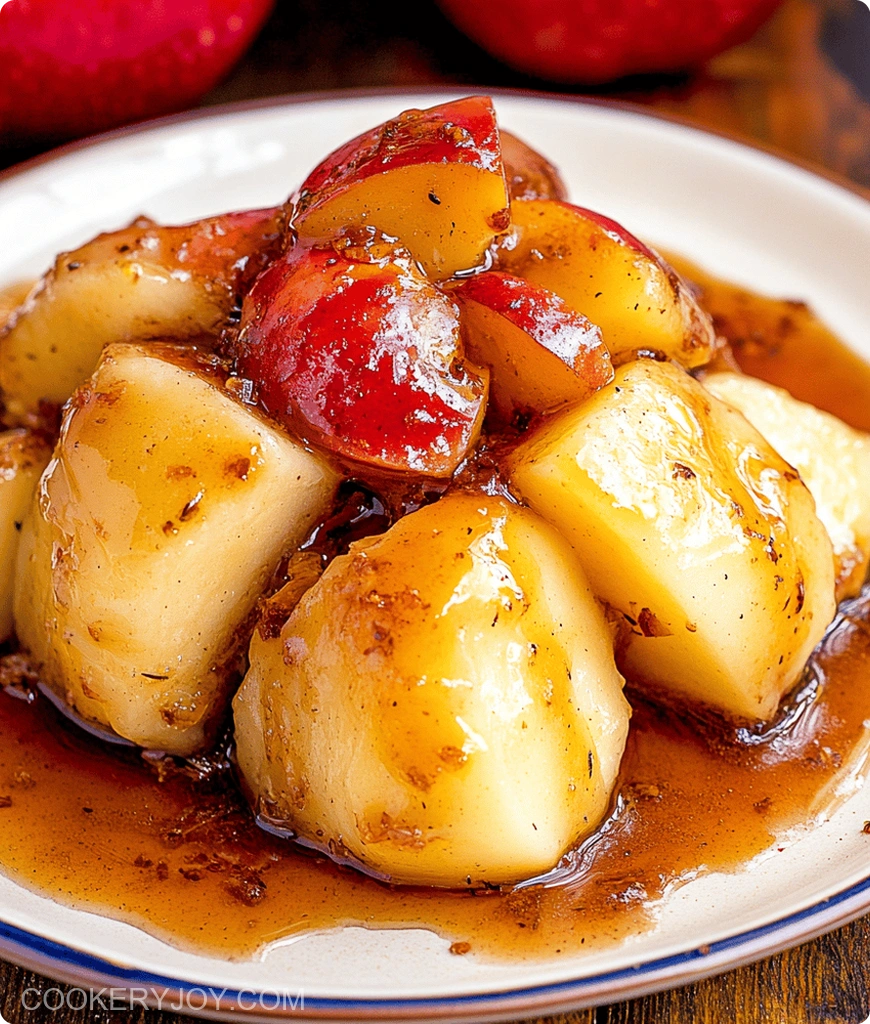
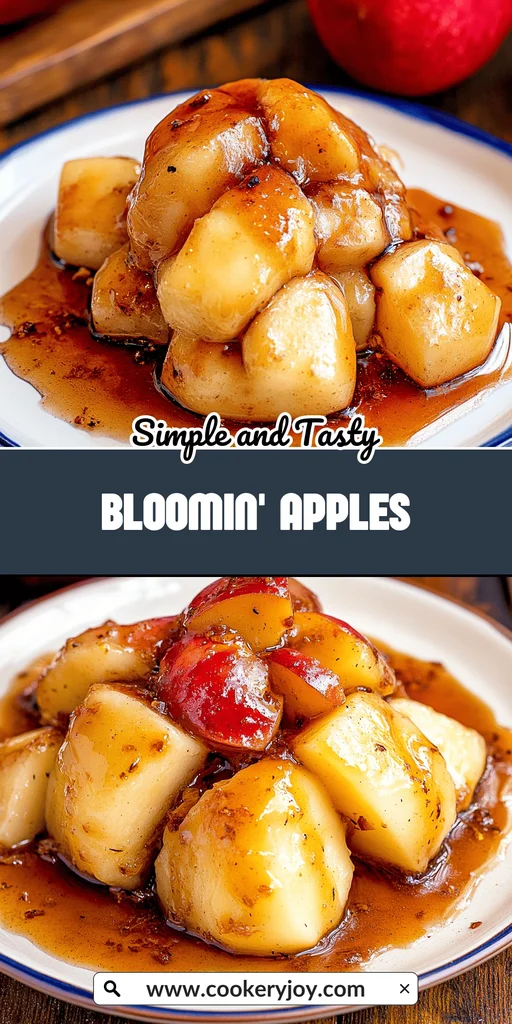
There’s something truly special about a dessert that captures the essence of autumn, and these Bloomin’ Apples do just that. Imagine tender, baked apples, their skins softened to a perfect yielding texture, revealing a warm, gooey center of sweet caramel. The gentle spice of cinnamon weaves through each bite, creating a comforting and utterly delightful treat that feels like a hug from the inside out.
These Bloomin’ Apples are a favorite for a reason; they’re surprisingly simple to prepare, making them ideal for a weeknight treat or a lovely dessert to share with friends. They bake up beautifully, filling your kitchen with an irresistible aroma, and are best enjoyed warm, perhaps with a scoop of vanilla ice cream melting into the sweet, spiced apple.
Why I Love This Recipe
Honestly, these Bloomin’ Apples are a weeknight hero! They look so fancy, yet they’re surprisingly easy to whip up. Plus, they’re ready in less than an hour, which is a huge win for my busy schedule. The combination of warm, spiced apple and melted caramel just feels like pure autumn comfort in a bowl. They’re also super versatile – perfect on their own or jazzed up with a scoop of ice cream.
Bloomin’ Apples Ingredients
The magic of these Bloomin’ Apples lies in its simple yet perfectly balanced ingredients, creating a harmonious blend of sweet, spiced, and tender goodness. Each component plays a crucial role in transforming a humble apple into a show-stopping dessert.
- Apples: The star of the show, providing a tender, slightly tart base that bakes beautifully. Firm, sweet varieties like EverCrisp®, Honeycrisp, Pink Lady, or SweeTango® hold their shape and offer the best flavor.
- Butter: Adds richness and helps create a lovely golden glaze when brushed over the apples.
- Sugars (Brown & Granulated): Provide sweetness and contribute to the caramelization and tender texture.
- Cinnamon: The quintessential fall spice, adding warmth and depth to the flavor profile.
- Caramel Squares: Melt into a gooey, sweet filling that makes these apples truly irresistible.
Substitutions and Tips:
For an extra burst of flavor, consider adding a pinch of nutmeg or allspice to the butter mixture. If you don’t have caramel squares, chopped soft caramels or even a spoonful of dulce de leche can work as a substitute. For a dairy-free option, use a plant-based butter and dairy-free caramels. Ensure your apple cuts don’t go all the way through to keep the filling contained. For exact quantities, please refer to the printable recipe card at the end of the post. Happy baking!
How to Make Bloomin’ Apples
Step 1: Prepare the Baking Dish and Apples
Preheat your oven to a steady 375°F (190°C). Lightly grease a square baking dish. This prevents any sticking. Next, prepare your apples. Carefully slice off the top of each apple. Then, use a melon baller or a small teaspoon. Scoop out the core from the center. Be sure to leave the bottom intact.
Step 2: Create the “Bloom”
To achieve the beautiful “blooming” effect, make two circular cuts inside the apple’s core. After that, carefully make eight vertical cuts down the sides. Extend these from the top almost to the bottom. It’s crucial not to cut all the way through. This helps the apple hold its shape and its delicious filling during baking.
Step 3: Fill and Glaze the Apples
Place the prepared apples into the greased baking dish. Fill the cavity of each apple with two soft caramel squares. They will melt into a wonderful, gooey center. In a separate small bowl, whisk together melted butter, brown sugar, granulated sugar, and ground cinnamon. Brush this delightful mixture all over the apples. Get into all the nooks and crannies for maximum flavor.
Step 4: Bake to Perfection
Now, place the baking dish into the preheated oven. Bake the Bloomin’ Apples for approximately 30 minutes. You’ll know they’re ready. The apples should be tender when pierced with a fork. They will also have a slightly golden hue. The caramel inside should be melted and bubbly. This creates a truly inviting fall dessert.
Step 5: Serve Warm
Once baked, carefully remove the Bloomin’ Apples from the oven. Serve them warm. This is when their flavors and textures are at their absolute best. For an extra special touch, consider topping them. A dusting of powdered sugar is lovely. So is a scoop of creamy vanilla ice cream. A drizzle of extra caramel sauce is also great. Toasted pecans add a nice crunch too.
How to Store Bloomin’ Apples
Leftover Bloomin’ Apples store well. Keep them in an airtight container in the fridge. They are good for 2 to 3 days. Reheat them gently. Use a microwave or a low oven. Around 300°F (150°C) works well. This revives their tender texture. The warm, gooey center gets a second life. Freezing is an option. However, the apple’s texture can change. It might become softer upon thawing. For the best eating experience, refrigerate them. This ensures the best quality.
Tips for Success
- Choose firm apples that hold their shape well when baked.
- Don’t cut completely through the apple. Keep those vertical slices intact.
- Ensure the butter mixture coats every surface. This gives even flavor.
- Taste your apples first. Adjust sugar if they are very tart.
- Serve immediately after baking. This ensures the best tender texture.
Kitchen Tools You’ll Need
You don’t need a lot of fancy gadgets for these Bloomin’ Apples. Most kitchens have these basics. Grab a baking dish, maybe a square one. A small bowl is needed for the butter mixture. You’ll also want a whisk or fork for mixing. A melon baller or a teaspoon works for coring apples. A sharp knife is essential. A pastry brush is optional but helpful for glazing.
Serving Suggestions
- Serve warm with vanilla ice cream. Whipped cream is also delicious.
- Drizzle with extra caramel sauce. Chopped pecans add a nice crunch.
- Pair with warm apple cider. A light dessert wine works too.
- Dust with powdered sugar. This adds a touch of elegance.
Frequently Asked Questions
Can I prepare the Bloomin’ Apples ahead of time?
Yes, you absolutely can prep the apples ahead. Core them and make the cuts a few hours before baking. Keep them chilled in the fridge. Add the caramel and butter mixture right before they go into the oven. This prep step makes entertaining so much easier!
What are the best types of apples for Bloomin’ Apples?
Firm, slightly tart apples are your best bet. They hold their shape well during baking. Think Honeycrisp, Pink Lady, EverCrisp®, and SweeTango®. Softer apples can get a bit mushy. Stick with these firmer varieties for the perfect Bloomin’ Apples.
Can I freeze Bloomin’ Apples?
You can freeze baked Bloomin’ Apples. Just know the texture might change a bit after thawing. It can become softer than fresh. If you freeze them, let them thaw fully in the fridge first. Then, reheat them gently. For the best results, enjoy them baked fresh from the oven.
Print
Bloomin’ Apples
- Prep Time: 15 minutes
- Cook Time: 30 minutes
- Total Time: 45 minutes
- Yield: 4 servings
- Category: Dessert
- Method: Baking
- Cuisine: American
- Diet: Vegetarian
Description
A delightful fall dessert featuring tender baked apples filled with caramel and spiced with cinnamon.
Ingredients
- Cooking spray
- 4 Tbsp (1/2 stick) unsalted butter, melted
- 1 Tbsp brown sugar
- 1 Tbsp granulated sugar
- 1/2 tsp ground cinnamon
- 4 large apples (EverCrisp®, Honeycrisp, Pink Lady, or SweeTango® recommended)
- 8 soft caramel squares
- Optional: powdered sugar, vanilla ice cream, caramel, pecans for serving
Instructions
- Preheat oven to 375°F (190°C). Lightly grease a square baking dish with cooking spray or butter.
- In a small bowl, whisk together melted butter, brown sugar, granulated sugar, and cinnamon.
- Slice off the top of each apple then use a melon baller (or a teaspoon) to scoop out the core, keeping the base intact.
- Make 2 circular cuts inside the apple and then make 8 vertical cuts down the sides to create small sections of apple (be sure not to cut all the way through, or the apple will fall apart).
- Place apples in the baking dish and fill each with two caramel squares.
- Brush butter mixture over apples, making sure to get in the nooks and crannies.
- Bake for 30 minutes or until apples are tender and slightly golden.
- Serve warm with ice cream and drizzle with caramel and pecans if desired.
Notes
- Ensure the cuts in the apple do not go all the way through to prevent the apple from falling apart during baking.
- Using firm, sweet apples like Honeycrisp or Pink Lady will yield the best results.
- For an extra touch, sprinkle a little extra cinnamon on top before baking.


