

Some desserts just feel like a warm hug on a chilly evening. These Buckeye Brownie Cookies manage that feeling so well. I promise you this recipe delivers that perfect fudgy texture you crave. It truly marries the best parts of two classics into one amazing bite. You will certainly adore these rich Buckeye Brownie Cookies.
We often make a big batch for holiday gatherings. Honestly, they disappear faster than any other treat on the platter. They store beautifully, too. Therefore, you can easily prep some ahead for busy weeks.
Why I Love This Recipe
This recipe saves the day often.
- It combines brownie cookies perfection.
- Assembly is very straightforward.
- The flavor combination is simply unbeatable.
- They always impress my family.
Buckeye Brownie Cookies Ingredients
Gathering the components for these wonderful treats is half the fun. We are creating layers of pure deliciousness here. The rich chocolate base begs for that sweet peanut butter pairing. It is a match made in dessert heaven, truly. We need good quality chocolate for the best results, naturally.
Substitutions and Tips
Remember, exact amounts live on the recipe card below. Feel free to use dark chocolate chips instead of semi-sweet. That swap adds a nice little depth of flavor. If you run out of shortening for the topping, use coconut oil. It melts even smoother. For an extra nutty taste, use crunchy peanut butter. Store leftovers in the fridge if your kitchen runs warm.
Kitchen Tools You’ll Need
- Mixing bowls are essential for combining wet and dry parts.
- You will need parchment paper for easy cleanup.
- A whisk helps incorporate air into the batter quickly.
- Use measuring cups and spoons for accuracy.
- Spatulas are needed for scraping bowls clean.
How to Make Buckeye Brownie Cookies
Preparing the Fudgy Brownie Cookie Base
Begin by setting your oven to 350 degrees Fahrenheit. Line sturdy baking sheets with parchment paper first. Melt your butter and chocolate together gently. Stir this mixture until it becomes completely smooth. Next, whisk the sugar in vigorously. Then, add the eggs one by one. Don’t forget the vanilla extract now.
In a separate, smaller bowl, mix your dry items. Combine the flour, baking powder, and salt well. Add these dry components to the wet batter slowly. Mix only until everything is just combined together. Drop rounded spoons of dough onto the sheets. You must leave some space between these rich brownie cookies.
Bake these for just eight to ten minutes total. You want edges set but the middle soft. Remove them carefully from the hot oven. Let them cool fully on those sheets afterward.
Crafting the Creamy Peanut Butter Layer
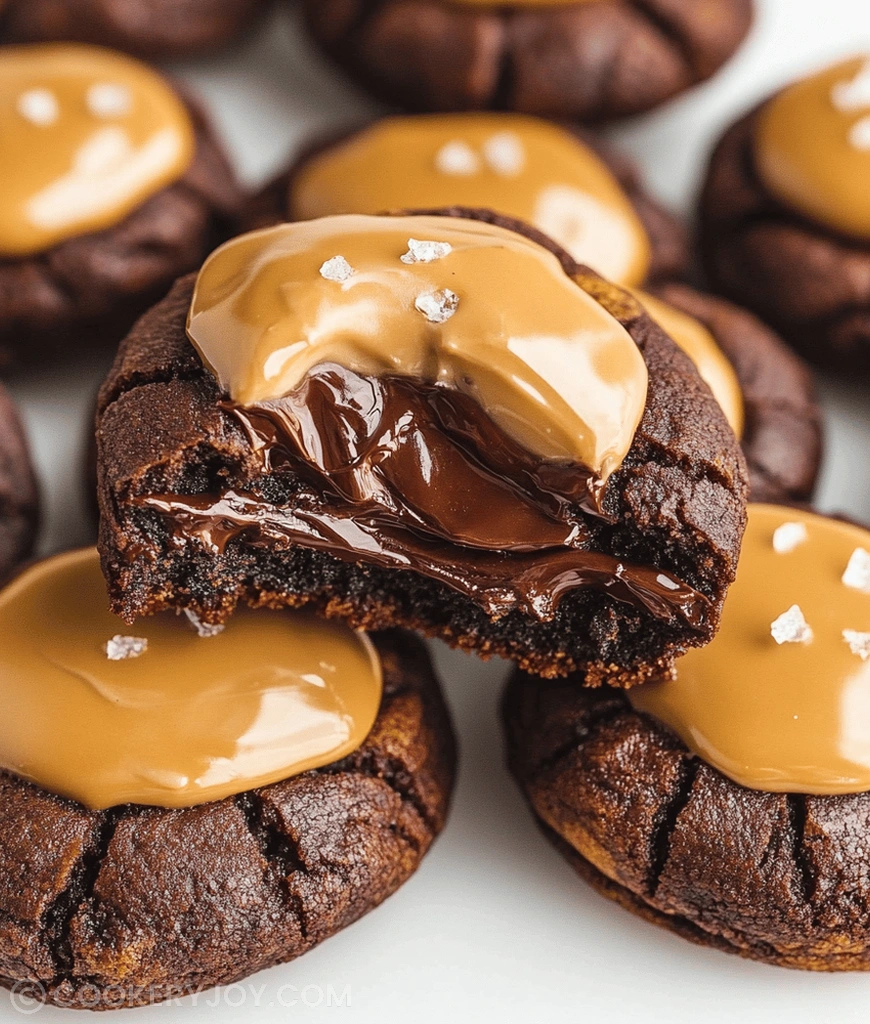
Now we focus on the sweet filling structure. In your medium bowl, start mixing the peanut butter. Add the powdered sugar and softened butter next. Finally, mix in the vanilla extract thoroughly. Beat everything until it is smooth and surprisingly creamy. This mixture is the key to better Buckeye Brownie Cookies.
Roll this peanut butter mixture into small balls. About one teaspoon size works perfectly fine. Gently flatten each small ball into a little disc. Place one disc right on top of every cooled brownie cookie base. Make sure the base is totally cool first.
Finishing with the Smooth Chocolate Coating
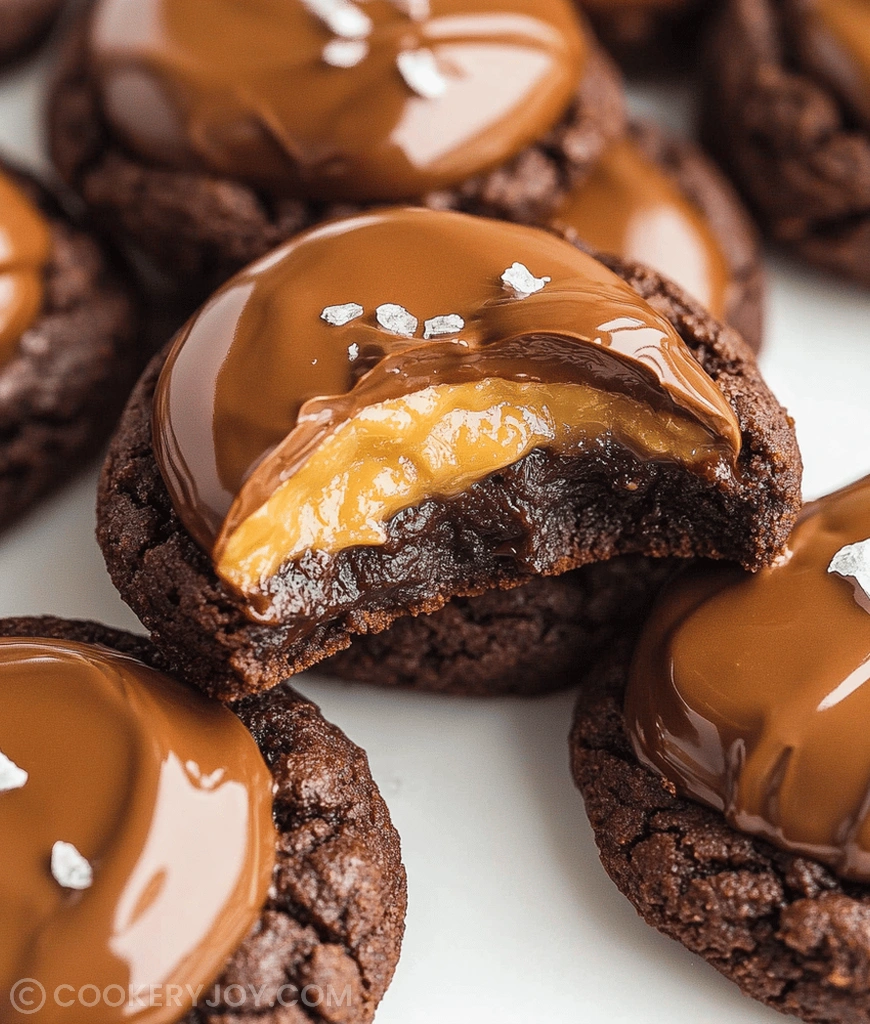
Time for the final, decadent chocolate layer. Melt your chocolate chips and shortening together. Use a microwave-safe bowl for this step. Stir until the chocolate melts smoothly. Spoon a little bit of this luscious chocolate over the peanut butter top. Cover the filling completely with shiny chocolate now.
Place the finished cookies into the refrigerator. Chill them for about fifteen minutes. This sets the chocolate topping nicely. Enjoy your amazing layered treat very soon.
How to Store Buckeye Brownie Cookies
Storing these layered delights is simple. Keep them in an airtight container at cool room temperature. If your home gets really warm, the fridge is better. Chilling ensures the chocolate coating stays firm always. They maintain fantastic quality for five days. Freezing works too for longer preservation. Wrap them tightly before placing them in the freezer.
Tips for Success
- Cool the brownie base thoroughly first. Warm cookies melt the filling fast.
- Measure your flour correctly for the best cookie texture. Spoon it into the cup.
- Do not overbake the cookie base at all. We want fudgy centers only.
- Use room temperature butter for the peanut butter layer. This ensures creaminess.
- For perfect chocolate coating, melt slowly to avoid seizing.
Serving Suggestions
- Serve alongside a tall glass of very cold milk.
- Coffee provides a wonderful bitter contrast to the sweetness.
- A small dusting of flaky sea salt looks elegant.
- These are great packed in lunch boxes for treats.
Buckeye Brownie Cookies
- Prep Time: 25 minutes
- Cook Time: 10 minutes
- Total Time: About 45 minutes (plus chilling time)
- Yield: Varies based on cookie size, typically 2-3 dozen
- Category: Dessert
- Method: Baking and No-Bake Assembly
- Cuisine: American
- Diet: Vegetarian
Description
A delightful combination of a rich, fudgy brownie cookie topped with a sweet peanut butter filling and finished with a smooth chocolate coating, reminiscent of the classic Buckeye candy.
Ingredients
- For the Brownie Cookie:
- 1/2 cup (1 stick) unsalted butter
- 4 ounces unsweetened chocolate, chopped
- 1.5 cups granulated sugar
- 2 large eggs
- 1 teaspoon vanilla extract
- 1 cup all-purpose flour
- 1/2 teaspoon baking powder
- 1/4 teaspoon salt
- For the Peanut Butter Filling:
- 1 cup creamy peanut butter
- 1/2 cup powdered sugar
- 1/4 cup (1/2 stick) unsalted butter, softened
- 1 teaspoon vanilla extract
- For the Chocolate Topping:
- 6 ounces semi-sweet chocolate chips
- 1 tablespoon shortening or coconut oil
Instructions
- For the Brownie Cookie: Preheat oven to 350°F (175°C). Line baking sheets with parchment paper.
- In a microwave-safe bowl, melt the butter and unsweetened chocolate together, stirring until smooth.
- Whisk in the granulated sugar, then beat in the eggs one at a time, followed by the vanilla extract.
- In a separate bowl, whisk together the flour, baking powder, and salt. Add the dry ingredients to the wet ingredients, mixing until just combined.
- Drop rounded tablespoons of dough onto the prepared baking sheets, leaving space between them.
- Bake for 8-10 minutes. The edges should be set, but the centers will still be soft. Remove from oven and let cool completely on the baking sheets.
- For the Peanut Butter Filling: In a medium bowl, beat together the peanut butter, powdered sugar, softened butter, and vanilla extract until smooth and creamy.
- Roll the peanut butter mixture into small balls (about 1 teaspoon each) and flatten them slightly into discs. Place a peanut butter disc on top of each cooled brownie cookie.
- For the Chocolate Topping: In a microwave-safe bowl, melt the chocolate chips and shortening, stirring until smooth.
- Spoon or spread a small amount of melted chocolate over the peanut butter filling, covering it completely.
- Refrigerate the cookies for 15-30 minutes, or until the chocolate topping is set. Store in an airtight container at room temperature or in the refrigerator.
Notes
- Ensure the brownie cookies are completely cool before adding the peanut butter filling to prevent melting.
- The peanut butter filling balls should be small enough to fit nicely on the cookie base.
- For a smoother chocolate topping, use coconut oil instead of shortening.


