
This festive dessert layers rich chocolate with cool, creamy vanilla perfection. Honestly, making this Christmas Lasagna feels like assembling a holiday dream. The no-bake aspect means zero oven stress during busy seasons. You simply press, spread, and chill this gorgeous treat. It delivers decadent flavor without demanding hours on your feet.
I often whip this up a day ahead for gatherings. It keeps beautifully in the fridge, waiting patiently for dessert time. Everyone always asks me for the recipe for this simple, colorful delight. It truly steals the show every single time.
why i love this recipe
I adore this dessert for so many reasons. Seriously, it’s a holiday miracle worker. It tastes miles more complicated than it actually is. Plus, it handles all the chilling time itself. This easy recipe is my secret weapon for holiday entertaining.
- Zero Oven Time: My kitchen stays cool during chilly December days.
- Crowd Pleaser: It vanishes faster than Santa down a chimney.
- Make-Ahead Champion: Great for planning ahead and reducing stress.
the appeal of Christmas lasagna for busy cooks
This recipe simplifies dessert planning immensely. We busy moms need shortcuts that still shine. You just mix and layer these simple ingredients. It is perfect for potlucks or family dinners. The vibrant red and green colors really pop too. It feels special without the heavy work.
Christmas Lasagna Ingredients
Gathering the components for this dessert is like collecting colorful presents for a special box. The magic truly happens when these simple, sweet things merge together beautifully. We are building layers of chocolate richness and fluffy vanilla clouds here.
The Essential Components of Our Christmas Lasagna
Crust Components
- Crushed Oreos: These form our decadent, dark chocolate base layer.
- Melted Butter: This binds the crumbs together quite nicely.
Creamy Filling Elements
- Cream Cheese: Softened cheese creates that crucial, tangy, firm middle layer.
- Granulated Sugar: Just a touch sweetens the rich cream cheese mixture.
- Vanilla Extract: Pure vanilla adds lovely warmth and depth.
- Whipped Topping (Part 1): This lightens the cream cheese significantly.
Pudding and Topping Layers
- Instant Vanilla Pudding Mix: This sets up quickly for our main soft layer.
- Cold Milk: The necessary liquid agent to set the pudding properly.
- Whipped Topping (Part 2): This is reserved for the fluffy top coat.
- Food Coloring (Optional): Red and green make this holiday-ready.
- Sprinkles: Only fine red and green sprinkles for final festive appeal.
Substitutions and Tips
- Alternative Crusts: You could use graham crackers if Oreos are unavailable.
- Dairy Swaps: Heavy cream whipped stiff can replace the frozen topping.
- Flavor Boost: Try adding a tiny splash of almond extract to the cream cheese.
- No Food Coloring? Use crushed peppermint candies instead. It adds crunch!
See recipe card below for a full list of ingredients and measurements.
kitchen tools you’ll need
You do not need fancy gadgets for this dessert. Keep things simple, just like the recipe itself. I always keep these items handy for no-bake treats.
- 9×13 inch baking dish: A standard casserole dish works perfectly here.
- Mixing bowls: Gather a few for preparing the separate layers.
- Electric mixer or whisk: Essential for smoothing the cream cheese layer.
- Measuring cups and spoons: Accuracy helps everything set correctly.
- Rubber spatula: Great for gently folding in the whipped topping.
How to Make Christmas Lasagna
Let us dive into the assembly now. Building this fantastic Christmas Lasagna is quite fun. Remember, everything gets layered, building flavor upon flavor. Follow these simple directions closely. Soon you will have a spectacular holiday centerpiece.
Step 1: Preparing the Chocolate Cookie Crust
First, crush those chocolate cookies completely. I use the food processor for speed. Alternatively, just seal them in a bag. Then pound them with a rolling pin. Mix the crumbs well with melted butter, stirring until totally combined. Press this mixture firmly into the bottom of your 9×13 dish. We want it packed tightly for a good foundation. Pop the dish into the refrigerator now. Chill it for about fifteen to twenty minutes while you prep the next layer.
Step 2: Assembling the Cream Cheese Layer
Next, we tackle the sweet, tangy filling. Make sure your cream cheese is nicely softened. Beat the cream cheese, sugar, and vanilla until very smooth. Now, gently fold in one container of thawed whipped topping. Go easy here; we need to keep the air inside. Spoon this mixture over the chilled crust presently. Spread it evenly using your spatula. Return this dish to the fridge to firm up slightly.
Step 3: Creating and Layering the Vanilla Pudding
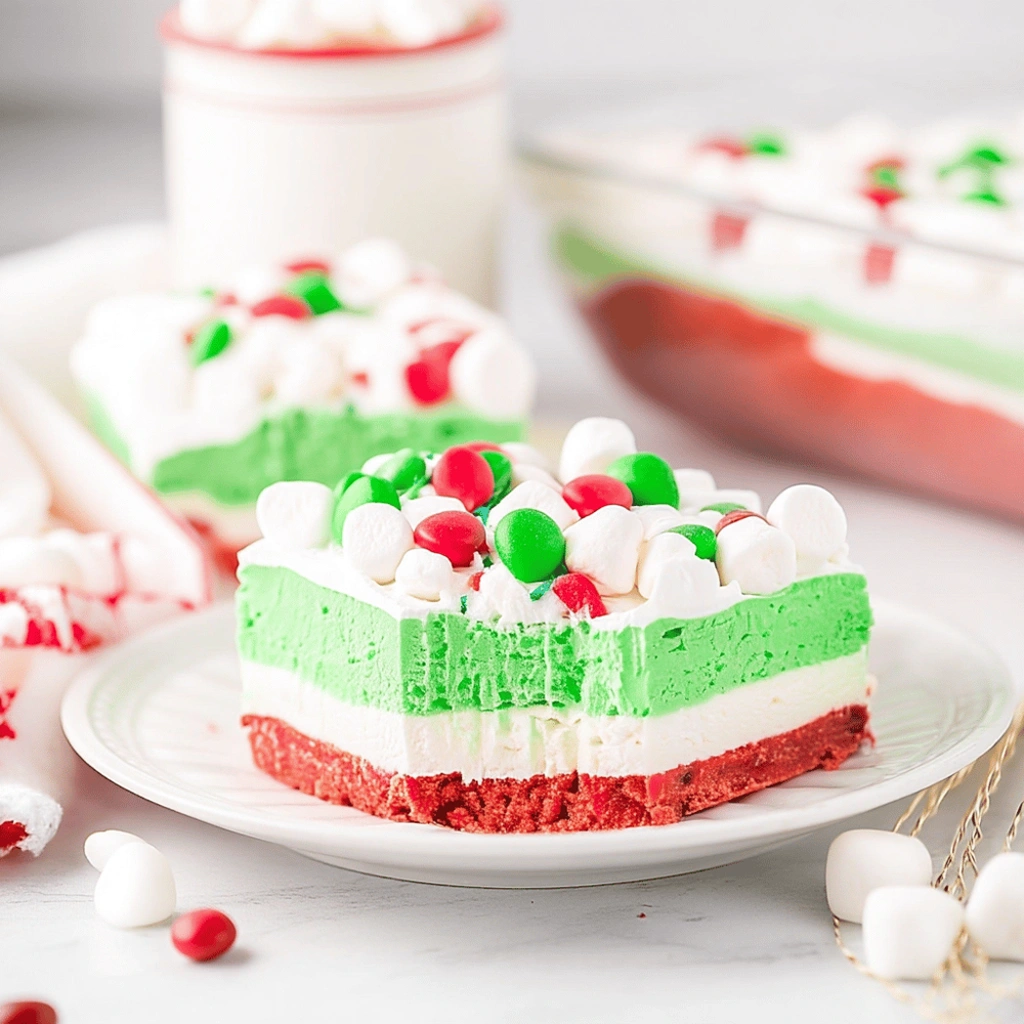
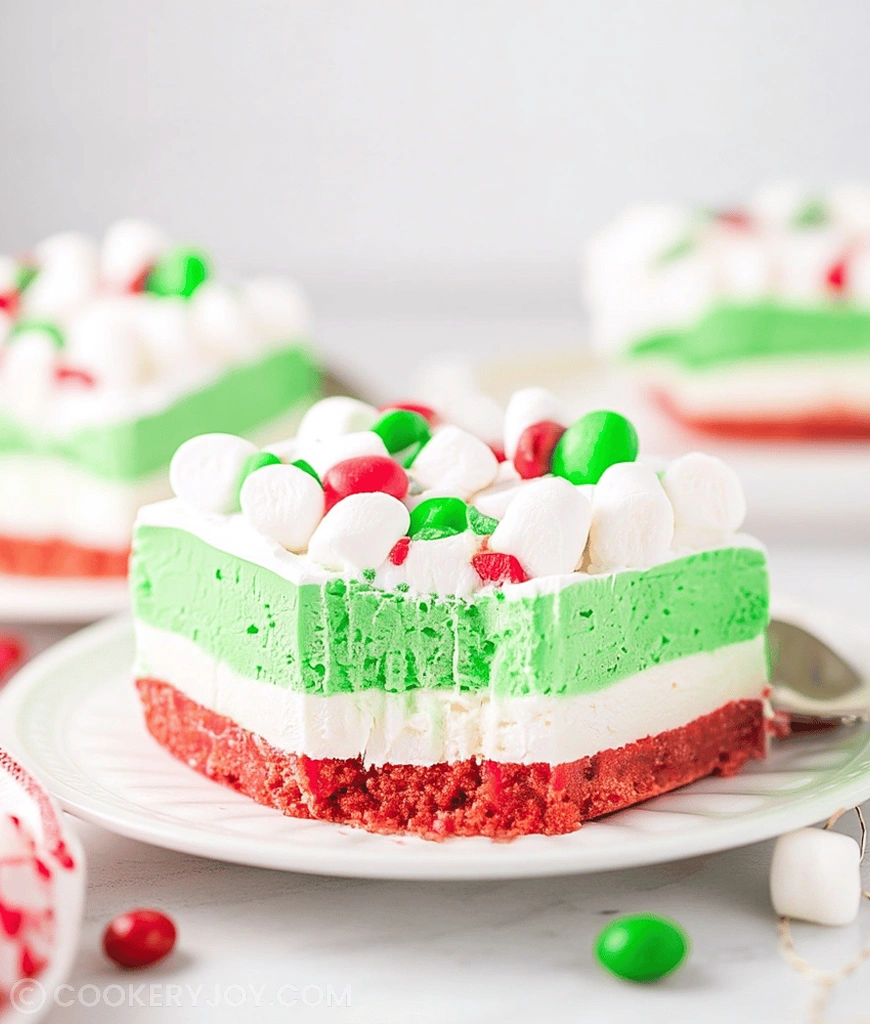
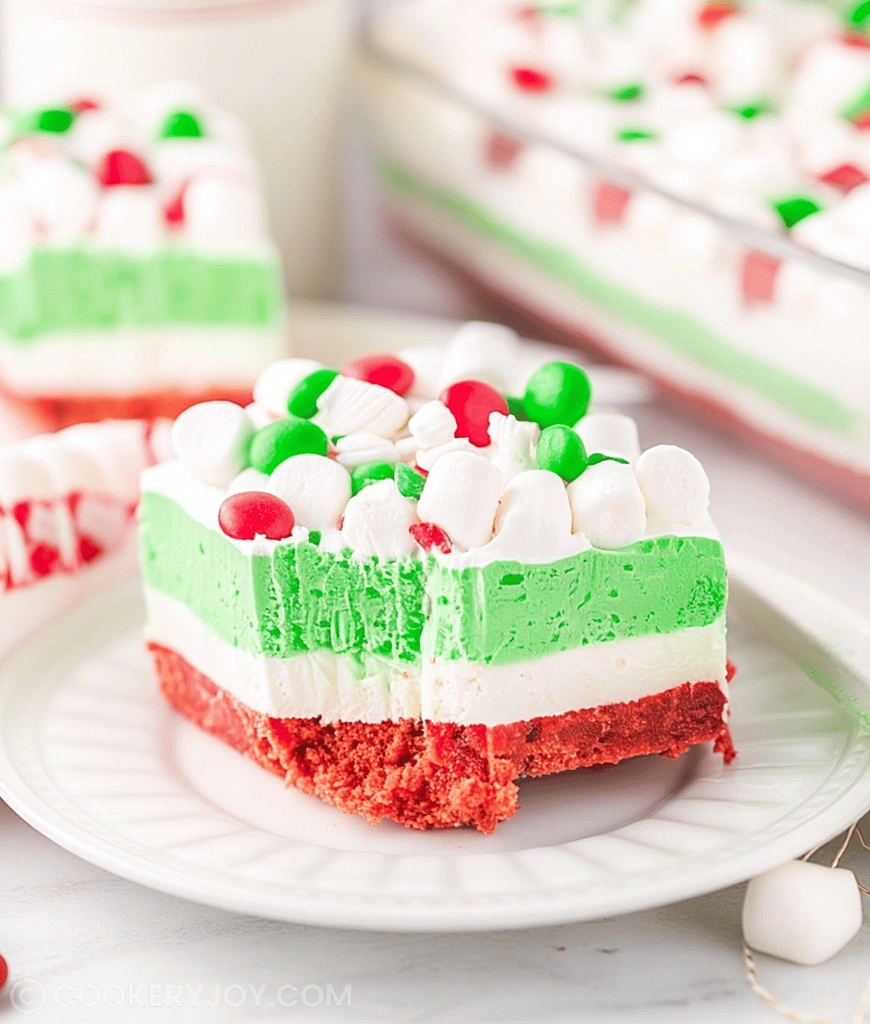
Time for that cooling pudding component. Whisk the instant vanilla pudding mixes with the cold milk. Beat them together vigorously for about three minutes. The mixture will thicken quite quickly, becoming smooth. Now for the festive touch if you desire it. Divide the pudding into two separate bowls, perhaps. Add a drop of red coloring to one bowl. Add green coloring to the other bowl. Carefully spoon or gently spread the colored puddings over the cream cheese base. Alternate the colors for a nice striped effect in your beautiful dessert lasagna.
Step 4: Finishing and Chilling Your Christmas Lasagna
The final layer is just as easy, thankfully. Take your remaining container of thawed whipped topping. Spread this final blanket smoothly over the pudding layer now. Make sure you cover all those colors underneath. Next, grab those holiday sprinkles. Scatter the red and green sprinkles generously across the top. This decoration makes it truly feel like a holiday treat. Now, the hardest part awaits us all. You must refrigerate this dessert. Chill it for at least four hours, or better yet, overnight. Cutting it while warm ruins the layers completely. Slice only when it is totally set.
how to store christmas lasagna
Storing this chilled dessert is quite simple, thankfully. Keep leftovers covered tightly in the refrigerator. It stays fresh and delicious for about three to four days. Freezing this Christmas Lasagna is possible but tricky. The whipped topping may weep slightly upon thawing. If you do freeze it, wrap the entire dish securely in plastic wrap first. Always thaw frozen portions overnight in the fridge. This ensures the best texture when serving later.
Tips for Success
I have learned a few tricks over my years making chilly desserts like this. Follow these little notes for the best outcome.
- Always use full-fat cream cheese for the best structure.
- Make sure your butter is fully melted for the crust binding agent.
- Do not overmix when folding in the whipped topping ingredients.
- Chilling time is non-negotiable for clean slices of this dessert.
- Use high-quality crushed cookies for the deepest chocolate flavor.
serving suggestions
This rich dessert stands beautifully on its own. Still, a few additions make serving even nicer.
- Serve alongside hot coffee or peppermint tea for contrast.
- A few fresh raspberries add a bit of tart freshness.
- Slice into neat squares for beautiful presentation on a platter.
- Offer small dessert forks; no spoons needed for this firm treat.
Christmas Lasagna
- Prep Time: 30 minutes
- Cook Time: 0 minutes (No-Bake)
- Total Time: Minimum 4.5 hours (including chilling)
- Yield: 12-16 servings (standard 9×13 dish)
- Category: Dessert
- Method: No-Bake/Chilled
- Cuisine: American
- Diet: Vegetarian
Description
A festive, no-bake dessert lasagna featuring a chocolate cookie crust, a creamy layer, vanilla pudding, and whipped topping, decorated with red and green sprinkles for the Christmas season.
Ingredients
- 25–30 Oreos, crushed (about 2 1/2 cups crumbs)
- 1/2 cup (1 stick) unsalted butter, melted
- 1 (8 oz) package cream cheese, softened
- 1/4 cup granulated sugar
- 1 tsp vanilla extract
- 1 (8 oz) container frozen whipped topping, thawed (like Cool Whip)
- 2 (3.4 oz) packages instant vanilla pudding mix
- 3 cups cold milk
- Red and green food coloring (optional)
- 1 (8 oz) container frozen whipped topping, thawed (for topping)
- Red and green sprinkles for decoration
Instructions
- For the Crust: In a medium bowl, combine crushed Oreos and melted butter. Press firmly into the bottom of a 9×13 inch baking dish. Refrigerate for 15-20 minutes.
- For the Cream Cheese Layer: In a large bowl, beat softened cream cheese, granulated sugar, and vanilla extract until smooth. Gently fold in one 8 oz container of thawed whipped topping until fully combined. Spread this mixture evenly over the chilled Oreo crust. Refrigerate.
- For the Pudding Layer: In a separate bowl, whisk together instant vanilla pudding mixes and cold milk for 2-3 minutes until thickened. If desired, divide pudding into two bowls and color one red and one green with food coloring. Carefully spread the pudding over the cream cheese layer.
- For the Topping: Spread the remaining 8 oz container of thawed whipped topping over the pudding layer.
- Decorate with red and green sprinkles.
- Refrigerate for at least 4-6 hours, or preferably overnight, until thoroughly chilled and set.
- Cut into squares and serve cold.
Notes
- Using Oreo cookies provides a chocolate base. Ensure the butter is fully incorporated for a firm crust.
- The pudding layer can be layered visually with red and green by coloring two separate batches of pudding.
- This dessert must be thoroughly chilled (at least 4-6 hours) to set properly before slicing.


