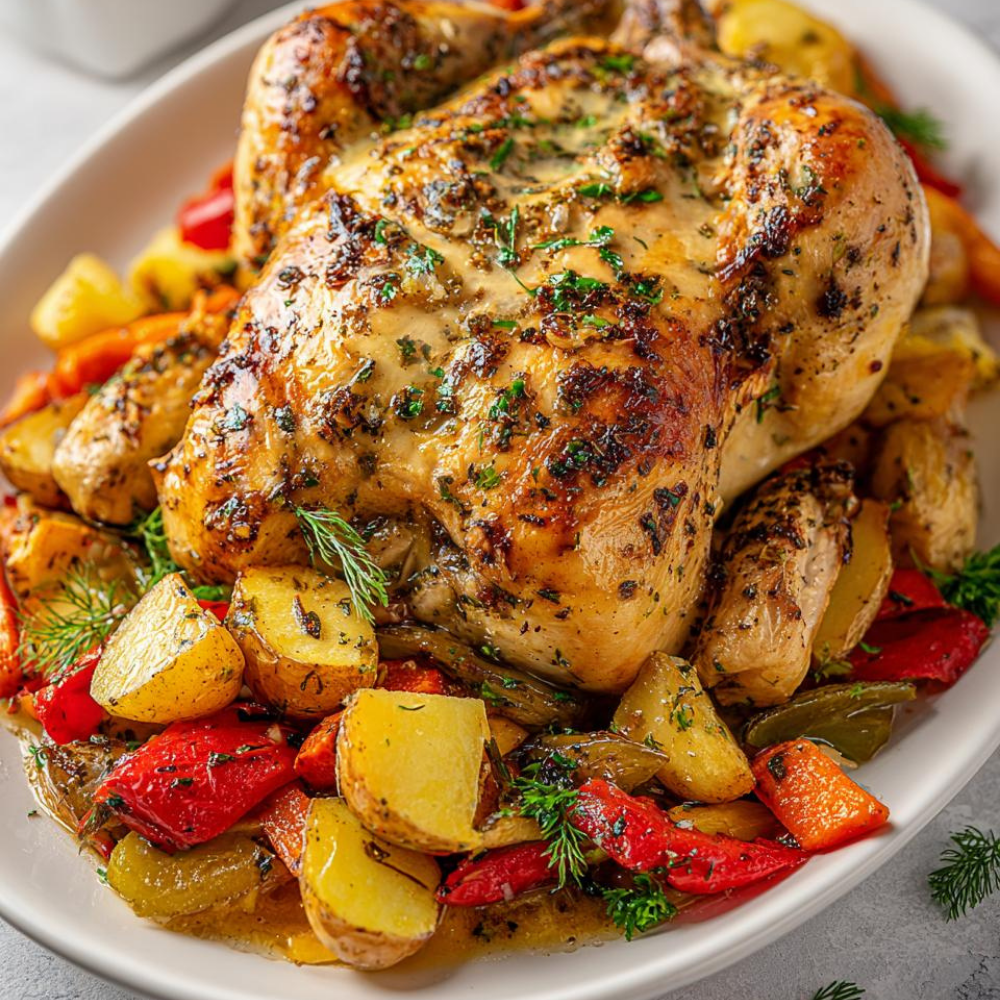
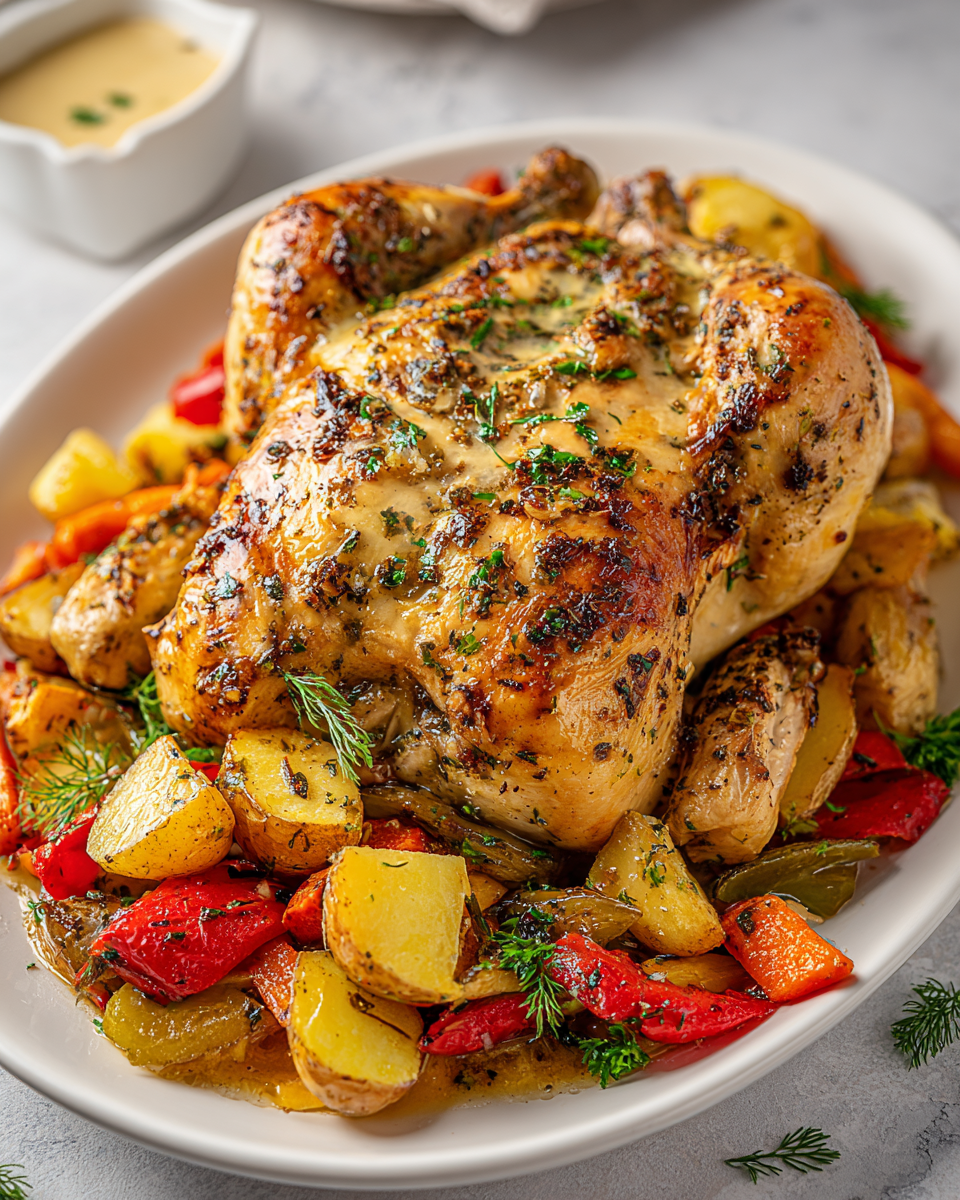
On busy evenings when the family is gathered around the table, spatchcock chicken transforms a simple roast into a centerpiece that’s both impressive and effortless. The technique of flattening the bird ensures juicy meat and crispy skin. I love how a garlicky herb butter melts into every tender bite. Roasted alongside colorful vegetables, it delivers a hearty, comforting meal without hours in the kitchen.
This recipe fits seamlessly into my schedule as a busy professional. Prep takes just 20 minutes, and the oven handles the rest. Leftovers store well and reheat to keep their flavor. That’s why it’s ideal for meal planning. What draws me in is the burst of fresh dill and lemon that keeps it light yet satisfying.
Why We Love This Recipe
- Even Cooking: Spatchcock chicken flattens for uniform heat distribution. It yields juicy results without dry spots.
- Rich Flavor: Garlic herb butter infuses the meat with savory, aromatic notes. This elevates a basic roast.
- One-Pan Ease: Pairing with roasted vegetables means minimal cleanup. Plus, you get a complete, nutritious dinner.
- Family Favorite: Its tender texture and customizable veggies appeal to picky eaters. Everyone digs in happily.

Easy Spatchcock Chicken
- Prep Time: 20 minutes
- Cook Time: 45 minutes
- Total Time: 1 hour 15 minutes
- Yield: 4 servings
- Category: Main Dish
- Method: Roasting
- Cuisine: American
Description
Easy Spatchcock Chicken is a flavorful roasted whole chicken that’s flattened for even cooking, seasoned with garlic herb butter, and baked with assorted vegetables for a simple, delicious meal.
Ingredients
- 1 whole chicken (approx. 4 lbs)
- 1/2 tsp salt (for seasoning chicken interior)
- Pinch black pepper (for seasoning chicken interior)
- 8 tbsp unsalted butter, softened
- 4 cloves garlic, minced
- 1 tbsp fresh lemon juice
- 1 tbsp fresh parsley, chopped
- 1 tbsp fresh dill, chopped
- 1/2 tsp paprika
- Olive oil (for drizzling)
- Salt and black pepper (to taste, for exterior and vegetables)
- Assorted vegetables (e.g., carrots, potatoes, onions), chopped
Instructions
- Preheat your oven to 425°F (220°C). Prepare a rimmed baking sheet by lining it with parchment paper.
- To spatchcock the chicken, place it breast-side down with the wings facing you. Using sturdy kitchen shears, cut along both sides of the spine to remove it completely. Open the rib cage and score down the sternum with a heavy knife; then, using the palm of your hand, press firmly over the breastbone to flatten the chicken entirely. You may hear a slight crack.
- Season the inside cavity of the flattened chicken with 1/2 teaspoon of salt and a pinch of black pepper.
- Flip the chicken breast-side up and place it on your prepared baking sheet. Gently separate the skin from the meat over the breast, thigh, and drumstick areas using your thumbs.
- In a small mixing bowl, combine the softened unsalted butter, minced garlic, fresh lemon juice, chopped fresh parsley, chopped fresh dill, and paprika. Mash these ingredients together with a fork until they are well incorporated.
- Spread approximately two-thirds of the flavored butter mixture underneath the chicken skin. Distribute the remaining butter over the top of the chicken skin.
- Arrange your chopped vegetables around the chicken on the baking sheet. Drizzle both the chicken and vegetables with olive oil, then season generously with salt and black pepper to taste.
- Bake uncovered for about 45 minutes, or until an instant-read thermometer inserted into the thickest part of the chicken breast registers 160°F (71°C). The internal temperature will rise to 165°F (74°C) as it rests.
- Remove the chicken from the oven and let it rest uncovered on a cutting board for 10 minutes before carving and serving. This allows the juices to redistribute, ensuring a tender and flavorful bird.
Notes
- Ensure the chicken reaches an internal temperature of 165°F (74°C) after resting for food safety.
- Vegetables can be customized based on preference; root vegetables work best for roasting.
Ingredients to make Spatchcock Chicken
These ingredients blend fresh herbs and simple seasonings. They create a moist, flavorful roast that highlights the chicken’s natural taste. I always opt for high-quality butter and fresh garlic. That ensures a richer, more vibrant result every time.
- Whole chicken – the base, spatchcocked for even roasting and crispy skin.
- Salt – seasons the interior cavity to enhance overall flavor balance.
- Black pepper – adds a subtle kick inside the chicken for depth.
- Unsalted butter – softened base for the herb mixture, providing richness under the skin.
- Garlic – minced for pungent aroma that permeates the meat.
- Lemon juice – brightens the butter rub with a fresh, citrusy note.
- Fresh parsley – chopped for earthy freshness in the seasoning blend.
- Fresh dill – chopped to bring a unique, tangy herbal layer.
- Paprika – adds mild smokiness and color to the butter mixture.
- Olive oil – for drizzling over chicken and vegetables to promote crisp roasting.
- Salt and black pepper – to taste for exterior seasoning and vegetables.
- Assorted vegetables – chopped carrots, potatoes, and onions for a hearty, roasted side. Swap based on preference.
How to Make Spatchcock Chicken
Step 1: Preheat and Prepare Baking Sheet
I preheat my oven to 425°F. Then, I line a rimmed baking sheet with parchment paper for easy cleanup. This setup ensures the chicken and vegetables roast evenly without sticking. I keep tools like kitchen shears and a heavy knife nearby. That streamlines the whole process nicely.
Step 2: Spatchcock the Chicken
I place the chicken breast-side down. Using kitchen shears, I cut along both sides of the spine to remove it completely. Next, I open the rib cage and score the sternum. Finally, I press firmly on the breastbone with my palm to flatten it. You might hear a crack. This step allows for faster, more uniform cooking.
Step 3: Season the Interior
I flip the chicken breast-side up. Then, I season the inside cavity with 1/2 teaspoon salt and a pinch of black pepper. This basic seasoning builds a flavorful foundation from within. If needed, I pat the chicken dry. That helps with skin crispiness later on.
Step 4: Loosen the Skin
I gently separate the skin from the breast, thigh, and drumstick meat. My thumbs create pockets for the butter. I take care not to tear the skin. That keeps all the moisture locked in. Once done, I place the chicken on the prepared baking sheet.
Step 5: Make the Herb Butter
In a small bowl, I combine softened unsalted butter, minced garlic, lemon juice, chopped parsley, chopped dill, and paprika. I mash everything with a fork until fully incorporated. This makes a spreadable paste. It carries bright, herby flavors throughout the dish.
Step 6: Apply the Butter Mixture
I spread about two-thirds of the butter under the loosened skin. I work it into the pockets over the meat carefully. The remaining butter goes on top of the skin for extra browning. I distribute it evenly. So, every part gets infused with flavor.
Step 7: Arrange Vegetables and Season
I chop assorted vegetables like carrots, potatoes, and onions. Then, I arrange them around the chicken on the sheet. I drizzle everything with olive oil. Finally, I season generously with salt and black pepper to taste. This creates a balanced, one-pan meal with caramelized sides.
Step 8: Bake the Chicken
I bake uncovered for about 45 minutes. I check with a thermometer in the thickest part of the breast. It should read 160°F. The temperature rises to 165°F during resting. If my oven heats unevenly, I rotate the sheet halfway. That gives consistent results. The skin turns golden and crisp.
Step 9: Rest Before Serving
I transfer the chicken to a cutting board. Then, I let it rest uncovered for 10 minutes. This allows juices to redistribute for maximum tenderness. Finally, I carve and serve it alongside the roasted vegetables.
Pro Tips for Success
- Flatten Thoroughly: I press firmly on the breastbone. This ensures even thickness and avoids undercooked spots.
- Use a Thermometer: I always check for 165°F after resting. It guarantees food safety without overcooking.
- Distribute Butter Evenly: I work it under all skin pockets. That provides consistent flavor and moist meat.
- Choose Sturdy Veggies: I opt for root vegetables like potatoes. They hold up well to roasting times.

How to Serve Spatchcock Chicken
Garnishes
I love finishing spatchcock chicken with a sprinkle of extra chopped fresh parsley and dill. It adds a vibrant green pop that brightens the golden skin. A final squeeze of lemon juice over the top cuts through the richness. That adds a zesty lift. For texture, I scatter some toasted breadcrumbs sometimes. It gives a subtle crunch.
Side Dishes
I pair the roasted chicken with a simple green salad. It balances the hearty vegetables already on the pan. Steamed broccoli or asparagus offers a fresh, crisp contrast to the tender meat. If I’m feeding a crowd, buttered noodles round out the meal nicely. And it takes little extra effort.
Creative Ways to Present
I often carve the spatchcock chicken into slices. Then, I arrange them fanned out on a platter. I surround them with the colorful roasted veggies for an inviting family-style display. I drizzle any pan juices over the top too. That keeps everything moist and flavorful. For a cozy touch, I serve it straight from the baking sheet. Rustic wooden boards go underneath perfectly.
Make Ahead and Storage
Storing Leftovers
I store leftover spatchcock chicken in an airtight container in the fridge. It keeps well for up to three days. I separate the meat from the vegetables to prevent sogginess. I cover the chicken loosely too. That maintains the crisp skin. Always, I cool it completely before refrigerating. It avoids condensation issues.
Freezing
For longer storage, I wrap cooled spatchcock chicken pieces tightly. I use plastic wrap and foil first. Then, I place them in a freezer bag for up to two months. I freeze vegetables separately in portions. That preserves their texture. I label everything with the date. So, I use them within that timeframe easily.
Reheating
I reheat spatchcock chicken in a 350°F oven. I cover it with foil for 10-15 minutes to prevent drying. Or, I use the microwave in short bursts while covered. If needed, I add a splash of broth to restore moisture. The oven method works best. It preserves the crispy skin and juicy interior beautifully.