
If you’re looking for a satisfying snack that fits seamlessly into a hectic schedule, these vegan chickpea protein bars deliver just that. I created this recipe during one of my busiest weeks, blending simple pantry staples for a quick win.
Made with wholesome ingredients like chickpeas for plant-based protein and dates for natural sweetness, they offer a chewy texture. The nutty flavor from peanut butter feels both comforting and energizing. Plus, they come together quickly without much fuss. I love prepping them ahead on Sundays.
I enjoy these bars as a mid-afternoon pick-me-up or post-workout boost. They’re perfect when I’m juggling work deadlines and family dinners. They stay fresh in the fridge for up to a week. No reheating needed—they taste great cold or at room temperature.
As a busy mom, I appreciate how these vegan chickpea protein bars keep hunger at bay. Their high protein content curbs cravings without the guilt of processed snacks. Finally, a treat that nourishes and satisfies effortlessly.
Why I Love This Recipe
These vegan chickpea protein bars are my go-to for quick, nourishing snacks. I don’t need fancy equipment or hours in the kitchen. They fit perfectly into my busy life.
With just 15 minutes of prep, plus a short bake or no-bake freeze, they’re ideal for weeknights. I rush between meetings and school pickups, so simplicity matters. First, I gather the ingredients. Then, everything blends fast in the food processor.
The chickpea base gives impressive protein without any meat. Meanwhile, dates add natural sweetness. Peanut butter brings that rich, indulgent taste. It feels like a treat, but it’s healthy. I smile every time I bite into one.
Plus, these vegan chickpea protein bars are versatile. Swap nut butters easily for allergies. They’re naturally gluten-free too. Even my picky eaters at home love them. No battles at snack time.
Who knew healthy could be this effortless and delicious? I make a batch weekly. It saves me from grab-and-go junk. Finally, a snack that fuels my day without the guilt.
Vegan Chickpea Protein Bars Ingredients
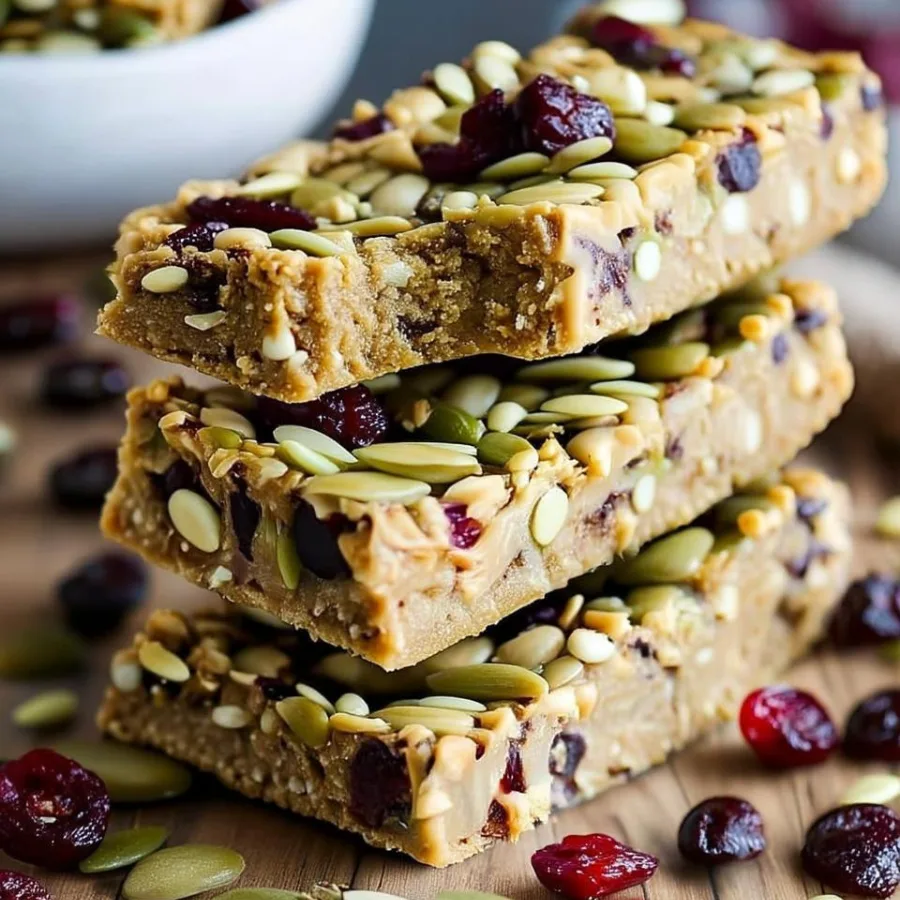
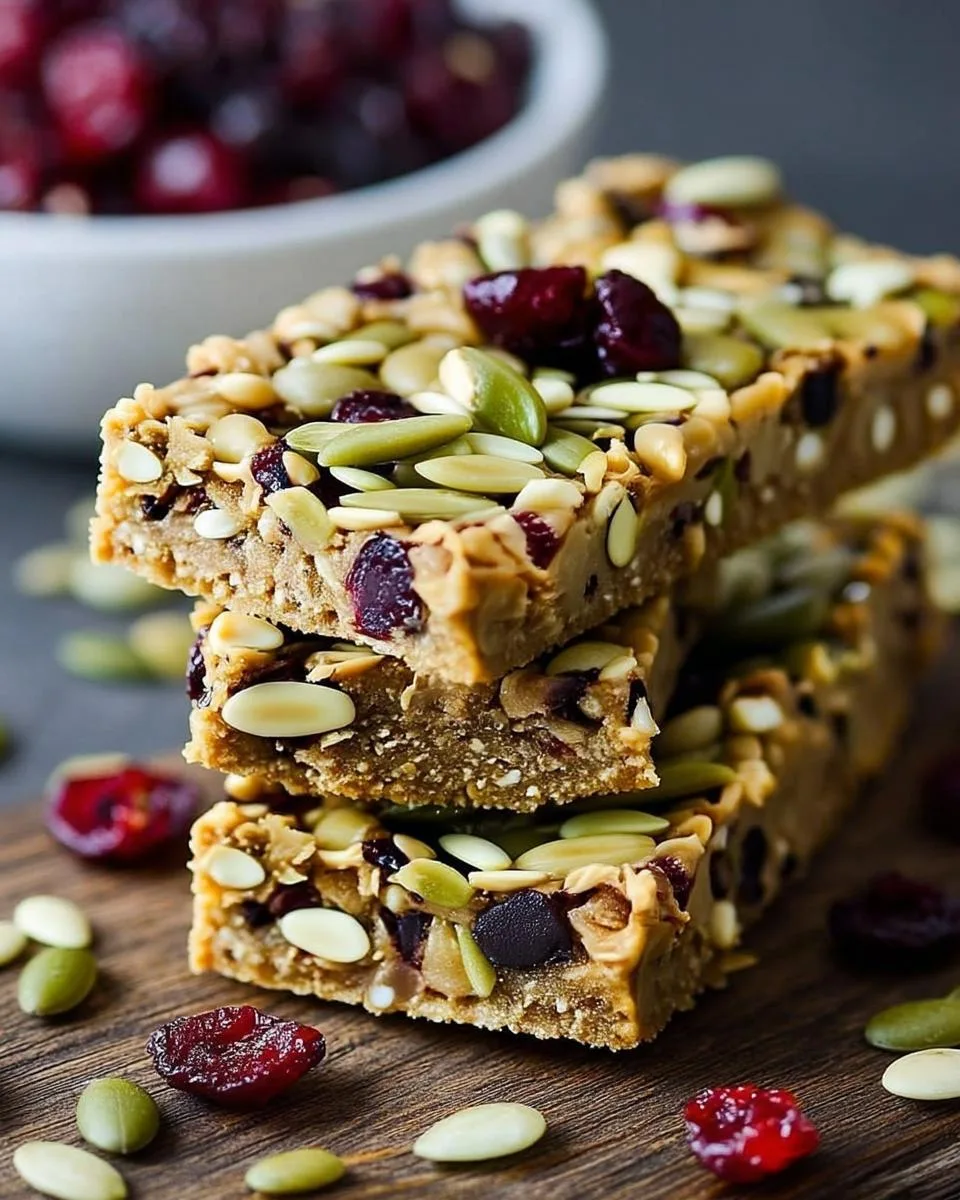
I always say the magic starts with the ingredients in these vegan chickpea protein bars. They harmonize perfectly, you see. Chickpeas offer a neutral base with a real protein punch. Dates add that sticky sweetness to bind everything together. Meanwhile, peanut butter brings creamy richness for a satisfying mouthfeel. I opt for fresh, high-quality items like ripe dates and natural nut butters. This elevates the flavor every time. Each bite becomes more vibrant and wholesome, without overpowering the subtle earthiness.
Let me walk you through what makes each one special. First, the pitted Medjool dates provide natural sweetness. They act as a binder to hold the bars together, skipping refined sugar entirely. Next, chickpeas serve as the primary protein source. They add a mild flavor and soft texture for a filling, plant-based foundation. I love how they keep things simple yet nutritious.
- Pitted Medjool dates: Provide natural sweetness and act as a binder to hold the bars together without refined sugar.
- Chickpeas: Serve as the primary protein source, adding a mild flavor and soft texture for a filling, plant-based foundation.
- Natural peanut butter: Contributes creamy fat and nutty depth, enhancing moisture and preventing the bars from drying out (use almond, cashew, or sunflower seed butter for nut-free options).
- Vanilla extract: Infuses a warm, aromatic note that balances the savory elements and boosts overall flavor.
- Rolled oats: Add hearty texture and fiber for chewiness, while keeping the bars gluten-free if certified.
- Vanilla plant-based protein powder: Boosts protein content significantly, ensuring a nutrient-dense snack with a subtle vanilla enhancement.
- Unsweetened non-dairy milk: Helps achieve the right dough consistency, adding just enough moisture without diluting flavors.
For busy days, these choices mean no fancy shopping trips. Just grab what you have. The complete list of ingredients and exact measurements can be found in the printable recipe card at the bottom of the post.
Kitchen Tools You’ll Need
I keep my kitchen simple for recipes like these vegan chickpea protein bars. You don’t need gadgets that collect dust. Just a few basics make prep quick and painless. I know how exhausting it feels after a long day. So, let’s focus on what works without extra hassle.
First, a food processor blends everything into a smooth dough. It’s essential for that perfect texture. If you don’t have one, a high-speed blender works too. Just pulse in small batches to avoid frustration.
Next, grab an 8×8-inch baking pan for pressing the mixture. A similar-sized dish or loaf pan does fine if that’s what you have. No need to buy special ones.
Parchment paper lines the pan for easy removal. It saves time and prevents sticking. Foil can substitute, but it might cling a bit more. I always keep rolls on hand for busy weeks.
Finally, use your oven or freezer to set the bars. For baking, preheat to 350°F. Or freeze for a no-bake option. A spatula helps press the dough firmly. That’s it—no fancy tools required.
- Food processor: Essential for blending into a smooth dough; a high-speed blender works as an alternative if you pulse in batches.
- 8×8-inch baking pan: For pressing and baking the mixture; use a similar-sized dish or loaf pan if needed.
- Parchment paper: Lines the pan for easy removal; foil can substitute but may stick slightly.
- Oven or freezer: For setting the bars; no special tools beyond basics like a spatula for pressing.
With these, you’ll whip up vegan chickpea protein bars effortlessly. Prep fatigue? Not here. Just real results in under 30 minutes.
How to Make Vegan Chickpea Protein Bars
Making these vegan chickpea protein bars feels simple and rewarding. I know how tiring it gets after a full day. So, I keep steps straightforward. You only need about 15 minutes of active time. Then, let them set while you handle other tasks. Follow along, and you’ll have tasty snacks ready soon.
First, prepare the baking pan. Preheat your oven to 350°F. Line an 8×8-inch pan with parchment paper. Leave overhangs for easy lifting later. This prevents sticking and saves hassle. For no-bake, skip the oven. Just plan to freeze instead.
Next, process the base ingredients. In a food processor, combine pitted Medjool dates, rinsed and dried chickpeas, natural peanut butter, and vanilla extract. Blend until dates break down. The mixture forms a cohesive paste in 1-2 minutes. This builds the flavorful base I crave.
Now, incorporate dry ingredients and adjust consistency. Add rolled oats and vanilla plant-based protein powder. Blend while adding 1 tablespoon of non-dairy milk. Keep going until it resembles thick cookie dough. Not too sticky, not crumbly. If dry, add another tablespoon. Or extra powder if moist. Getting this right ensures chewy bars.
Then, press and bake or freeze the dough. Transfer to the pan. Press evenly with a spatula for a compact layer. Bake 15-20 minutes until edges turn golden. Or freeze 1 hour for no-bake. Cool fully in the pan to avoid crumbling.
Finally, cool, slice, and store. Lift out with parchment. Slice into 8-10 pieces. These portable vegan chickpea protein bars go in an airtight container. Refrigerate up to a week. Easy for busy mornings.
- Preheat your oven to 350°F (175°C) and line an 8×8 inch baking pan with parchment paper, leaving an overhang on the sides for easy removal. This recipe is technically no-bake but often calls for a short bake to set, or you can opt for freezing. The original recipe suggests preheating, so let’s stick with that for best results in terms of texture.
- In the bowl of a large food processor, combine the pitted Medjool dates, thoroughly rinsed and drained chickpeas, natural peanut butter, and vanilla extract. Process until the dates are mostly broken down and the mixture starts to come together.
- Add the rolled oats and vanilla plant-based protein powder to the food processor. Begin processing, adding 1 tablespoon of non-dairy milk. Continue to process until a dense, uniform dough forms. The consistency should be like a thick cookie dough, not overly sticky. If it seems too dry or crumbly, add the second tablespoon of milk and blend again. If it’s too moist, add a bit more protein powder.
- Transfer the dough to the prepared baking pan. Press it down firmly and evenly to create a smooth, compact layer.
- Bake for about 15-20 minutes, or until the edges are lightly golden and the bars feel set. Alternatively, for a truly no-bake version, you can simply freeze the pressed mixture for about an hour to firm up.
- Let the bars cool completely in the pan before using the parchment paper overhang to lift them out.
- Slice into 8-10 bars. Store these protein bars in an airtight container in the refrigerator for up to a week.
Tips for Success
I know how frustrating it feels when recipes don’t turn out right, especially on busy days. So, here’s what I’ve learned from making these vegan chickpea protein bars over and over. These tricks keep things simple and foolproof. No more soggy messes or crumbly disasters.
First, pat those chickpeas thoroughly dry after rinsing. Skip this, and your dough gets soggy. It ruins the texture you crave. I use a clean kitchen towel for the job. It takes just a minute but makes all the difference.
Next, start with only 1 tablespoon of non-dairy milk. Add more if the mixture crumbles. This way, your vegan chickpea protein bars hold shape perfectly. They won’t stick to your hands or fall apart later. Balance is key here.
For nut-free vegan chickpea protein bars, swap peanut butter with sunflower seed butter. It keeps the creaminess without allergies ruining the day. My family with sensitivities loves this tweak.
If you’re avoiding gluten, use certified gluten-free oats. This keeps the recipe safe and accessible. No one wants tummy troubles after a snack.
Press the dough firmly into the pan too. Aim for even bars that slice cleanly. I use the back of a spoon sometimes. It prevents wobbly pieces that picky eaters notice.
Finally, taste the dough before baking. Adjust the vanilla if you want more flavor. It’s safe since no eggs, so go ahead. This personal touch makes them irresistible.
- Pat chickpeas thoroughly dry after rinsing to avoid a soggy dough that affects texture.
- Start with 1 tablespoon of non-dairy milk and add more only if the mixture is crumbly, ensuring the bars hold shape without being sticky.
- For nut-free Vegan Chickpea Protein Bars, swap peanut butter with sunflower seed butter to maintain creaminess.
- Use certified gluten-free oats if avoiding gluten, keeping the recipe accessible for dietary needs.
- Press the dough firmly into the pan for even bars that don’t fall apart when sliced.
- Taste the dough before baking and adjust vanilla if you prefer stronger flavor.
Follow these, and your vegan chickpea protein bars will be a hit. Less stress, more enjoyment—I promise.
How to Store Vegan Chickpea Protein Bars
I know how it goes with busy days— you make a batch of these vegan chickpea protein bars, then wonder how to keep them fresh without constant babysitting. Luckily, storage is super simple. It fits right into your routine, saving time and effort.
Store these vegan chickpea protein bars in an airtight container in the refrigerator. They last up to one week there. Plus, they keep that chewy texture and freshness you love. Grab one on your way out the door for a quick snack. No fuss, just nourishment.
For longer keeping, wrap individual bars in parchment paper. Then, pop them into a freezer-safe bag. Freeze for up to three months. Thaw at room temperature or in the fridge overnight. They come back just as tasty, ready for your next hectic week.
Avoid leaving vegan chickpea protein bars at room temperature beyond a day. They might soften up, and nobody wants mushy snacks. This easy method ensures they stay convenient. You maintain all that nutritional value without waste. Finally, snacks that work with your life, not against it.
Serving Suggestions
I love how versatile these vegan chickpea protein bars are for everyday life. As a busy mom, I often grab one when time slips away. They pair well with simple additions that boost flavor without extra work. Let me share my favorite ways to enjoy them.
First, pair a vegan chickpea protein bar with herbal tea or black coffee. This creates a balanced mid-morning break. It keeps me energized without a crash. Perfect for those rushed mornings before meetings.
Next, top one with fresh berries or a drizzle of nut butter. This enhances the natural flavors beautifully. I do this when I want a little indulgence. It feels special yet stays healthy.
For post-yoga recovery, serve a bar alongside Greek-style non-dairy yogurt. The combo adds extra protein. I feel nourished after a quick session. No need for complicated meals.
Finally, pack vegan chickpea protein bars in lunchboxes with apple slices. This makes a kid-friendly treat that sustains energy. Picky eaters love it, and it saves me from snack battles.
- Pair with a cup of herbal tea or black coffee for a balanced mid-morning break.
- Top with fresh berries or a drizzle of nut butter to enhance natural flavors.
- Serve as a post-yoga snack alongside Greek-style non-dairy yogurt for extra protein.
- Pack in lunchboxes with apple slices for a kid-friendly, energy-sustaining treat.
These ideas keep things easy and fun. Try them, and see how vegan chickpea protein bars fit your routine effortlessly.
Print
Easy Vegan Chickpea Protein Bars
- Prep Time: 15 minutes
- Cook Time: 15-20 minutes
- Total Time: 35-45 minutes (plus cooling)
- Yield: 8-10 bars
- Category: Snacks
- Method: Baking/No-Bake
- Cuisine: American
- Diet: Vegan
Description
Easy vegan chickpea protein bars made with simple ingredients like dates, chickpeas, peanut butter, and plant-based protein powder for a healthy, high-protein snack that’s naturally gluten-free and customizable.
Ingredients
- ½ cup pitted Medjool dates, tightly packed (about 7 large dates)
- 1 (15-ounce) can chickpeas, rinsed, drained, and thoroughly patted dry
- ½ cup natural peanut butter (or almond butter, cashew butter, or sunflower seed butter for nut-free)
- 2 teaspoons vanilla extract
- ½ cup rolled oats (gluten-free if needed)
- ½ cup vanilla plant-based protein powder
- 1–2 tablespoons unsweetened non-dairy milk (e.g., almond milk)
Instructions
- Preheat your oven to 350°F (175°C) and line an 8×8 inch baking pan with parchment paper, leaving an overhang on the sides for easy removal. This recipe is technically no-bake but often calls for a short bake to set, or you can opt for freezing. The original recipe suggests preheating, so let’s stick with that for best results in terms of texture.
- In the bowl of a large food processor, combine the pitted Medjool dates, thoroughly rinsed and dried chickpeas, natural peanut butter, and vanilla extract. Process until the dates are mostly broken down and the mixture starts to come together.
- Add the rolled oats and vanilla plant-based protein powder to the food processor. Begin processing, adding 1 tablespoon of non-dairy milk. Continue to process until a dense, uniform dough forms. The consistency should be like a thick cookie dough, not overly sticky. If it seems too dry or crumbly, add the second tablespoon of milk and blend again. If it’s too moist, add a bit more protein powder.
- Transfer the dough to the prepared baking pan. Press it down firmly and evenly to create a smooth, compact layer.
- Bake for about 15-20 minutes, or until the edges are lightly golden and the bars feel set. Alternatively, for a truly no-bake version, you can simply freeze the pressed mixture for about an hour to firm up.
- Let the bars cool completely in the pan before using the parchment paper overhang to lift them out.
- Slice into 8-10 bars. Store these protein bars in an airtight container in the refrigerator for up to a week.
Notes
- For a nut-free version, substitute peanut butter with sunflower seed butter.
- Use gluten-free rolled oats if needed for gluten-free diet.
- The recipe can be made fully no-bake by freezing instead of baking for 1 hour to set.
- Adjust non-dairy milk based on dough consistency; start with 1 tablespoon and add more if dry.


