
Introduction
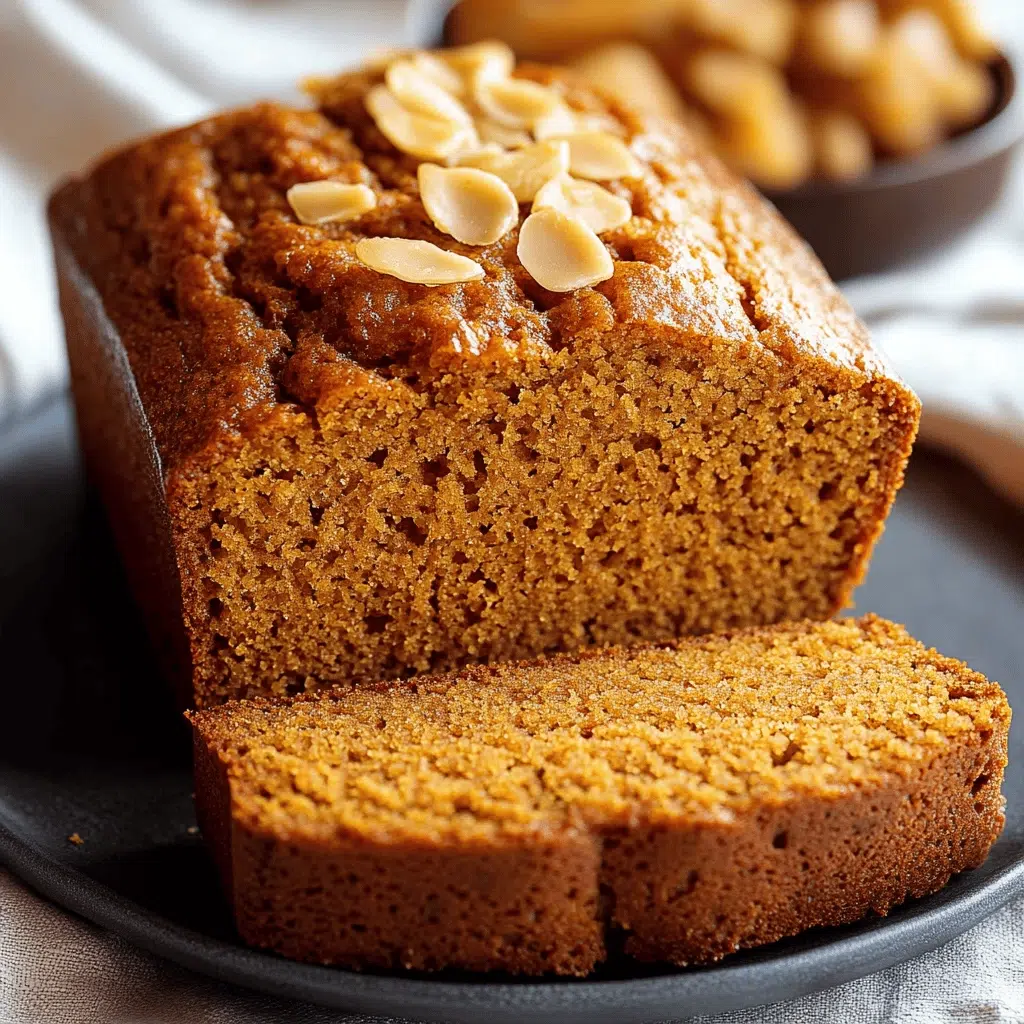
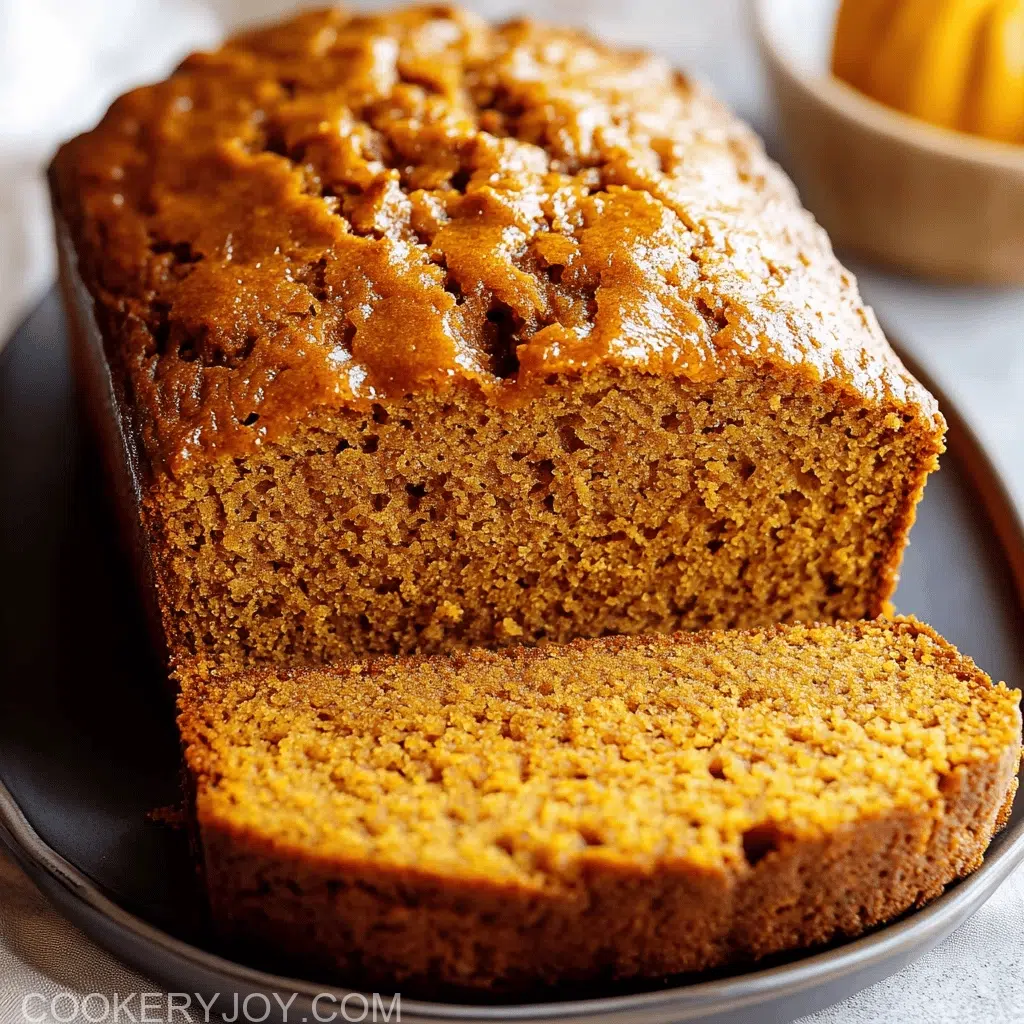
There’s nothing quite like the comforting aroma of freshly baked bread. Today, I’m thrilled to share a recipe close to my heart: a truly delicious gluten free pumpkin bread. This loaf is incredibly moist and bursting with warm, autumnal spices, making it a perfect treat.
I often bake this for lazy Sunday mornings or pack slices for a quick, satisfying snack. It stores beautifully, perfect for busy weeknights. Friends and family always ask for the recipe!
Why I Love This Recipe
This gluten free pumpkin bread recipe is a true lifesaver for so many reasons. First, it’s incredibly simple to whip up. You won’t spend hours in the kitchen! It’s also very forgiving, which is great for new bakers. Plus, the flavor is just dreamy: rich, spicy, and perfectly sweet. Everyone loves it! It really brings a cozy feeling to any day, making it a perfect fall treat, and it’s wonderful for those busy moments when you need a little something special.
Gluten Free Pumpkin Bread Ingredients
Gathering the ingredients for this amazing gluten free pumpkin bread feels like magic. Each component plays a vital role in creating its incredible flavor and perfect texture. You’ll love how simple yet powerful these pantry staples are.
Core Ingredients for Your Gluten Free Pumpkin Bread
- Gluten-Free All-Purpose Flour: This is our base. It gives the bread its structure without any gluten. I always use a 1:1 blend for easy baking.
- 100% Pure Pumpkin: This provides that signature pumpkin flavor and keeps our bread wonderfully moist. Make sure it’s not pumpkin pie filling!
- Granulated Sugar: It adds sweetness, of course! But it also helps with browning and moisture.
- Large Eggs: Eggs bind everything together and give the bread a soft, airy crumb. They are little miracle workers.
- Vegetable Oil: This fat creates an incredibly tender and moist texture. It’s a key player here.
Flavor Enhancers and Spices
- Pumpkin Pie Spice: This blend gives us that classic, warm autumnal taste. It’s truly comforting.
- Baking Powder & Baking Soda: These leavening agents make our bread rise beautifully. They are tiny but mighty!
- Salt: Just a pinch of salt enhances all the other flavors. It balances the sweetness perfectly.
Substitutions and Tips for Gluten Free Pumpkin Bread
Want to make this gluten free pumpkin bread even more your own? Here are some simple ideas!
- Different Flours: This recipe works best with a 1:1 gluten-free baking flour. Using other blends might change the texture a bit.
- Sugar Swaps: Instead of granulated sugar, try brown sugar for a deeper, molasses-like flavor. It’s a subtle but delightful change.
- Spice It Up: No pumpkin pie spice? No worries! You can use individual spices. Think cinnamon, ginger, nutmeg, and allspice. I love playing around with these.
- Fun Add-ins: My favorite part! Stir in chocolate chips for a sweet surprise. Chopped nuts add a lovely crunch. Dried cranberries give a chewy tartness. Just don’t add more than two cups total of these goodies.
Remember, precise quantities for your delicious gluten free pumpkin bread are in the handy printable recipe card below!
How to Make Gluten Free Pumpkin Bread
Making this gluten free pumpkin bread is truly a joy. It’s simple, straightforward, and so rewarding. I’ll walk you through each step. You’ll have warm, fragrant loaves in no time. Let’s get baking!
Step 1: Prepare Your Pans and Preheat the Oven
First things first, let’s get the oven ready. Adjust your oven rack to the middle position. Then, preheat your oven to a cozy 350°F. Now, grab two 9-by-5-inch loaf pans. Give them a good spray with nonstick cooking spray. You can also line them with parchment paper. Just grease it lightly. This makes sure your delicious gluten free pumpkin bread won’t stick!
Step 2: Combine Dry Ingredients for Gluten Free Pumpkin Bread
In a big bowl, let’s mix all our dry ingredients. Whisk together the gluten-free flour. Add the pumpkin pie spice. Don’t forget the baking powder and baking soda. Finally, toss in the salt. Give it a good whisk. This ensures everything is blended well. Each bite of your gluten free pumpkin bread will be perfect.
Step 3: Mix Wet Ingredients and Form the Batter
Now, it’s time for the wet ingredients! Add the pumpkin puree to the bowl. Pour in the sugar and crack in the eggs. Drizzle in the vegetable oil. Mix until everything is wonderfully smooth. The batter for this gluten free pumpkin bread will be quite thick. If you’re adding chocolate chips, nuts, or cranberries, stir them in now. Mix just until they are evenly distributed.
Step 4: Fill the Loaf Pans
It’s almost ready for the oven! Divide the batter evenly. Pour it into your two prepared pans. Use a small spatula or the back of a spoon. Smooth the tops of the batter. This helps the gluten free pumpkin bread bake evenly. It will look beautiful.
Step 5: Bake Until Golden
Place your filled pans in the preheated oven. Bake for about 50 minutes. The baking time might vary a little. You’ll know it’s done when a cake tester comes out clean. Just stick it into the center of a loaf. This means your gluten free pumpkin bread is perfectly baked!
Step 6: Cool and Enjoy Your Gluten Free Pumpkin Bread
Once baked, take the pans out. Place them on a wire rack. Let them cool for about 15 minutes. This step is important! Then, carefully turn the loaves out. Put them directly onto the wire rack. Let them cool completely. It’s tough to wait, but so worth it for your fantastic gluten free pumpkin bread. Slice and enjoy!
How to Store Gluten Free Pumpkin Bread
Once your gluten free pumpkin bread has cooled completely, proper storage is key. To keep it fresh, simply wrap the cooled loaves tightly. Use plastic wrap or foil. You can store your gluten free pumpkin bread right on the counter. It will stay fresh and delicious for up to 4 days. Sometimes, I slice it and store individual portions. This makes it super easy to grab a quick snack!
If you want to keep your gluten free pumpkin bread longer, freezing is a fantastic option. Wrap the cooled loaf well. Use plastic wrap first, then a layer of foil. This double layer helps prevent freezer burn. You can freeze this delightful gluten free pumpkin bread for up to three months. When you’re ready to enjoy it, just thaw it out on the counter. It will taste almost as good as freshly baked!
Tips for Success
- Don’t overmix the batter; mix until just combined.
- Measure your flour by weight for best results.
- Use 100% pure pumpkin, not pie filling.
- Let the bread cool completely before slicing.
- For extra moisture, don’t overbake.
- Experiment with different add-ins for variety.
- Store in an airtight container to keep it fresh.
Kitchen Tools You’ll Need
- Large Mixing Bowls: Two are ideal, one for dry, one for wet.
- Whisk: Perfect for blending ingredients smoothly.
- Measuring Cups and Spoons: Essential for accuracy.
- Loaf Pans: Two 9×5 inch pans are perfect.
- Spatula: Great for scraping down bowls and smoothing batter.
- Wire Rack: For cooling your loaves evenly.
- Parchment Paper or Nonstick Spray: For easy release.
Serving Suggestions
- Enjoy a slice plain with your morning coffee.
- Add a smear of cream cheese for pure indulgence.
- Serve warm with a dollop of whipped cream.
- Pair it with a cozy cup of spiced chai tea.
- It’s wonderful with a glass of cold milk.
- Toast a slice lightly for extra crispiness.
- Drizzle with a simple glaze for added sweetness.
Frequently Asked Questions
Can I make this Gluten Free Pumpkin Bread ahead of time?
Absolutely, you can! This gluten free pumpkin bread is perfect for making in advance. Its flavors actually get even better the next day. Just store it properly, and you’ll have a delicious treat ready for any occasion.
What is the best way to ensure my Gluten Free Pumpkin Bread is moist?
The key to a super moist gluten free pumpkin bread is using enough oil and not overbaking it. The pumpkin puree also adds a lot of moisture. Make sure to check for doneness with a cake tester and pull it from the oven as soon as it’s clean.
Can I use fresh pumpkin puree instead of canned for this Gluten Free Pumpkin Bread?
Yes, you can definitely use fresh pumpkin puree! Just make sure it’s pure pumpkin, with no added spices or sugar. The consistency might be slightly different, but your gluten free pumpkin bread will still taste amazing with this natural ingredient.
How do I know when my Gluten Free Pumpkin Bread is fully baked?
To tell if your gluten free pumpkin bread is done, simply insert a wooden skewer or cake tester into the center. If it comes out clean, with no wet batter clinging to it, your bread is perfectly baked. Trust this little trick for delicious results every time!
Conclusion
Baking this gluten free pumpkin bread is more than just making a dish; it’s an experience. It fills your home with warmth and brings a sense of comfort. Every slice is a little taste of autumn bliss. I truly hope you enjoy making and sharing this recipe as much as I do. It’s a wonderful reminder of simple pleasures. So go on, bake a loaf, and savor the moments. You absolutely deserve this delicious treat.
Print
Gluten-Free Pumpkin Bread
- Prep Time: 15 minutes
- Cook Time: 50 minutes
- Total Time: 1 hour 5 minutes
- Yield: 2 loaves
- Category: Bread
- Method: Baking
- Cuisine: American
- Diet: Gluten Free
Description
This recipe outlines how to bake a delicious gluten-free pumpkin bread, perfect for a fall treat. It uses a specific gluten-free flour blend and offers variations for sugar and spices, as well as optional add-ins.
Ingredients
- 3 ½ cups gluten-free all-purpose flour (17 ½ ounces; 500 grams)
- 1 tablespoon pumpkin pie spice
- 1 teaspoon baking powder
- 1 teaspoon baking soda
- 1 teaspoon salt
- 1 (15 ounce) can 100% pure pumpkin
- 1 ½ cups granulated sugar (11 ½ ounces; 326 grams)
- 4 large eggs
- ¾ cup vegetable oil, such as canola oil (5 ¼ ounces; 148 grams)
Instructions
- Adjust oven rack to the middle position and preheat to 350℉. Grease two 9-by 5-inch loaf pans with nonstick cooking spray or line with parchment paper and grease lightly.
- Whisk together the gluten-free flour, pumpkin spice, baking powder, baking soda, and salt in a large bowl.
- Add the pumpkin puree, sugar, eggs, and vegetable oil. Mix until smooth. The batter will be thick. If adding chocolate chips, nuts, or dried cranberries, stir them in now.
- Divide batter evenly between prepared pans. Smooth batter into pans with a small spatula or the back of a spoon.
- Bake for about 50 minutes or until a cake tester inserted into the center of the loaves comes out clean.
- Place the pans on a wire rack to cool for 15 minutes and then turn the loaves out onto a wire rack to cool completely.
- Store bread wrapped on the counter for up to 4 days. To freeze, wrap the cooled loaf in plastic wrap and foil and freeze for up to three months.
Notes
- The Gluten-Free Flour: This recipe was tested with Bob’s Red Mill 1:1 Gluten-Free Baking Flour. Using a different flour or blend will affect the bread.
- Sugar: For a subtle molasses flavor, use 1 ½ cups light or dark brown sugar.
- Pumpkin Pie Spice: Pumpkin pie spice can be replaced with individual spices: 1 ½ teaspoons ground cinnamon, 1 teaspoon ground ginger, ¼ teaspoon ground nutmeg, ¼ teaspoon ground allspice.
- Optional Ingredients: Chocolate Chips, Nuts, or Dried Cranberries: Stir in 2 cups total either chocolate chips, chopped nuts, or dried cranberries. A mix of two or all three can be used. Just don’t exceed two cups total.


