Skip to content
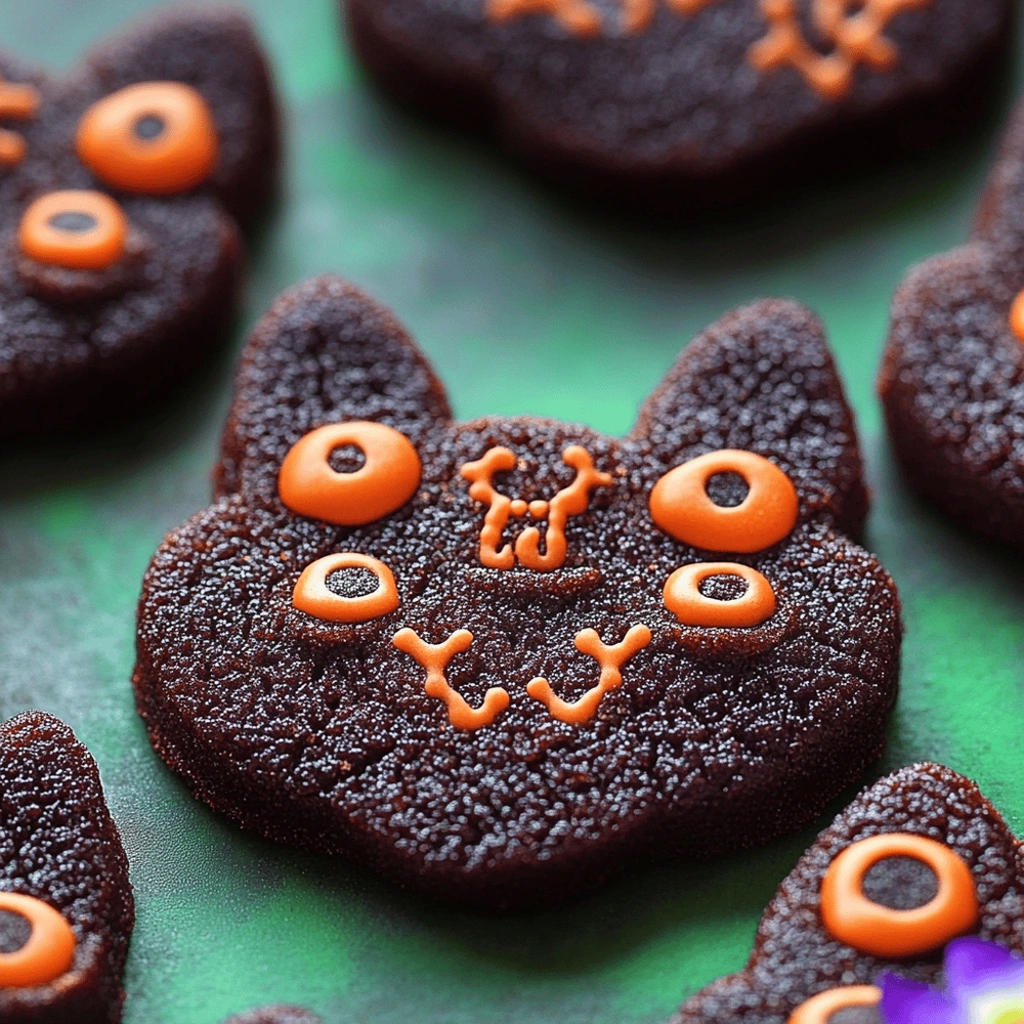
There’s something truly magical about baking for Halloween. This year, we’re diving into enchantment with these delightful Hocus Pocus Binx Cookies. They are a charming tribute to our favorite black cat. Their deep cocoa flavor is amazing. Adorable almond ears complete the look. The rich, fudgy texture is wonderful. Almonds add a satisfying crunch. This treat is fun to see and to eat.
These Hocus Pocus Binx Cookies are so versatile. They make a great party centerpiece. A special after-school surprise works too. They hold up beautifully. Everyone loves them. Little witches and warlocks adore them. Even the young at heart enjoy them. They store so well, too. You can enjoy Halloween magic all week.
Why I Love This Recipe
I absolutely adore these Hocus Pocus Binx Cookies. They’re a fantastic way to celebrate Halloween. It’s movie magic in cookie form. They’re surprisingly simple to whip up. This is great for busy weeknights. The black cocoa is wonderfully rich. The cute Binx design always brings smiles. They’re perfect for parties. They are also a special treat. They feel truly festive and fun.
Hocus Pocus Binx Cookies Ingredients
Creating these Hocus Pocus Binx Cookies feels like weaving a bit of Halloween enchantment. Our ingredient magic truly begins with quality. Black cocoa powder is key here. It gives these cookies their spooky dark color. It also provides an intense chocolate flavor.
Here’s what you’ll need:
- All-Purpose Flour: This forms the cookie’s structure.
- Black Cocoa Powder: It gives dramatic color and deep chocolate taste.
- Baking Soda: This helps cookies spread slightly. It makes them tender.
- Kosher Salt: It balances sweetness and boosts flavor.
- Granulated Sugar: This adds sweetness. It also improves texture.
- Unsalted Butter, Softened: Butter adds richness. It makes cookies tender.
- Light Brown Sugar, Packed: Brown sugar adds moisture. It offers a caramel note.
- Large Egg: The egg binds ingredients. It adds richness and structure.
- Pure Vanilla Extract: Vanilla enhances the chocolate. It adds a warm aroma.
- Sanding Sugar: It adds sparkle and a slight crunch. It’s perfect for our Hocus Pocus Binx Cookies.
- Sliced Raw Almonds: These create Binx’s cute ears. They add nutty flavor.
- Semisweet Chocolate Chips: Use these for Binx’s nose. They add classic chocolate goodness.
- Mini Green and Brown M&M’s: These are perfect for Binx’s eyes. They bring him to life.
Substitutions and Tips:
Can’t find black cocoa? Regular unsweetened cocoa works. The cookies won’t be as dark. For Binx’s eyes, use mini brown M&M’s. Black edible marker dots are another option. This is great for nut allergies. For deeper chocolate flavor, add espresso powder. Make sure your dough is chilled well. This helps with shaping.
How to Make Hocus Pocus Binx Cookies

Step 1: Prepare the Dry Ingredients
In a medium bowl, whisk together the flour, black cocoa, and baking soda. Add the kosher salt. Whisking these dry elements ensures they spread evenly in the dough. This is truly crucial for consistent baking results. Your Hocus Pocus Binx Cookies will thank you later!
Step 2: Cream the Butter and Sugars
In a large bowl, use an electric mixer. Beat the softened butter with granulated sugar. Add the packed light brown sugar. Continue beating until the mixture is light in color. It should be wonderfully creamy. This creaming step whips air into the dough. It makes the cookies tender.
Step 3: Add Wet Ingredients
Add the large egg to the creamed mixture. Beat until it is fully incorporated. Then, stir in the pure vanilla extract. Mix again just until combined. This creates a smooth, rich base for our Hocus Pocus Binx Cookies.
Step 4: Combine Wet and Dry Ingredients
Gradually add the whisked dry ingredients to the wet. Mix on low speed. Or blend by hand using a spatula. Mix only until the ingredients are just combined. Overmixing can make cookies tough. Stop as soon as you see no flour streaks. This keeps our cookies tender.
Step 5: Chill the Dough
Cover the bowl tightly with plastic wrap. Refrigerate the dough for at least 30 minutes. Chilling is very important. It firms up the butter. This makes shaping easier. It also prevents the Hocus Pocus Binx Cookies from spreading too much. You can chill the dough for up to two days.
Step 6: Preheat Oven and Prepare Baking Sheets
Preheat your oven to 350°F (175°C). Line two large baking sheets with parchment paper. Parchment paper prevents sticking. It also makes cleanup a breeze. This ensures your Hocus Pocus Binx Cookies bake evenly.
Step 7: Scoop and Roll the Cookie Dough
Use a medium cookie scoop. This is about 1.5 tablespoons. Scoop out 24 portions of dough. Reserve about 1/4 cup of dough for the ears. Roll each portion into a smooth ball. Then, roll each ball generously in sanding sugar. Coat it well. This forms a lovely sparkly crust.
Step 8: Shape the Cookies
Arrange the sugared dough balls on the baking sheets. Space them about 2 inches apart. This gives them room to spread. Gently flatten each ball. Use your palm or a glass bottom. Create a 2-inch circle. This is the base for Binx.
Step 9: Add the Binx Ears
Take small portions of the reserved dough. Scoop about 1/4-teaspoon amounts. Roll these into tiny balls. Coat them in sanding sugar. Place two on the top outer edge of each cookie. Shape them to form Binx’s ears. Gently pinch the tops to create points. This gives them a triangular look.
Step 10: Create Binx’s Features
Place two sliced almonds on each cookie. Position them for Binx’s eyes. Make sure the skinnier point faces inward. This looks just like his gaze! For the nose, press a semisweet chocolate chip. Place it in the center of the cookie. These details really bring Binx to life.
Step 11: Bake the Cookies
Bake the Hocus Pocus Binx Cookies for 8 to 10 minutes. Watch them closely. The edges should look set. Centers should still appear slightly soft. They will continue to firm up. They continue to firm up as they cool down.
Step 12: Cool the Cookies
Let the baked cookies cool on the sheets. Do this for about 5 minutes. This helps them set a bit more. Then, carefully transfer the Hocus Pocus Binx Cookies. Move them to a wire rack. Let them cool completely. Patience is key here!
Step 13: Final Decorations
Once cooled, add Binx’s eyes. Use mini green M&M’s or brown ones too. Place them where the almonds were. Or get creative! Add other edible decorations. This brings your Hocus Pocus Binx Cookies to life. They become truly special treats.
How to Store Hocus Pocus Binx Cookies
Keep your charming Hocus Pocus Binx Cookies fresh. Store them in an airtight container. Leave them at room temperature for 3-4 days. For longer enjoyment, you can freeze the baked cookies. Make sure they are completely cool first. Use a freezer-safe bag or container. They will keep well for up to 2 months. This prevents condensation. Enjoy your cookies later!
Tips for Success
- Chill dough thoroughly for easier handling.
- Don’t overmix cookie dough after adding dry ingredients.
- A cookie scoop ensures uniform cookie size.
- Watch cookies baking closely to prevent burning.
- Let cookies cool slightly on the sheet before moving.
- Experiment with different M&M colors for eyes.
Kitchen Tools You’ll Need
Let’s gather the essentials for making these Hocus Pocus Binx Cookies. Having the right tools makes baking so much smoother.
- Medium and large mixing bowls are needed.
- An electric mixer, handheld or stand, is helpful.
- A whisk is important for dry ingredients.
- Measuring cups and spoons ensure accuracy.
- A cookie scoop helps with portioning.
- Baking sheets are a must for baking.
- Parchment paper prevents sticking.
- A wire cooling rack is perfect for cooling.
Serving Suggestions
What are some fun ways to serve these delightful cookies?
- Serve with cold milk. Apple cider works too. Both taste great.
- Arrange them on a platter. Add other Halloween treats. It looks festive.
- Dust with powdered sugar. This creates a moonlit effect. It is quite pretty.
- These cookies are perfect for movie nights. Enjoy Hocus Pocus. Those cookies are a great companion.

Frequently Asked Questions
Can I make the Hocus Pocus Binx Cookies dough ahead of time?
Yes, you can absolutely prepare the cookie dough for these Hocus Pocus Binx Cookies in advance. Simply wrap the dough well in plastic wrap. Refrigerate it for up to two days. This chilling step makes shaping much easier.
What if I don’t have black cocoa powder?
No black cocoa powder? No problem! You can substitute regular unsweetened cocoa powder. Your cookies won’t be as dark. However, they will still have a wonderful, rich chocolate flavor. You might adjust the amount slightly. This helps achieve your desired taste.
How do I get the Binx ears to look right?
Getting Binx’s ears perfect is easy. Use small, uniform dough portions for the ears. Gently pinch the tops of these small dough balls. Create a pointed, triangular shape before adding them. Chilled dough really helps them hold their form while baking.
Can I freeze the Hocus Pocus Binx Cookies after baking?
You certainly can freeze your baked Hocus Pocus Binx Cookies. Ensure they are completely cooled first. Place them in an airtight container. Use a freezer-safe bag. Separate layers with parchment paper if needed. Freeze them for up to two months. They thaw beautifully.
Print
Hocus Pocus Binx Cookies
- Prep Time: 20 minutes
- Cook Time: 8-10 minutes
- Total Time: 30 minutes (plus chilling time)
- Yield: 24 cookies
- Category: Dessert
- Method: Baking
- Cuisine: American
- Diet: Vegetarian
Description
These Hocus Pocus Binx Cookies are a fun and festive treat inspired by the beloved Halloween movie. They feature a black cocoa cookie base, decorated to resemble Thackery Binx with almond ears and M&M eyes.
Ingredients
- 1 1/2 cups (180 g) all-purpose flour
- 1/4 cup (20 g) black cocoa powder
- 1/2 tsp. baking soda
- 1/4 tsp. kosher salt
- 3/4 cup (150 g) granulated sugar
- 1/2 cup (1 stick) unsalted butter, softened
- 1/2 cup (105 g) packed light brown sugar
- 1 large egg
- 1 tsp. pure vanilla extract
- Sanding sugar, for rolling
- Sliced raw almonds
- 1/4 cup semisweet chocolate chips
- Mini green M&M’s
- Mini brown M&M’s
Instructions
- In a medium bowl, whisk flour, cocoa powder, baking soda, and salt.
- In a large bowl, using an electric mixer on medium-high speed, beat granulated sugar, butter, and brown sugar until creamy.
- Add egg and beat until incorporated, then beat in vanilla.
- Add dry ingredients and beat until just combined.
- Cover bowl and refrigerate until chilled, at least 30 minutes or up to 2 days.
- Preheat oven to 350°F. Line 2 baking sheets with parchment.
- Using a medium (1 1/2-tablespoon) cookie scoop, scoop 24 portions; reserve remaining dough.
- Roll portions into 1″ balls, then roll in sanding sugar until coated.
- Arrange on prepared sheets, spacing 2″ apart. Flatten each ball to a 2″ circle.
- Scoop 1/4-teaspoon balls of reserved dough and roll into 1/2″ balls, then roll in sanding sugar until coated.
- Arrange 2 smaller balls on outer edge of top of flattened circles for ears. Slightly pinch tops to form triangle shapes.
- Place 2 sliced almonds on flattened circles for eyes, with the skinnier point facing toward the center.
- Bake cookies until edges are set, 8 to 10 minutes.
- Let cool 5 minutes, then transfer to a wire rack and let cool completely.
Notes
- For the eyes, you can use mini brown M&M’s instead of almonds if preferred.
- Ensure the dough is well-chilled for easier handling and to prevent spreading during baking.
- Decorate with mini green and brown M&M’s for the cat’s tail and nose if desired.