Skip to content

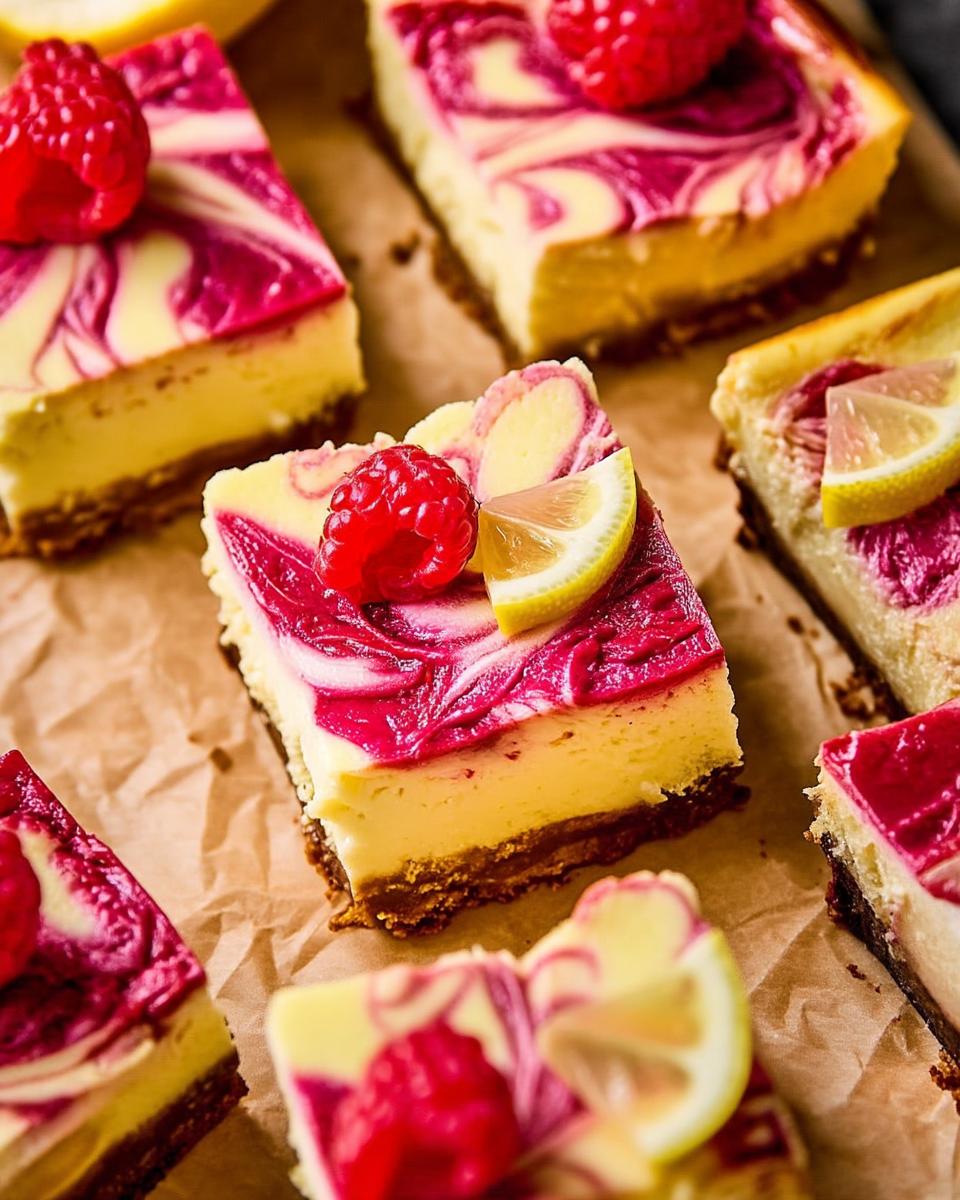
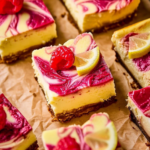
The bright tang of lemon zest cuts through the creamy richness of these cheesecake bars. Swirls of raspberry add a pop of juicy sweetness that lingers on the palate. I love how Lemon Raspberry High Protein Cheesecake Bars offer a refreshing twist on classic dessert. They blend smooth textures with zesty flavors that feel both indulgent and light. Plus, their ease comes from simple blending and baking. This makes them a go-to for satisfying cravings while supporting daily energy needs.
These bars fit seamlessly into afternoon snacks or post-dinner treats. Especially when you’re balancing family meals and work. They hold up well in the fridge for quick grabs throughout the week. With cottage cheese and Greek yogurt as the base, each bar delivers about 10 grams of protein. This helps you stay fueled without heavy calories. As a busy mom, I appreciate that protein boost in something so delicious.
Why We Love This Recipe
- Tangy Flavor Burst: The lemon and raspberry combo creates a vibrant, refreshing taste. It elevates everyday desserts perfectly.
- Simple Assembly: Blending and swirling take minimal effort. Ideal for home bakers short on time, like me after a long day.
- Protein Boost: Each bar provides approximately 10 grams of protein from cottage cheese and Greek yogurt. This supports muscle maintenance in a sweet treat.
- Versatile Treat: Enjoy chilled for a cool finish to meals. Or as a portable snack that travels well to work or kids’ events.
Ingredients to Make Lemon Raspberry High Protein Cheesecake Bars
The ingredients in these Lemon Raspberry High Protein Cheesecake Bars combine for a creamy, tangy filling. It sets beautifully over a crisp crust. The raspberry puree adds natural fruit brightness. I always opt for quality dairy like Good Culture cottage cheese. It enhances both creaminess and nutrition. Each serving delivers roughly 10 grams of protein from the cottage cheese and Greek yogurt. This keeps things light yet satisfying for my family.
- Raspberries – fresh or frozen berries blended into a smooth puree for swirling into the filling.
- Sugar – used in the puree and filling to balance the tart lemon and berry flavors; swap for a natural alternative if desired.
- Graham cracker crumbs – pulsed from Simple Mills Sweet Thins for a gluten-friendly, crunchy base.
- Coconut sugar – adds subtle caramel notes to the crust; brown sugar works as an easy substitute.
- Melted butter – binds the crust ingredients for a firm, golden layer.
- Cottage cheese – 2% variety blended smooth as the high-protein foundation of the filling.
- Greek yogurt – non-fat plain adds extra creaminess and protein without added fat.
- Granulated sugar – sweetens the filling lightly to complement the citrus.
- Arrowroot powder – acts as a thickener for a sliceable, sturdy texture.
- Eggs – provide structure and richness to the cheesecake layer.
- Egg yolk – enhances the velvety smoothness of the filling.
- Lemon zest – infuses bright, aromatic citrus essence.
- Lemon juice – fresh squeezed for tangy moisture in the base.
- Vanilla extract – rounds out flavors with warm undertones.
- Almond extract – a touch adds nutty depth to mimic traditional cheesecake notes.
Lemon Raspberry High Protein Cheesecake Bars
- Prep Time: 20 minutes
- Cook Time: 60 minutes
- Total Time: Overnight
- Yield: 16 bars
- Category: Dessert
- Method: Baking
- Cuisine: American
- Diet: Vegetarian
Description
High-protein cheesecake bars featuring a tangy lemon filling swirled with raspberry puree on a graham cracker crust, perfect for a healthy dessert.
Ingredients
- Raspberry Puree:
- 12 oz raspberries
- ¼ cup sugar
- Crust:
- 1 ⅔ cups graham cracker crumbs (Simple Mills Sweet Thins pulsed in food processor)
- ¼ cup coconut sugar (or brown sugar)
- 5 tbsp melted butter
- Filling:
- 3 cups 2% cottage cheese (Good Culture brand)
- ½ cup non-fat plain Greek yogurt
- ¾ cup granulated sugar
- ¼ cup arrowroot powder
- 3 eggs
- 1 egg yolk
- 1 tbsp lemon zest
- ¼ cup fresh lemon juice
- 1 tsp vanilla extract
- ½ tsp almond extract
Instructions
- Preheat oven to 350°F.
- Blend raspberries and sugar until smooth. Press through fine mesh strainer to remove seeds and pulp. Set aside.
- Mix crust ingredients until like wet sand. Press into oiled 9-inch square pan. Bake 10 minutes.
- Blend cottage cheese until smooth. Add Greek yogurt, sugar, arrowroot, eggs, egg yolk, lemon zest/juice, vanilla, and almond extract. Mix well.
- Pour filling over warm crust and smooth out.
- Spoon half raspberry puree on top and swirl with toothpick for design. Reserve remaining puree.
- Bake 50-60 minutes until sides brown and pull away, center slightly jiggly.
- Turn oven off, crack door, cool 1 hour inside. Refrigerate overnight.
- Slice into 16 bars with wet knife. Serve with remaining raspberry sauce, whipped cream, and lemon wedge if desired.
Notes
- Use a food processor to pulse graham crackers into crumbs if needed.
- Ensure the pan is well-oiled to prevent sticking.
- For best results, chill overnight to set properly.
How to Make Lemon Raspberry High Protein Cheesecake Bars
Step 1: Preheat and Prepare Raspberry Puree
I start by preheating my oven to 350°F. Then, I blend the raspberries with sugar until completely smooth. This takes about a minute in a food processor or blender. Next, I press the mixture through a fine mesh strainer. This removes seeds and any pulp. You end up with a silky puree to set aside for later. This step ensures the fruit element integrates seamlessly without grittiness. It saves time on picky eaters who hate seeds.
Step 2: Mix and Bake the Crust
I combine the graham cracker crumbs, coconut sugar, and melted butter in a bowl. Mix until the mixture resembles wet sand. This helps it hold together firmly. Then, press this evenly into the bottom of a well-oiled 9-inch square pan. It creates a solid base. Bake for 10 minutes until lightly golden and fragrant. Allow the crust to cool slightly while you prepare the filling. This prevents sogginess, which I learned the hard way once.
Step 3: Blend the Cheesecake Filling
Using a food processor or blender, I process the cottage cheese until it becomes perfectly smooth and creamy. This eliminates any curds for a luxurious texture. Then, add the Greek yogurt, granulated sugar, arrowroot powder, eggs, egg yolk, lemon zest, lemon juice, vanilla extract, and almond extract. Blend everything together until fully incorporated and lump-free. I taste the mixture if needed to adjust for brightness from the citrus. It’s key for that perfect tang.
Step 4: Assemble and Swirl the Bars
Pour the blended filling over the warm baked crust. Use a spatula to smooth it out evenly across the pan for uniform bars. Spoon about half of the reserved raspberry puree in dollops over the top. Then, gently swirl it through the filling with a toothpick. This creates an attractive marbled design. Save the remaining puree for serving to add fresh flavor later. The swirling is fun and makes them look pro without much effort.
Step 5: Bake and Cool the Cheesecake
Bake the assembled bars for 50 to 60 minutes. Watch until the edges turn golden brown and pull slightly away from the pan sides. The center should remain just a bit jiggly for a creamy set. Once done, turn off the oven. Crack the door open and let the bars cool inside for about one hour. This prevents cracking from sudden temperature changes. Then, transfer to the refrigerator and chill overnight. It allows flavors to meld and texture to firm up completely. Patience here pays off for sliceable bars.
Step 6: Slice and Serve
After chilling, run a wet knife under hot water. Wipe clean between cuts to slice the bars neatly into 16 equal pieces without crumbling. Drizzle each bar with the reserved raspberry puree for extra tang. Top with a dollop of whipped cream or a fresh lemon wedge if you want to enhance the presentation. These steps ensure clean edges and maximum enjoyment straight from the fridge. My kids love this part—it’s like a little dessert party.
Pro Tips for Success
- Smooth Blending: Pulse the cottage cheese thoroughly in a food processor. Achieve a velvety filling that mimics traditional cheesecake without lumps.
- Pan Prep: Oil the baking pan generously. Ensure the crust releases easily after cooling, avoiding any sticking issues that frustrate busy cooks.
- Overnight Chill: Refrigerate the bars for at least 8 hours post-baking. Fully set the protein-rich filling for clean slicing every time.
- Protein Enhancement: Boost the dairy base slightly with extra Greek yogurt. Aim for higher protein per bar while keeping the tangy profile intact.

How to Serve Lemon Raspberry High Protein Cheesecake Bars
Garnishes
I like to top these bars with a scattering of fresh raspberries. It adds a juicy contrast. A sprinkle of finely grated lemon zest brings a vibrant yellow pop. This amplifies the citrus aroma too. A few mint leaves tucked alongside bring a cool, herbal note. They don’t overpower the fruit. These simple touches make each bite feel fresh and inviting. Perfect for impressing guests without extra work.
Side Dishes
Pair the bars with a light green salad tossed in a citrus vinaigrette. It echoes the lemon flavors while keeping the meal balanced and refreshing. I often serve them alongside brewed herbal tea. This cuts through the sweetness gently. For a heartier option, a small bowl of mixed berries provides extra antioxidants. It complements the dessert’s theme beautifully. These pairings help with those weeknight dinners when time is tight.
Creative Ways to Present
I arrange the sliced bars on a platter lined with edible flowers. This gives a garden-inspired look that highlights their colorful swirls. Layering them in clear glasses with a spoonful of yogurt creates parfait-style treats. They’re perfect for picnics. Cutting into triangles and stacking slightly gives a modern, bakery-style display. It’s easy to grab on the go. These ideas make serving fun and fuss-free for family gatherings.
Make Ahead and Storage
Storing Leftovers
I keep any extra Lemon Raspberry High Protein Cheesecake Bars in the refrigerator. Cover with plastic wrap or in a shallow dish. This maintains their firmness for up to five days. The method preserves the creamy texture. It prevents any drying out from air exposure. Just pull them out 10 minutes before serving. Let the flavors brighten a bit. It’s great for mid-week treats when prep fatigue hits.
Freezing
For longer storage, I wrap individual bars tightly in plastic wrap. Place them in a freezer-safe bag. They hold up well for up to two months without losing moisture. Thaw them overnight in the fridge. This restores the original soft set and avoids condensation issues. The approach works great for portioning ahead. Ideal if you’re planning ahead for busy weeks.
Reheating
Since these bars taste best chilled, I usually serve them straight from the fridge. But if you prefer a slightly warmer texture, microwave a bar for 10-15 seconds on low power. Alternatively, let it sit at room temperature for 20 minutes to soften gently. Cover with a damp paper towel during the microwave step. This retains moisture and keeps the edges from toughening. Simple tweaks for different moods.