Skip to content
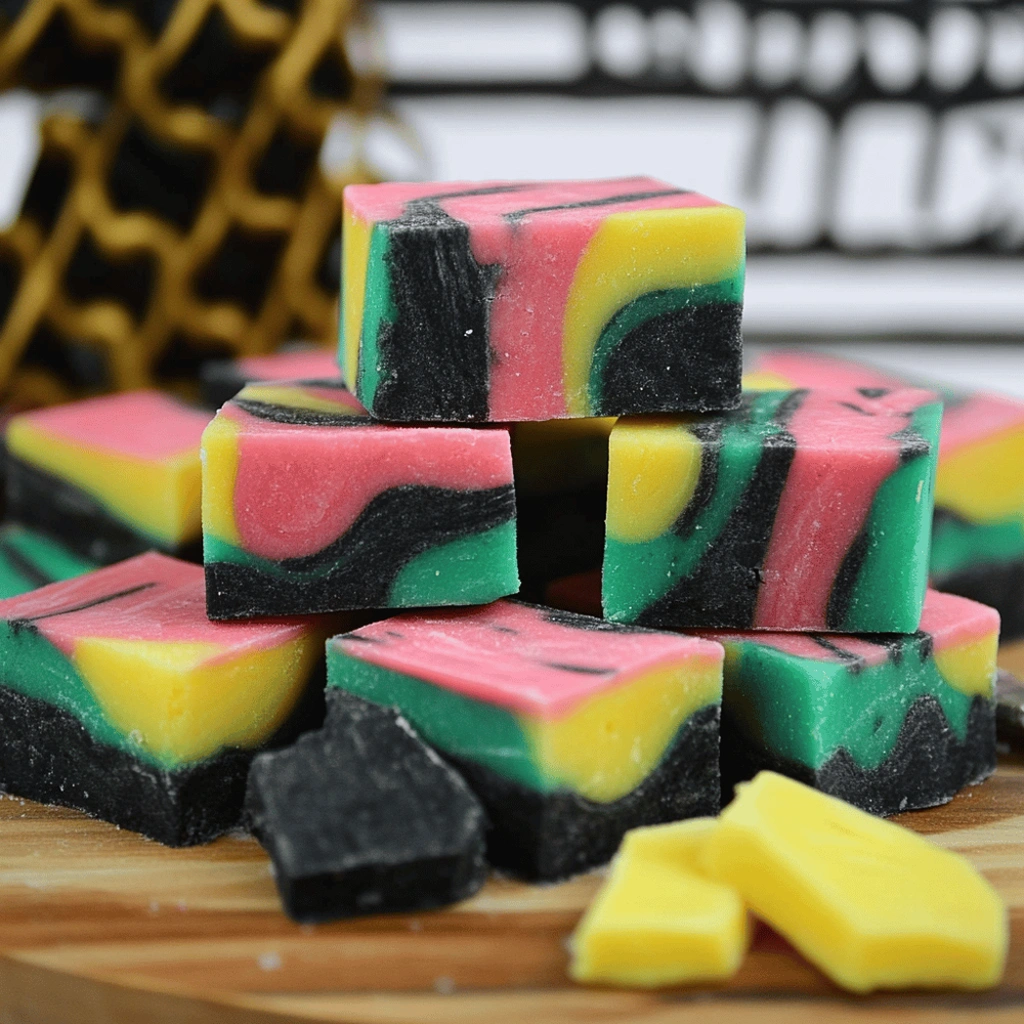
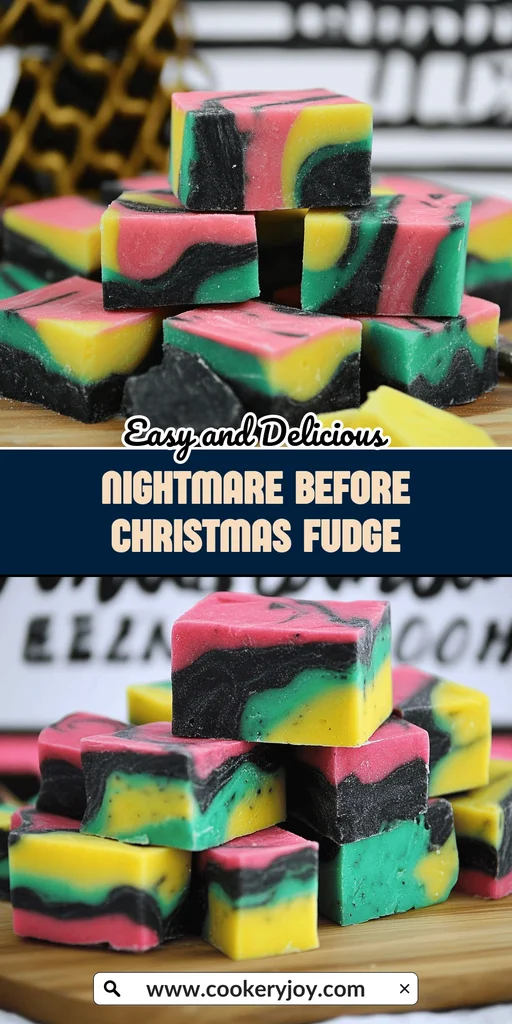
Crafting a treat that captures the whimsical spirit of a beloved film is always a delight. This Nightmare Before Christmas Fudge is no exception. Its vibrant, marbled patchwork of colors and rich, creamy texture make it a showstopper. Each square offers a delightful sweetness perfect for any fan. It’s a real treat.
This no-bake fudge is surprisingly simple to whip up. It makes an ideal project for busy afternoons. It’s also a fun activity with family. It stores beautifully, ensuring you have a festive treat ready. It’s always a hit at parties or movie nights.
Why I Love This Recipe
There are so many reasons I adore this Nightmare Before Christmas Fudge recipe. It truly ticks all the boxes for a busy home cook like me. Here’s why it’s a favorite in my kitchen:
- Incredibly Easy: Seriously, this is a no-bake wonder. It comes together in minutes.
- Visually Stunning: The marbled effect is so unique. It always catches everyone’s eye.
- Crowd-Pleaser: It’s perfect for Halloween. It’s also great for themed parties or just as a special treat.
- Deliciously Creamy: The flavor is just wonderful. It’s rich, satisfyingly sweet, and oh so creamy.
Nightmare Before Christmas Fudge Ingredients
The magic of this Nightmare Before Christmas Fudge truly lies in its simple yet effective combination of creamy white chocolate and sweet condensed milk. This base is brought to life with vibrant colors. It’s a foundation that’s both forgiving and delicious. This allows the visual artistry to really shine through beautifully.
- White Chocolate Chips: These form the creamy, sweet foundation. They melt down beautifully for that smooth texture.
- Sweetened Condensed Milk: This is key for richness and sweetness. It also helps the fudge set up perfectly.
- Unsalted Butter: A bit of butter adds a lovely smooth texture. It also contributes a hint of richness.
- Vanilla Extract: This little ingredient enhances the overall sweetness. It really boosts the flavor profile wonderfully.
- Gel Food Coloring (Black, Yellow, Pink, Teal): These are absolutely essential. They create Sally’s iconic patchwork look. Gel colors offer the most concentrated and vibrant hues.
Substitutions and Tips:
For an extra layer of flavor, consider using a combination of vanilla and peppermint extract. If you don’t have butter, Marshmallow Fluff can be used. It offers a slightly different texture. For the most vibrant results, ensure you use gel food coloring. Liquid versions can dilute the fudge. Always work quickly once the colors are added. This prevents the fudge from setting too soon in your bowls.
How to Make Nightmare Before Christmas Fudge

Making this Nightmare Before Christmas Fudge is a straightforward process. Each step is designed for ease, even if you are new to fudge making. You’ll love the creative aspect.
Step 1: Prepare Your Pan
Begin by lining an 8×8 inch square pan with parchment paper. For easier removal of your fudge, ensure there’s an overhang on all sides. You can even use two pieces of parchment in a plus sign shape. Then secure the overhangs with binder clips to keep them in place. This is a simple step.
Step 2: Melt the Base
In a medium pot, combine the white chocolate chips, sweetened condensed milk, and butter. Melt the mixture over low to medium heat. Stir constantly while it melts. Continue stirring for about 5 minutes until it is completely melted and smooth. This creates a wonderfully smooth base for your themed fudge.
Step 3: Add Flavor and Divide
Remove the pot from the heat carefully. Stir in the vanilla extract now. This is the perfect moment to divide the fudge mixture evenly. Place about one cup into each of four small bowls. This makes coloring much easier.
Step 4: Color the Fudge
Now, it’s time to bring the Nightmare Before Christmas Fudge to life with color. Add a few drops of black gel food coloring to one bowl. To the remaining three bowls, add a few drops of pink, yellow, and teal gel food coloring. Use one color per bowl. Mix each one thoroughly until you achieve vibrant, even colors. It’s important to work quickly here. This stops the fudge from starting to set too soon.
Step 5: Create the Marbled Effect
Carefully drop alternate spoonfuls of each colored fudge mixture randomly into your prepared pan. To create that signature patchwork, use a toothpick or a small paring knife. Gently swirl the colors together. Aim for a marbled effect that really resembles Sally’s iconic dress. Don’t over-mix!
Step 6: Set and Cut
Allow your Nightmare Before Christmas Fudge to set completely. You can leave it at room temperature overnight. For a quicker set, refrigerate it. It needs at least 2 hours until it feels firm to the touch. Patience is rewarded here.
Step 7: Serve Your Creation
Once your fudge is firm, use the parchment paper overhang. Lift it out of the pan with ease. Transfer the block to a cutting board. Then, cut it into 2-inch squares. Your amazing Nightmare Before Christmas Fudge is now ready to be enjoyed! Share the spooky fun.
How to Store Nightmare Before Christmas Fudge
Proper storage keeps your delightful Nightmare Before Christmas Fudge tasting its best. Store it in an airtight container at room temperature. It will stay fresh for up to one week this way. For longer storage, refrigeration is a good option. This helps maintain its firmness. If you wish to freeze it, wrap each square securely in plastic wrap. Then, place them in a freezer-safe bag or container. Frozen fudge can last nicely for 2-3 months.
Tips for Success
- Use high-quality white chocolate chips. They give the best flavor and melt.
- Work quickly when coloring. Swirl the fudge fast to prevent hardening.
- Make sure your pan is fully lined. Parchment paper aids easy removal.
- Gel food coloring is key. It achieves vibrant, distinct colors for your Nightmare Before Christmas Fudge.
- Let the fudge set completely. This allows for clean, neat squares when cutting.
Kitchen Tools You’ll Need
To create this spooky-fun Nightmare Before Christmas Fudge, you’ll want a few key tools:
- An 8×8 inch square baking pan is essential for shaping.
- Parchment paper is a must for easy removal.
- A medium saucepan works best for melting the base.
- You’ll need four small mixing bowls for coloring.
- A spatula or spoon is needed for stirring.
- A toothpick or a small paring knife helps create the swirl effect.
- Binder clips are handy if you decide to secure the parchment paper.
Serving Suggestions
These delightful little squares of Nightmare Before Christmas Fudge are perfect for so many occasions. Consider these serving ideas:
- Serve alongside a warm mug of hot chocolate. Spiced cider is also a great pairing.
- Present them on a platter with other Halloween-themed treats for a spooky spread.
- Garnish with edible black glitter. This adds an extra touch of sparkle and theme.
- They are absolutely perfect for a movie marathon of “The Nightmare Before Christmas.” Enjoy the magic.
Frequently Asked Questions
Can I make this Nightmare Before Christmas Fudge ahead of time?
Yes, absolutely! This fudge is perfect for making ahead. Once it’s set, store it in an airtight container at room temperature for up to a week, making it a convenient treat for parties or busy weeks. It’s a real lifesaver when you’re planning.
What if I don’t have gel food coloring?
While gel food coloring provides the most vibrant results for this Nightmare Before Christmas Fudge, you can use liquid food coloring in a pinch. Just be aware that you might need more drops. It could slightly alter the fudge consistency, making it a bit softer.
How do I get the best marbled effect?
To achieve a beautiful marbled look, don’t over-swirl the colors. Gentle, quick movements with a toothpick or knife will create distinct patterns. Aim for a patchwork effect that mimics Sally’s dress. Avoid fully blending the colors for that signature look.
Print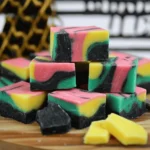
Nightmare Before Christmas Fudge
- Prep Time: 15 minutes
- Cook Time: 5 minutes
- Total Time: 5 minutes active, plus chilling/setting time
- Yield: Approximately 9-12 servings
- Category: Dessert
- Method: No-Bake
- Cuisine: American
- Diet: Vegetarian
Description
A festive and visually striking fudge inspired by the iconic character Sally from Tim Burton’s ‘The Nightmare Before Christmas’, featuring a marbled patchwork of vibrant colors.
Ingredients
- 3–3 1/2 cups white chocolate chips
- 1 (14-ounce) can sweetened condensed milk
- 4 tablespoons unsalted butter (or 2 tablespoons unsalted butter plus 3 tablespoons Marshmallow Fluff)
- 1 teaspoon pure vanilla extract (or 1/4 tsp vanilla bean paste/extract + 1/2 tsp peppermint extract)
- Black, yellow, pink, and teal gel food coloring
- 8×8 inch square pan
- Parchment paper
Instructions
- Line an 8×8 inch square pan with parchment paper, leaving an overhang on all sides for easy removal. (Optional: arrange two pieces in a plus sign shape for better coverage and use binder clips to secure overhang).
- In a medium pot over low to medium heat, combine the white chocolate chips, sweetened condensed milk, and butter (and Marshmallow Fluff if using).
- Stir the mixture continuously until it is completely melted and smooth (about 5 minutes).
- Remove from heat. Stir in the vanilla extract (and peppermint extract if using).
- Divide the fudge mixture evenly among 4 small bowls (approximately 1 cup per bowl).
- Add a few drops of black gel food coloring to one bowl, and a few drops of pink, yellow, and teal to the remaining three bowls (one color per bowl). Mix each bowl until you reach the desired vibrant color. Work quickly so the fudge doesn’t set too much.
- Drop alternate spoonfuls of each colored fudge randomly into the prepared square pan.
- Using a toothpick or a small paring knife, gently swirl the colors together to create a marbled, patchwork effect, resembling Sally’s dress.
- Allow the fudge to harden overnight at room temperature, or refrigerate for at least 2 hours until set.
- Once firm, use the parchment overhang to lift the fudge out of the pan and transfer it to a cutting board. Cut into 2-inch squares.
Notes
- Using gel food coloring provides the most vibrant colors for the fudge.
- For a stronger peppermint flavor, consider using the peppermint extract option.
- Ensure the fudge is completely set before cutting for clean slices.