Skip to content

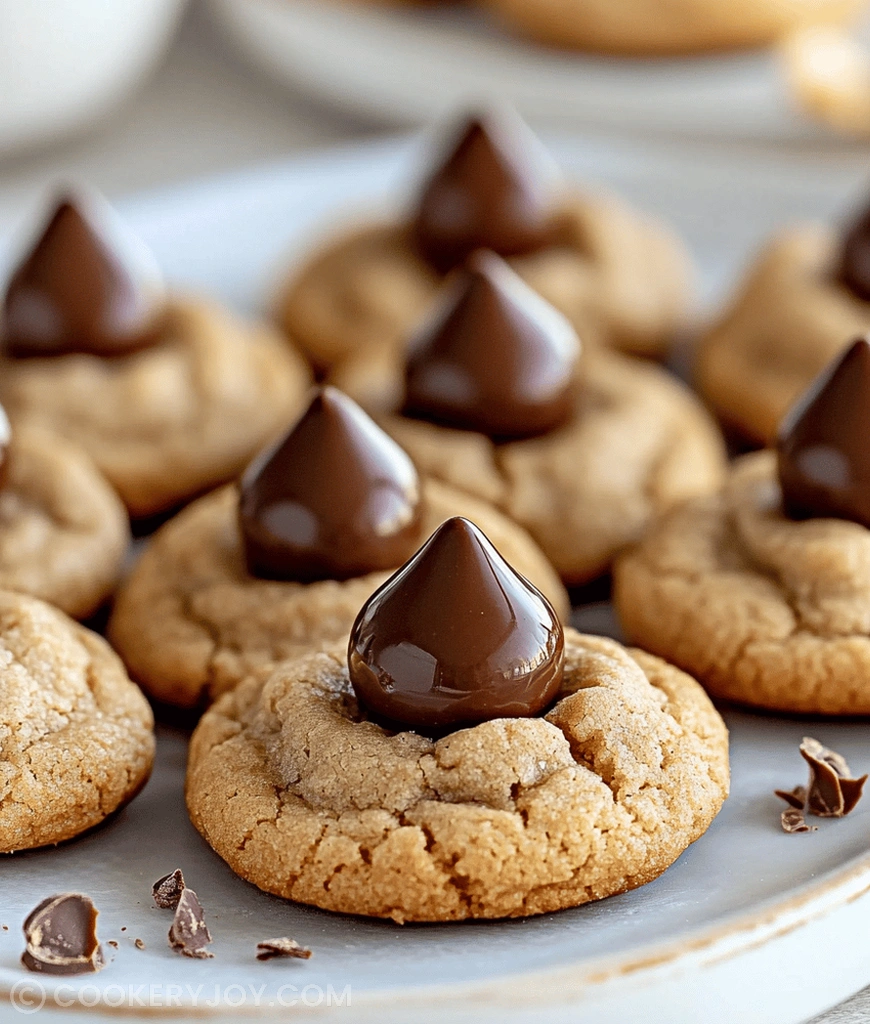
There is truly nothing better than a classic American treat. These iconic peanut butter blossom cookies bring instant smiles to any face. The combination of soft peanut butter dough with that single, shiny chocolate kiss is pure magic. I find myself craving this perfect blend often.
They bake up beautifully every time I make them. We made these constantly when my kids were small. They are wonderful for school bake sales or for a quick after-school snack. Truly, everyone always asks for this irresistible recipe. Storing the leftovers is never a problem in our house.
Why I Love This Recipe
I adore this recipe because it proves simple is often best. It takes less than an hour from start to finish. The texture is delightfully tender and perfectly chewy. Plus, these peanut butter blossom cookies are always a crowd-pleaser. They look festive without much effort. You will find they hold up well for potlucks. They are the definition of comfort food baking.
Peanut Butter Blossom Cookies Ingredients
The heart of this cookie lies in its rich peanut butter foundation. It creates that wonderfully savory, sweet flavor profile we all crave. Let us look at what we need for these wonderful cookies.
- Butter: This gives our cookies the rich, necessary base structure.
- Sugars: Both granulated and brown sugar provide sweetness and moisture retention.
- Egg and Vanilla: These bind everything and add classic aromatic depth.
- Peanut Butter: The star ingredient adds that unmistakable nutty richness.
- Flour, Baking Soda, and Salt: These create the structure and ensure proper lift.
- Extra Granulated Sugar: This becomes the outer, slightly crunchy coating.
- Hershey’s Kisses: This finishes the cookie with its signature chocolate center.
Substitutions and Tips
You can easily substitute creamy peanut butter for crunchy, if you like texture. For a deeper flavor, try using slightly less vanilla extract. If you are out of baking soda, use a tiny touch of baking powder. Remember, precise measurements for the flour are key here. Roll the dough balls gently into the coating sugar. You will find the exact amounts in the recipe card below.
Kitchen Tools You’ll Need
- A mixer really helps blend the butter smooth.
- Baking sheets lined with parchment paper save cleanup time.
- Use a small cookie scoop for uniform shapes easily.
- Two good mixing bowls are nice for organization.
- A wire rack cools the baked goods quickly.
How to Make Peanut Butter Blossom Cookies
Preheating and Pan Preparation
First, always preheat your oven right away. Set your oven temperature to 375 degrees Fahrenheit. Line your baking sheets with parchment paper now. This step prevents sticking later on. Proper heat management ensures perfect cookies.
Creaming the Wet Ingredients
In a large bowl, cream the butter and sugars well. Mix until the mixture looks light and fluffy. Then, beat in your egg and vanilla extract smoothly. Next, incorporate the creamy peanut butter mix. Stir until everything is thoroughly combined together.
Mixing the Dry Ingredients
Grab another bowl for the dry stuff. Whisk the flour, baking soda, and salt together. Keep them gently mixed for even distribution. This quick blend stops pockets of soda later.
Combining Dough
Add the dry mixture to the wet ingredients slowly. Mix on low speed just until a soft dough forms. Do not overmix the developing dough at this stage. Overmixing makes those wonderful cookies tough.
Rolling and Coating
Pour the remaining sugar into a wide, shallow dish. Scoop your dough into little one-inch balls quickly. Roll each ball completely in the sugar coating. Make sure the sugar coats every little surface. Place them two inches apart on the prepared sheets.
Baking the Bases
Slide those cookie trays into the hot oven carefully. Bake for only eight to ten minutes total baking time. Watch for slightly golden, cracked tops only. Remember, we want the center soft for sinking.
Adding the Kisses
Pull the hot cookies from the oven immediately. Press one unwrapped Hershey’s Kiss right into the center. The residual heat melts the bottom chocolate piece. This creates the signature look for great peanut butter blossom cookies.
Cooling Process
Let the cookies rest on the hot pan for five minutes. This quick rest helps prevent them from breaking apart. Then, move them gently onto a wire rack. This allows them to cool completely down. The chocolate will firm up nicely once cooled.
How to Store Peanut Butter Blossom Cookies
These classic peanut butter blossom cookies taste best very quickly. Store any leftover cookies in an airtight container now. They stay fresh at room temperature for nearly a week. For longer storage, freezing works wonderfully for you. Layer the cooled cookies with wax paper slices inside. They maintain great quality for about two months frozen. Thaw them overnight before serving to your family.
Tips for Success
- Use room temperature butter for better creaming action always.
- Do not flatten the cookie dough balls before baking to keep them puffy.
- Press the chocolate kisses in while the cookies are piping hot, really quickly.
- Chilling the dough ten minutes helps if your kitchen is particularly warm today.
- Always measure your flour by spooning it into the cup first, then leveling off.
- The secret to great peanut butter blossom cookies is underbaking slightly.
- Ensure your peanut butter is the standard creamy kind, not the natural runny type.

Serving Suggestions
- Serve warm with a tall glass of cold milk, naturally.
- These pair wonderfully with strong coffee or tea.
- Arrange them nicely on a tiered platter for guests.
- A light dusting of confectioners’ sugar looks fancy.
- They look lovely next to fresh berries on a plate.

Peanut butter blossom cookies
- Prep Time: 20 minuti
- Cook Time: 8-10 minuti
- Total Time: Circa 30 minuti
- Yield: Circa 40 biscotti
- Category: Dolci
- Method: Forno
- Cuisine: Americana
- Diet: Vegetarian
Description
Ricetta classica dei biscotti Peanut Butter Blossom, caratterizzati da un morbido impasto al burro di arachidi e sormontati da un bacio di cioccolato Hershey’s fuso.
Ingredients
- 1/2 tazza (1 panetto) di burro non salato, ammorbidito
- 1/2 tazza di zucchero semolato
- 1/2 tazza di zucchero di canna compattato
- 1 uovo grande
- 1 cucchiaino di estratto di vaniglia
- 1.5 tazze di burro di arachidi cremoso
- 1 3/4 tazze di farina per tutti gli usi
- 1 cucchiaino di bicarbonato di sodio
- 1/2 cucchiaino di sale
- Circa 1/2 tazza di zucchero semolato (per rotolare)
- Circa 40 Hershey’s Kisses, senza involucro
Instructions
- Preriscaldare il forno a 190°C (375°F). Foderare le teglie con carta da forno.
- In una ciotola grande, sbattere insieme il burro ammorbidito, lo zucchero semolato e lo zucchero di canna fino a ottenere un composto chiaro e spumoso.
- Incorporare l’uovo e l’estratto di vaniglia fino a quando non sono ben amalgamati. Aggiungere il burro di arachidi.
- In una ciotola separata, mescolare la farina, il bicarbonato di sodio e il sale.
- Aggiungere gradualmente gli ingredienti secchi agli ingredienti umidi, mescolando fino a quando sono appena combinati e si forma un impasto morbido.
- Mettere la restante 1/2 tazza di zucchero semolato in un piatto fondo.
- Formare delle palline di impasto da 1 pollice (circa 2,5 cm) e poi rotolare ogni pallina nello zucchero semolato per ricoprirle.
- Disporre le palline ricoperte di zucchero a circa 5 cm di distanza sulle teglie preparate.
- Cuocere per 8-10 minuti, o fino a quando i bordi sono leggermente dorati e le cime sono leggermente screpolate (non cuocere troppo).
- Immediatamente dopo aver tolto dal forno, premere un Hershey’s Kiss senza involucro al centro di ogni biscotto caldo.
- Lasciare raffreddare i biscotti sulle teglie per 5 minuti prima di trasferirli su una gratella per farli raffreddare completamente. Il cioccolato si ammorbidirà e poi si solidificherà.
Notes
- È importante non cuocere troppo i biscotti, poiché il cioccolato viene aggiunto subito dopo la cottura.
- Il raffreddamento iniziale sulle teglie aiuta il cioccolato a stabilizzarsi prima di trasferirli.