As the weekend approaches, my family gathers around the grill. I feel true satisfaction then. I fire up a dish with bold flavors. It requires little fuss. Peri-Peri Chicken Portuguese Style brings that joy. It offers a spicy kick from bird’s eye chilies. A smoky paprika sauce clings tightly. It coats every tender, brined bite. You get juicy meat inside. The exterior chars beautifully. This dish feels exotic yet comforting. It’s ideal for sharing dinner stories.
This recipe fits busy lives perfectly. The overnight brine handles most work early. So, you only need 30 minutes prep next day. Additionally, it reheats well for leftovers. The brine keeps everything moist. It pairs easily with simple sides too. Even picky eaters often enjoy them. Many appreciate the adjustable heat. Therefore, it suits varied household tastes.

Why We Love This Recipe
- Bold Flavor Burst: I make the homemade piri-piri sauce fresh. It delivers a spicy, garlicky punch. This elevates basic grilled chicken. Soon, it becomes a Portuguese-inspired feast.
- Tender and Juicy: Brining overnight works wonders. The meat stays moist always. It remains flavorful too. Even after grilling to a perfect char, it holds up.
- Family-Friendly Heat: You can adjust the chilies easily. Choose mild or fiery results. This makes it great for home. Diverse palates all enjoy it.
- Quick Weekend Win: Hands-on time stays minimal. So, it’s stress-free cooking. You impress everyone. Yet, you avoid a full day in the kitchen.

Peri-Peri Chicken Portuguese Style Recipe
- Prep Time: 30 minutes (plus overnight brining)
- Cook Time: 45-60 minutes
- Total Time: 1 hour 15 minutes (plus overnight brining)
- Yield: 4 servings
- Category: Main Dish
- Method: Grilling
- Cuisine: Portuguese
- Diet: Gluten Free
Description
A spicy and flavorful Portuguese-style peri-peri chicken recipe featuring a brined whole chicken grilled to perfection with a homemade piri-piri sauce made from chilies, garlic, and herbs.
Ingredients
- 1 whole chicken (around 1.5 kg), spatchcocked
- For the Brine:
- ½ cup salt
- 8 cups water (half boiling, half cold/ice)
- For the Piri-Piri Sauce:
- 8 garlic cloves, peeled
- 1 small lemon (or ½ large lemon), cut into 6 pieces, seeds removed
- 2 tablespoons white vinegar
- 4–5 bird’s eye chilies (adjust to preferred heat)
- 2 tablespoons fresh coriander leaves, finely chopped
- 3 teaspoons smoked paprika
- 3 teaspoons sugar
- 1 teaspoon salt
- ½ teaspoon black pepper
- 75ml olive oil
- 2 large bay leaves
Instructions
- First, prepare the brine: Dissolve the salt in about half of the boiling water. Once dissolved, add the remaining cold water and ice to cool it down. Submerge the whole spatchcocked chicken in this brine, ensuring it’s fully covered, and refrigerate overnight.
- The next day, remove the chicken from the brine, allowing any excess water to drain. Do not rinse the chicken.
- Prepare the Piri-Piri sauce: In a food processor, combine the peeled garlic cloves, lemon pieces (ensure no seeds), white vinegar, bird’s eye chilies, chopped coriander, smoked paprika, sugar, salt, black pepper, and olive oil. Process until a relatively smooth paste forms.
- Preheat your grill or oven to medium-high heat. Generously slather the Piri-Piri sauce all over the chicken, ensuring it’s well coated. Alternatively, for grilling, use a bunch of parsley as a basting brush to apply the sauce.
- Cook the chicken, turning every 10-15 minutes, basting frequently with additional Piri-Piri sauce, until it’s cooked through and develops a beautiful char on the exterior. Aim for an internal temperature of 165°F (74°C).
- Allow the chicken to rest for 10 minutes before carving and serving, ensuring the juices redistribute for maximum tenderness.
Notes
- Adjust the number of chilies based on your preferred level of heat.
- Spatchcocking the chicken helps it cook evenly and quickly.
- The brine enhances flavor and tenderness; do not skip this step.
- Use a meat thermometer to ensure the chicken reaches the safe internal temperature.
Ingredients to make Peri-Peri Chicken Portuguese Style
I select ingredients carefully for Peri-Peri Chicken Portuguese Style. They balance heat, acidity, and smokiness well. This infuses the chicken deeply. I always choose fresh chilies. Quality olive oil is key too. Together, they create an authentic Portuguese feel. The taste becomes truly vibrant.
- Whole chicken: Spatchcocked for even cooking and quicker grilling.
- Salt: Essential for the brine to tenderize and season the meat overnight.
- Water: Used in the brine, half boiling to dissolve salt and half cold with ice for cooling.
- Garlic cloves: Peeled and blended into the sauce for aromatic depth.
- Lemon: Cut into pieces and processed into the sauce for bright, tangy notes; remove seeds first.
- White vinegar: Adds acidity to the piri-piri sauce for balance.
- Bird’s eye chilies: Provides the signature spicy heat; adjust number for your tolerance.
- Fresh coriander leaves: Finely chopped for a fresh, herbal layer in the sauce.
- Smoked paprika: Gives the sauce its smoky essence and vibrant color.
- Sugar: Balances the heat and acidity in the piri-piri mixture.
- Black pepper: Seasons the sauce with a subtle kick.
- Olive oil: Binds the sauce and helps it coat the chicken evenly.
- Bay leaves: Infuses subtle earthy flavor into the sauce during blending.
How to Make Peri-Peri Chicken Portuguese Style
Step 1: Prepare the Brine
I start by preparing the brine. First, dissolve ½ cup salt in half the boiling water. Once dissolved, add the remaining cold water and ice. Cool it down completely. Then, submerge the spatchcocked whole chicken fully. Ensure it’s covered. Refrigerate overnight. This step maximizes tenderness. It infuses deep flavor too.
Step 2: Remove and Drain Chicken
The next day, I remove the chicken from the brine. I let excess water drain naturally. Importantly, I skip rinsing. This preserves the seasoned brine on the surface. As a result, the taste improves greatly.
Step 3: Make the Piri-Piri Sauce
Now, I make the piri-piri sauce. In a food processor, I combine peeled garlic cloves. I add lemon pieces without seeds. Next, include white vinegar, bird’s eye chilies, chopped coriander, smoked paprika, sugar, salt, black pepper, olive oil, and bay leaves. Process until a smooth paste forms. This sauce is the dish’s heart. It provides spicy and smoky layers.
Step 4: Preheat and Coat the Chicken
I preheat the grill or oven to medium-high. Then, I slather the sauce generously over the chicken. Coat all sides well. For grilling, I sometimes use parsley as a basting brush. This ensures even application.
Step 5: Cook the Chicken
I grill or bake the chicken now. Turn it every 10-15 minutes. Baste frequently with more sauce. Continue until internal temperature hits 165°F. Look for a charred exterior too. Total time is about 45-60 minutes. So, it cooks through safely.
Step 6: Rest and Serve
After cooking, I let the chicken rest 10 minutes. This allows juices to redistribute. As a result, each slice stays juicy. It remains flavorful when carved.
Pro Tips for Success
- Adjust Chili Heat: I start with fewer bird’s eye chilies if spice-sensitive. Then, I taste the sauce before coating. This lets me fine-tune perfectly.
- Spatchcock for Evenness: Flattening the chicken helps a lot. It promotes uniform cooking. Plus, it reduces grill time noticeably.
- Don’t Skip Brining: The overnight soak is crucial. It creates tender, flavorful meat. So, plan ahead. Avoid dry results that way.
- Use a Thermometer: I always check for 165°F internally. This guarantees safety. Yet, it prevents overcooking the juicy interior.

How to Serve Peri-Peri Chicken Portuguese Style
Garnishes
I like to sprinkle fresh chopped coriander on top. It adds a bright, herbaceous finish. This cuts through the spice nicely. Additionally, a squeeze of extra lemon brings zing. Some charred lemon halves on the side work well. They add smoky aroma to every plate.
Side Dishes
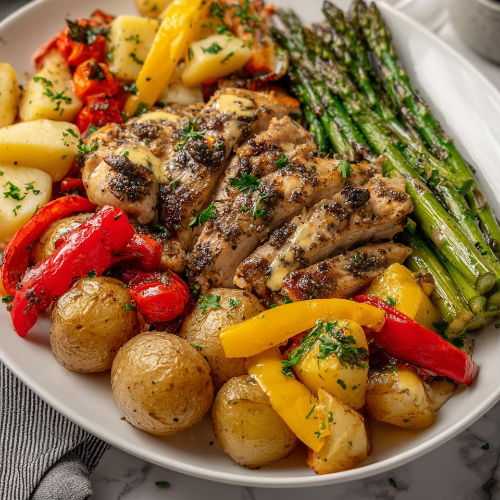
I pair Peri-Peri Chicken Portuguese Style with grilled corn on the cob. It provides sweet contrast to the heat. Or, I choose a simple green salad with vinaigrette. This refreshes the palate effectively. Roasted potatoes are another favorite. They absorb the sauce beautifully. The meal becomes hearty but light.
Creative Ways to Present
For family-style, I carve the chicken first. Then, I arrange it on a wooden board. I place extra piri-piri sauce in a small bowl for dipping. The golden, charred skin looks inviting. Adding lime wedges enhances it. This creates a cozy, vibrant presentation.
Make Ahead and Storage
Storing Leftovers
I store leftover Peri-Peri Chicken Portuguese Style in an airtight container. I keep it in the fridge. It stays good for up to three days. This makes quick lunches easy. The flavor doesn’t fade at all.
Freezing
I portion the cooked chicken into freezer bags. I flatten them to save space. Then, I freeze for up to two months. Later, I thaw overnight in the fridge. This keeps tenderness intact. You enjoy it just as fresh.
Reheating
I reheat in a 350°F oven. Cover with foil for 10-15 minutes. This prevents drying out. Or, use the microwave in short bursts. Place a damp paper towel over it. The sauce retains moisture well. So, the char stays perfect too.