
The air is just starting to crisp, a tell-tale sign that fall is whispering around the corner, and suddenly, an undeniable craving for something warm, spiced, and comforting hits. It’s not quite time for a full-blown baking extravaganza, but that desire for a cozy, pumpkin-infused treat is real. This is precisely when the magic of a Pumpkin Mug Cake reveals itself – a single-serving wonder that materializes in minutes, satisfying that seasonal yearning almost instantly.
This Pumpkin Mug Cake is your personal, speedy solution to those “I need something sweet and autumnal now” moments. It’s a beautifully simple concoction of pantry staples, transformed in your microwave into a warm, moist, and delightfully spiced cake. Perfect for a quick weeknight indulgence, a solo movie night treat, or even a fun little baking project with the kids, this recipe brings the essence of fall baking right to your favorite mug, no fuss required.
Why You’ll Love This Recipe
- Speedy Satisfaction: Got five minutes? That’s practically all you need to whip up and “bake” this Pumpkin Mug Cake. It’s the ultimate quick fix for dessert emergencies or sudden pumpkin spice cravings.
- Perfectly Portioned: Say goodbye to leftover cake tempting you for days. This recipe makes a generous single serving, so you can indulge without overdoing it. It’s ideal for solo treat moments.
- Fall Flavors on Demand: All the comforting spices of autumn – cinnamon and pumpkin pie spice – meld beautifully with the earthy sweetness of pumpkin. This Pumpkin Mug Cake delivers that quintessential fall experience any time you want it.
- Minimal Cleanup: One mug, a fork for mixing, and your microwave. That’s it! Forget piles of baking pans and bowls; this is as low-mess as it gets.
- Customizable Fun: While delicious as is, this Pumpkin Mug Cake is a fantastic base for your favorite additions. Chocolate chips, a dollop of whipped cream, a sprinkle of nuts – make it your own!
Ingredients for Pumpkin Mug Cake
Let’s gather what you’ll need to create this delightful single-serving treat. You likely have most of these ingredients already on hand, especially during pumpkin season!
Core Ingredients
- ¼ cup all-purpose flour: This provides the structure for our Pumpkin Mug Cake. Standard all-purpose works perfectly.
- 3 tablespoons granulated sugar: For sweetness, of course! Adjust slightly to your preference if you like things more or less sweet.
- ⅛ teaspoon ground cinnamon: A classic warm spice that pairs beautifully with pumpkin.
- ¼ teaspoon pumpkin pie spice: This blend is the heart of the fall flavor! It typically includes cinnamon, nutmeg, ginger, and cloves.
- ¼ teaspoon baking powder: This is our leavening agent, giving the Pumpkin Mug Cake its fluffy lift. Make sure it’s fresh for the best rise.
- Pinch of salt: Just a tiny bit to balance the sweetness and enhance the other flavors.
- 2 tablespoons milk: Any kind of milk works – dairy (whole, 2%, skim) or non-dairy (almond, soy, oat). This adds moisture.
- 1 tablespoon canned pumpkin: Not pumpkin pie filling! We want pure pumpkin puree for that authentic flavor and lovely texture.
- 1 tablespoon melted butter: Adds richness and flavor. You can use salted or unsalted; if using salted, you might want to slightly reduce the pinch of salt.
- Dash of vanilla extract: A little vanilla enhances all the other flavors in the Pumpkin Mug Cake.
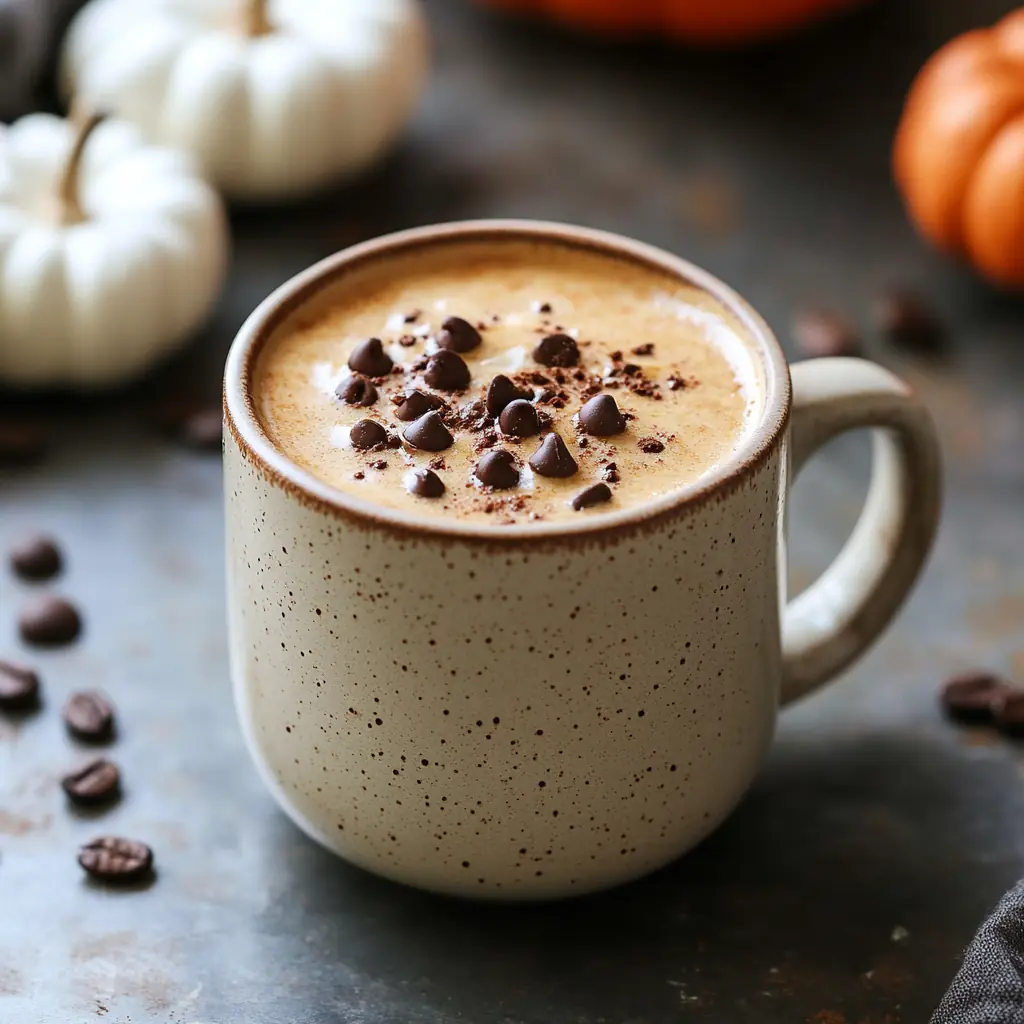
- 1 tablespoon chocolate chips (optional): For those who love a little chocolate with their pumpkin. Semi-sweet, milk, or dark chocolate chips all work well.
Substitutions and Tips
- Flour: For a gluten-free Pumpkin Mug Cake, you can try a 1:1 gluten-free baking flour blend. The texture might be slightly different but still delicious.
- Sugar: Brown sugar can be substituted for a molasses-y depth of flavor. You could also use coconut sugar.
- Spices: If you don’t have pumpkin pie spice, you can make your own blend! A common mix is 4 parts cinnamon, 2 parts ginger, 1 part nutmeg, and 1 part allspice or cloves. For this recipe, a generous pinch of each should do.
- Milk: As mentioned, any milk works. Water can even be used in a pinch, though the cake might be slightly less rich.
- Butter: Melted coconut oil can be used as a dairy-free alternative to butter. The flavor will be slightly different but still lovely. Applesauce can also be a substitute for a lower-fat version, though the texture will be a bit denser. Chef’s Insight: Using melted butter gives the richest flavor and best crumb for this Pumpkin Mug Cake.
- Pumpkin Puree: Ensure you are using 100% pure pumpkin puree, not pumpkin pie filling, as the latter is pre-sweetened and spiced.
- Add-ins: Besides chocolate chips, consider adding a pinch of chopped pecans or walnuts for crunch, or even a swirl of cream cheese frosting after “baking” for an extra decadent Pumpkin Mug Cake.
Best Type of Canned Pumpkin to Use
When you’re standing in the baking aisle, faced with various pumpkin options, reaching for the right one is key to the success of your Pumpkin Mug Cake. You’ll want to pick up 100% pure pumpkin puree. This is simply cooked and mashed pumpkin, with no added sugars, spices, or other ingredients. It allows you to control the sweetness and the spice level of your cake perfectly.
Avoid “pumpkin pie filling” or “pumpkin pie mix.” These products come pre-sweetened and pre-spiced, designed to be poured directly into a pie crust. While convenient for pies, they won’t work as well for this Pumpkin Mug Cake recipe because the sugar and spice ratios will be off, and the texture might be different.
Look for brands that have a smooth, consistent texture and a vibrant orange color. Some well-known brands consistently deliver great quality, but store brands can also be excellent. The key is “pure pumpkin.” If you happen to have leftover homemade pumpkin puree from roasting a sugar pumpkin, that would be absolutely fantastic and would lend an even fresher flavor to your Pumpkin Mug Cake. Just make sure it’s pureed smooth and isn’t too watery. If it seems very wet, you can blot it gently with a paper towel or let it drain in a fine-mesh sieve for a little while.
Using good quality, pure pumpkin puree will ensure your Pumpkin Mug Cake has that authentic, comforting pumpkin flavor we all crave, especially when the weather turns cool.
Kitchen Tools You’ll Need
One of the beauties of a Pumpkin Mug Cake is its simplicity, and that extends to the equipment. You don’t need any fancy gadgets!
Must-Have Tools
- A Microwave-Safe Mug: This is your baking vessel! Choose a standard-sized mug, around 10-12 ounces. Make sure it’s microwave-safe to avoid any accidents. A wider mug can sometimes cook more evenly than a tall, narrow one.
- Measuring Spoons and Cups: For accurate measurement of your ingredients. Baking is a science, even for a simple Pumpkin Mug Cake!
- A Fork or Small Whisk: For mixing the batter right in the mug. A fork works perfectly well.
- Microwave Oven: The “oven” for our quick cake.
Nice-to-Have Extras
- Small Bowl (optional): While you can mix everything directly in the mug (and I often do to save on dishes!), some people find it easier to mix the dry ingredients in a small bowl first, then add the wet ingredients and combine, before pouring into the mug. This can sometimes help ensure everything is thoroughly mixed without overmixing.
- Spatula (optional): A small silicone spatula can be handy for scraping down the sides of the mug or bowl to ensure all the batter is incorporated.
- Oven Mitt or Pot Holder: The mug can get quite hot in the microwave. It’s always a good idea to have something to protect your hands when removing it.
That’s truly it! This Pumpkin Mug Cake recipe is designed for ease and minimal fuss, so you can get to enjoying your warm, spiced treat as quickly as possible.
How to Make Pumpkin Mug Cake

Ready for the easiest cake you’ll ever “bake”? Let’s walk through it step-by-step. This Pumpkin Mug Cake comes together in a flash!
Step 1: Combine Dry Ingredients
In your microwave-safe mug (at least 10-12 ounce capacity), add the all-purpose flour, granulated sugar, ground cinnamon, pumpkin pie spice, baking powder, and pinch of salt. Use a fork to whisk these dry ingredients together thoroughly. You want to make sure the baking powder and spices are evenly distributed – this is key for a well-risen and uniformly flavored Pumpkin Mug Cake.
Pro-Chef Tip: Whisking the dry ingredients first prevents clumps and ensures the leavening agent is dispersed, which helps your mug cake rise evenly.
Step 2: Add Wet Ingredients
To the mug with the dry ingredients, add the milk, canned pumpkin, melted butter, and vanilla extract.
Sensory Cue: You’ll see the vibrant orange of the pumpkin and smell the sweet aroma of vanilla starting to mingle with the spices.
Step 3: Mix Thoroughly
Using your fork, mix all the ingredients together until just combined and no dry streaks of flour remain. Be careful not to overmix; mix just until everything comes together into a smooth batter. Scrape the sides and bottom of the mug to ensure all ingredients are incorporated.
Pro-Chef Tip: Overmixing can lead to a tougher cake. Mix until the ingredients are just blended for the most tender Pumpkin Mug Cake. The batter will be fairly thick.
Step 4: Stir in Optional Chocolate Chips
If using, gently fold in the chocolate chips. You can leave a few to sprinkle on top if you like.
Step 5: Microwave
Place the mug in the center of your microwave. Microwave on high power for 70 to 90 seconds. Microwave times can vary depending on the wattage of your microwave and the size/shape of your mug.
Start with 70 seconds. The Pumpkin Mug Cake is done when it’s puffed up and the surface looks mostly dry. A toothpick inserted into the center should come out with a few moist crumbs, but not wet batter.
Sensory Cue: As it cooks, you’ll start to smell the wonderful aroma of baked pumpkin and spices filling your kitchen! You might see the cake rise quite a bit – don’t worry, it will settle slightly once cooked.
Pro-Chef Tip: It’s better to slightly undercook than overcook a mug cake, as overcooking can make it rubbery. If it still looks wet in the center after 70-80 seconds, add another 10-15 seconds and check again.
Step 6: Cool Slightly and Enjoy
Carefully remove the mug from the microwave – it will be hot! Let the Pumpkin Mug Cake cool for a minute or two before diving in. This allows the cake to finish setting up and prevents you from burning your mouth.
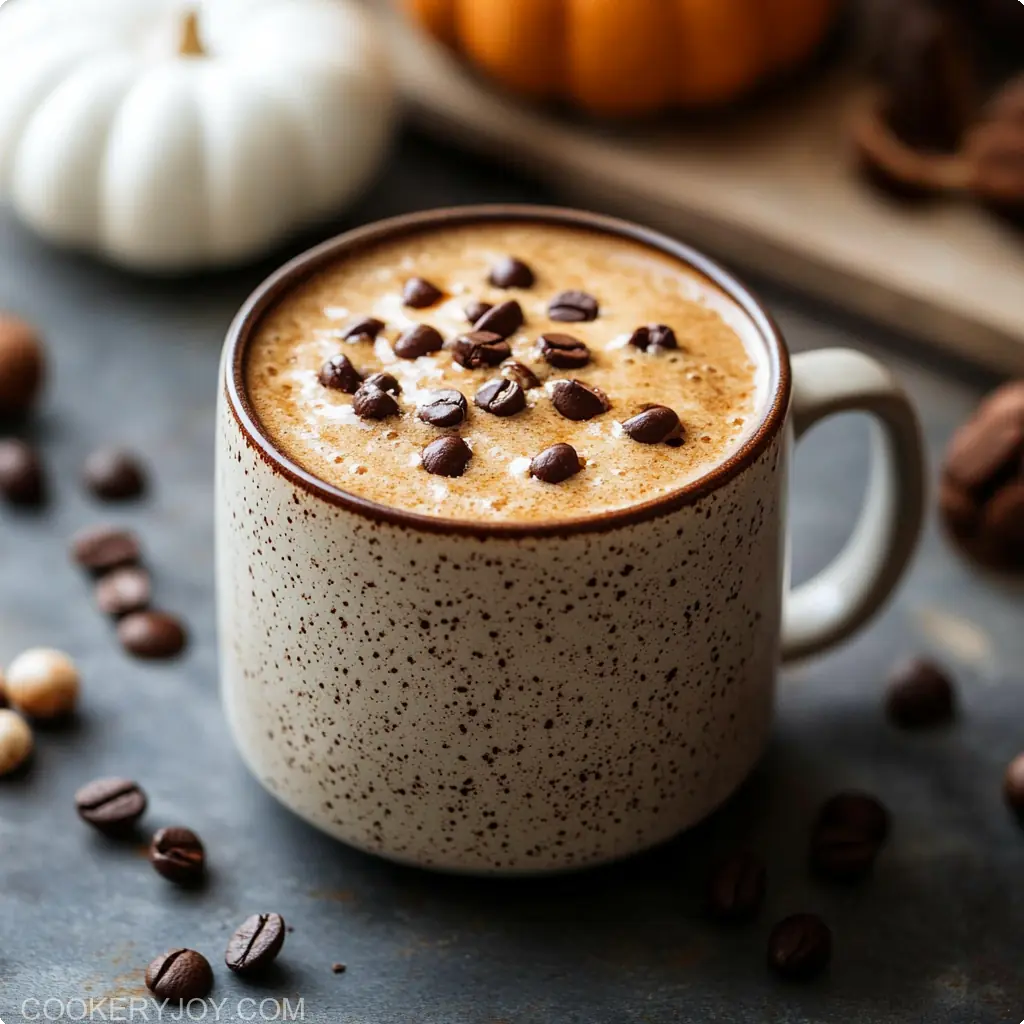
You can enjoy it straight from the mug. For an extra treat, top with a dollop of whipped cream, a sprinkle of cinnamon, or a drizzle of caramel sauce.
Enjoy your incredibly easy and delicious homemade Pumpkin Mug Cake!
Tips for Success
To ensure your Pumpkin Mug Cake turns out perfectly every single time, keep these simple tips in mind:
- Use a Properly Sized, Microwave-Safe Mug: A standard coffee mug (around 10-12 ounces) is ideal. If your mug is too small, the batter could overflow. If it’s too large, the cake might cook unevenly or end up a bit flat. Always ensure your mug is labeled microwave-safe.
- Don’t Overmix the Batter: Mix the wet and dry ingredients until just combined. Overmixing develops the gluten in the flour, which can lead to a tough or rubbery Pumpkin Mug Cake. A few small lumps are perfectly fine.
- Know Your Microwave’s Wattage (or Test Carefully): Microwave cooking times are estimates because wattage varies. Higher wattage microwaves will cook faster. If you’re unsure, start with the lower end of the recommended cooking time (e.g., 70 seconds for this Pumpkin Mug Cake) and add 10-15 second increments if needed. It’s better to slightly undercook and add more time than to overcook it from the start.
- Measure Ingredients Accurately: While it’s a simple recipe, accurate measurements, especially for the baking powder and flour, ensure the right texture and rise for your Pumpkin Mug Cake. Too much flour can make it dry, and too little baking powder will result in a dense cake.
- Let it Cool Slightly: As tempting as it is to dig in immediately, letting your Pumpkin Mug Cake rest for a minute or two after taking it out of the microwave allows it to finish cooking from the residual heat and firm up. It also prevents a burnt tongue!
By following these pointers, you’ll be well on your way to mastering the art of the perfect, cozy Pumpkin Mug Cake.
How to Store Pumpkin Mug Cake
Honestly, a Pumpkin Mug Cake is at its absolute best when enjoyed fresh and warm, straight from the microwave. It’s designed as a single serving for immediate gratification. However, if you somehow find yourself with leftovers (perhaps you made two, just in case?), here’s how to handle them:
Room Temperature:
If you plan to eat it within an hour or two, you can leave the Pumpkin Mug Cake in its mug at room temperature, perhaps loosely covered with a napkin. However, because it contains milk and pumpkin, it’s not ideal to leave it out for much longer than that for food safety reasons.
In the Refrigerator:
If you need to store it for longer, allow the Pumpkin Mug Cake to cool completely in the mug. Once cooled, cover the mug tightly with plastic wrap or transfer the cake to an airtight container. It can be stored in the refrigerator for up to 2 days.
To reheat, you can microwave it in 15-20 second intervals until warmed through. Be aware that the texture might not be quite as light and fluffy as when freshly “baked,” as microwaved cakes can sometimes become a bit denser upon chilling and reheating.
Freezing Tips:
Freezing a Pumpkin Mug Cake is generally not recommended. The charm of a mug cake lies in its instant, fresh-baked quality. Freezing and thawing can significantly alter the texture, making it a bit soggy or rubbery. Given how quick and easy it is to make a fresh Pumpkin Mug Cake, it’s best to whip one up when the craving strikes rather than trying to freeze it. If you absolutely must, you could try freezing it in its mug (once cooled and well-wrapped), but thaw it in the refrigerator and reheat gently, keeping expectations modest for the texture.
Chef’s Insight: For the ultimate Pumpkin Mug Cake experience, always aim to make it fresh. It takes mere minutes and the taste and texture are unparalleled right after it’s cooked.
FAQs
Here are some common questions about making this easy Pumpkin Mug Cake:
Can I make this Pumpkin Mug Cake gluten-free?
Yes, you can substitute the all-purpose flour with a good quality 1:1 gluten-free baking blend. The texture might be slightly different, but it should still yield a delicious gluten-free Pumpkin Mug Cake.
I don’t have pumpkin pie spice. What can I use instead?
If you don’t have pumpkin pie spice, you can make a quick substitute. For this single-serving Pumpkin Mug Cake, try using about ⅛ teaspoon of cinnamon, a tiny pinch of nutmeg, a tiny pinch of ground ginger, and an even tinier pinch of ground cloves or allspice. Adjust to your taste!
My mug cake was rubbery. What did I do wrong?
A rubbery Pumpkin Mug Cake is usually the result of overmixing the batter or overcooking it in the microwave. Mix the ingredients only until they are just combined, and be careful not to microwave it for too long. Start with the lower end of the recommended cooking time and add more in small increments if needed.
Can I use fresh pumpkin puree instead of canned?
Absolutely! If you have homemade pumpkin puree, that would be wonderful. Just ensure it’s thick and not too watery. If it seems very wet, you might want to blot it with a paper towel or strain it slightly to achieve a consistency similar to canned pumpkin puree for the best Pumpkin Mug Cake results.
What if I don’t have butter?
You can substitute the melted butter with an equal amount of melted coconut oil for a dairy-free option, which works quite well in a Pumpkin Mug Cake. For a lower-fat version, you could try unsweetened applesauce, though the texture will be a bit denser and less rich.
Can I bake this Pumpkin Mug Cake in the oven?
This recipe is specifically designed for the microwave for speed and convenience. While you could technically bake it in a small, oven-safe ramekin, the baking time and temperature would need significant adjustment (likely around 350°F or 175°C for 15-20 minutes), and the texture might differ from the intended microwaved Pumpkin Mug Cake.
Conclusion
When that craving for something warm, spiced, and comforting hits, there’s hardly a more satisfying or quicker solution than this Pumpkin Mug Cake. It’s a delightful little treat that brings all the cozy flavors of fall right into your hands in mere minutes. Whether you’re seeking a quick dessert for one, a simple treat to make with kids, or just an easy way to enjoy seasonal flavors without a big baking project, this Pumpkin Mug Cake recipe is a true winner. Give it a try, and you’ll see just how easy it is to whip up a moment of pure autumnal bliss.


