I love the crisp, tangy bite of pickled cauliflower. It transforms simple meals into something special. And it fits perfectly into my busy schedule with a hands-off approach. This quick refrigerator pickle uses everyday ingredients. Think fresh cauliflower florets and a spiced vinegar brine. They create a vibrant, flavorful condiment. It’s ready after just a couple of days in the fridge. The bright flavors and easy prep make it my go-to. I add zest without the fuss of traditional canning.
As a busy mom and professional, I truly appreciate pickled cauliflower. It stores effortlessly in the refrigerator for weeks. I pull out a jar whenever I need a healthy snack or side. It pairs beautifully with everyday dishes. From salads to charcuterie boards, it works great. Plus, its low-calorie profile keeps things light. Friends always rave about the fresh, homemade taste. It elevates my weeknight dinners so easily.
Why I Love This Recipe
This pickled cauliflower recipe has become my go-to for effortless flavor boosts. I turn to it often in the kitchen. And trust me, as a busy mom juggling work and family, that means a lot.
Its quick prep time of just 15 minutes fits perfectly into my hectic evenings. I can whip it up without sacrificing taste. The tangy brine infuses the crisp florets beautifully in a few days. Best of all, no canning required. That saves me time and hassle on those long days.
I truly appreciate its versatility too. It adds that welcome crunch to salads, sandwiches, or even as a simple snack. Guests always love it. Meanwhile, it keeps things healthy and vegan-friendly for everyone. Picky eaters in my house? They sneak bites anyway because of the fun tang.
Plus, using simple pantry staples makes it so budget-friendly. It’s reliable for those rushed weeknights when I need something quick. The comforting spice blend brings just the right warmth. It never overwhelms. Instead, this pickled cauliflower creates an exciting yet approachable condiment. I reach for it daily to brighten meals without extra effort.
Pickled Cauliflower Ingredients
These ingredients come together for a balanced, tangy pickled cauliflower. It’s crisp and full of flavor. The vinegar provides acidity, while spices add depth. I always opt for fresh, high-quality produce. Firm cauliflower ensures the best texture and taste. It elevates this simple condiment easily.
- Cauliflower: It forms the crisp, absorbent base. This soaks up the tangy brine perfectly. You get that satisfying crunch every time.
- Cider vinegar: It delivers essential acidity. This preserves and infuses bright, apple-tinged tanginess. I love how it brightens everything without being too sharp.
- Water: It dilutes the vinegar nicely. This creates a milder brine. It coats the florets evenly without overpowering them at all.
- Pickling salt: It enhances flavor preservation. Plus, it draws out moisture for better results. I use fine sea salt if pickling salt isn’t handy.
- Granulated sugar: It balances the acidity well. Just a subtle sweetness rounds out the overall taste. No one notices, but it makes a difference.
- Pickling spice blend: It adds aromatic warmth and complexity. Think notes of cloves, mustard seed, and coriander. This is where the fun flavor comes from.
The complete list of ingredients and exact measurements can be found in the printable recipe card at the bottom of the post.
Kitchen Tools You’ll Need
I keep things simple for this pickled cauliflower recipe. You won’t need fancy equipment. Just basic tools from your kitchen will do the trick. As a busy mom, I love that. It means less time hunting for gadgets and more time enjoying the results.
Here’s what you’ll need to get started. These items make prep easy and prevent any frustration during busy evenings.
- Clean mason jar or glass container with tight lid: Essential for safe pickling. It holds the brine and florets securely. No mason jar? Any heat-safe jar works fine as an alternative.
- Sharp knife and cutting board: Perfect for prepping cauliflower florets evenly. This ensures quick cuts without sore hands from dull blades.
- Small saucepan: Ideal to heat the brine gently. If you don’t have one, a small pot does the job just as well.
- Wooden spoon or chopstick: Great for stirring the brine and removing air bubbles later. I always have chopsticks handy from takeout nights.
- Measuring cups and spoons: Key for accurate brine ratios. They help everything dissolve smoothly without guesswork.
These basics make the whole process straightforward. No extra gadgets required. You’ll whip up pickled cauliflower in no time, even on a tiring day.
How to Make Pickled Cauliflower
Step 1: Prepare the Jar
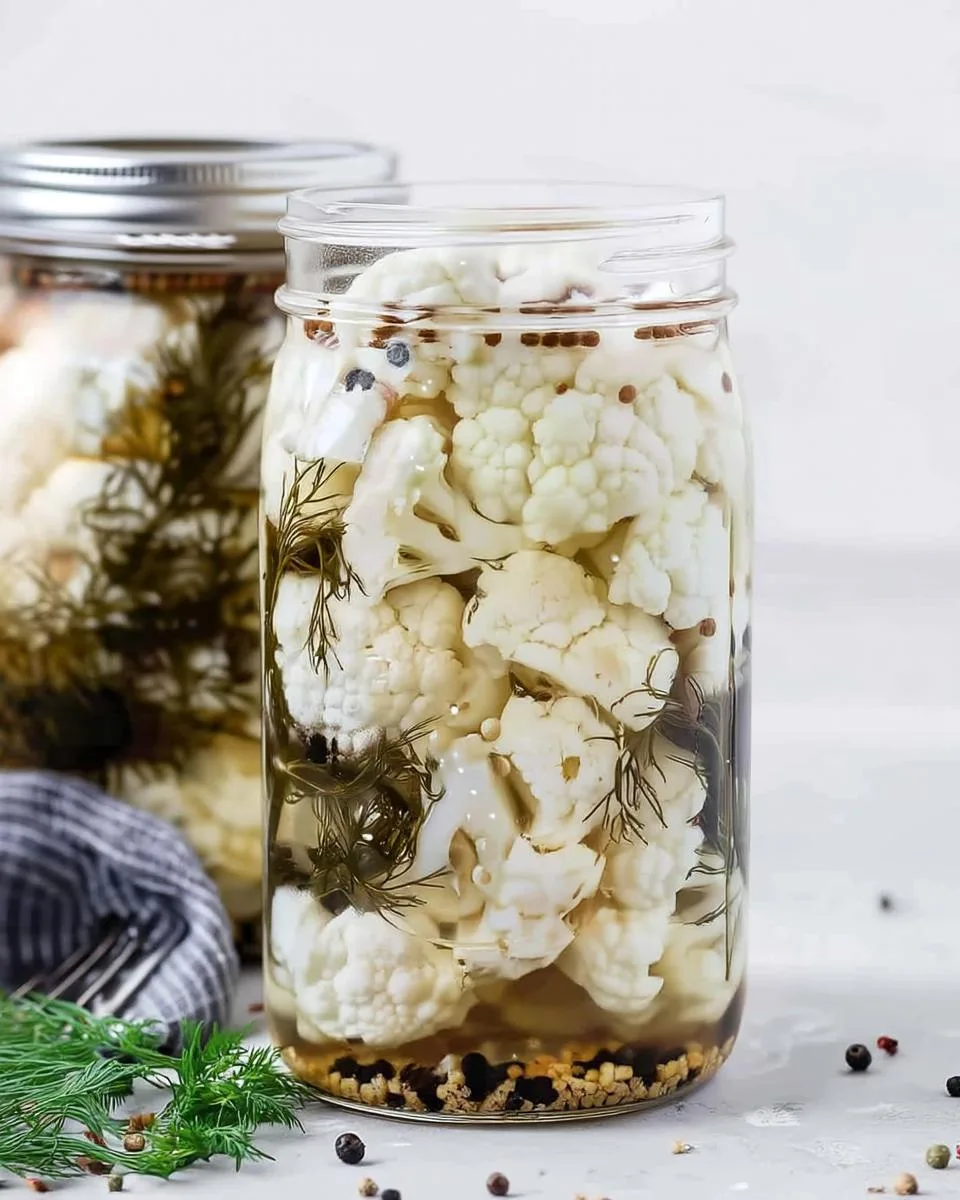
I always start by ensuring my mason jar is clean and sterilized. This prevents spoilage in my pickled cauliflower. First, wash it thoroughly with hot, soapy water. Then, rinse well. Place the pickling spice blend at the bottom. It allows even flavor distribution as the brine soaks in. This simple setup takes just a minute. It sets the foundation for successful quick pickling. No fuss, just reliable results for busy days.
Step 2: Cut and Pack the Cauliflower
Next, cut the cauliflower head into small, bite-sized florets. Choose pieces that fit comfortably in the jar. Pack them in tightly but gently. Fill the space without crushing the florets. This leaves room for the brine to fully submerge everything. Aim for uniform pieces always. They ensure even pickling and a nice crunch. Your refrigerator pickle will turn out perfect every time. I love how this step keeps things prep simple.
Step 3: Prepare the Brine
Now, in a small saucepan, combine the cider vinegar, water, pickling salt, and granulated sugar. Bring the mixture to a low boil over medium heat. Stir until the salt and sugar fully dissolve. This creates a smooth, seasoned liquid. The quick step takes about 5 minutes. It infuses the pickled cauliflower with bold, tangy flavors. Plus, the aroma fills my kitchen with promise of what’s to come.
Step 4: Pour, Seal, and Cool
Carefully pour the hot brine over the packed cauliflower. Ensure all florets are submerged with about 1/4 inch headspace. Use a chopstick to release trapped air bubbles. Add more brine if needed. Then, screw on the lid tightly. Let the jar cool to room temperature on the counter. This starts the flavor development before refrigerating. It’s hands-off, which suits my schedule perfectly.
Step 5: Refrigerate for Flavor
Finally, transfer the sealed jar to the refrigerator. Allow it to sit for at least two days. This brings out the best taste in your pickled cauliflower. The tangy, spiced profile develops over time. It stays fresh for several weeks too. So, it’s a convenient make-ahead condiment. I pull it out for meals, and it always adds that zesty touch effortlessly.
Tips for Success
I want your pickled cauliflower to turn out perfectly every time. So, here are my tried-and-true tips. They make the process foolproof, even on those rushed evenings when you’re short on time.
- Always use a sterilized jar. This avoids spoilage and ensures safe refrigerator pickling. I soak mine in boiling water for peace of mind.
- Choose firm, fresh cauliflower. It gives the best crisp texture that holds up in the brine. Skip the wilted ones—they lead to mushy results.
- Stir the brine thoroughly while heating. This fully dissolves salt and sugar. It prevents gritty spots that ruin the smooth tang.
- Adjust the pickling spice amount slightly. Do this for milder or bolder flavors based on your taste. My family prefers a bit less heat sometimes.
- Let it pickle for the full two days minimum. The wait enhances that tangy depth without extra effort. Patience pays off here, trust me.
- If bubbles persist after pouring, gently tap the jar. This releases them for proper submersion. No big deal, just a quick fix.
Follow these, and your pickled cauliflower will be a hit. It’s simple tweaks that save frustration and boost flavor for busy days like yours.
How to Store Pickled Cauliflower
I always store my pickled cauliflower in the refrigerator right after it cools to room temperature. This keeps the flavors fresh and safe. Simply use the sealed jar for everything.
It will keep well for up to several weeks in there. That’s perfect for my busy schedule. I pull it out whenever I need a quick tang. But always ensure the florets stay submerged in the brine. This maintains that crispness and prevents spoilage. If the level drops, just top off with a splash of vinegar. It works every time without fuss.
For longer storage, you can freeze it too. Portion into airtight containers for up to three months. However, the texture may soften a bit upon thawing. So, I save freezing for extras I won’t use soon. As a refrigerator pickle, never leave it at room temperature. That could spoil the batch quickly.
Instead, grab it straight from the fridge for easy access. This method keeps the tangy flavors intact. I love how it fits spontaneous meals or snacks on hectic days. No extra planning needed with pickled cauliflower.
Serving Suggestions
I love how versatile this pickled cauliflower is for busy days. It adds crunch and tang without extra cooking. As a mom with picky eaters, I sneak it into meals. They enjoy the zesty bite before they realize it. Here are my favorite ways to serve it. These ideas fit right into your routine.
- Add pickled cauliflower to salads or grain bowls. It brings a crunchy, tangy contrast. This brightens fresh greens instantly. I toss it in for lunch, and it perks up boring veggies.
- Top sandwiches, burgers, or wraps with a few florets. They enhance flavors with that zesty bite. No one complains about dinner then. It’s quick and transforms ordinary meals.
- Serve it alongside cheese and crackers on a charcuterie board. This makes an easy, impressive appetizer. Guests love the homemade touch. I prepare it ahead for parties without stress.
- Mix it into tuna or potato salad for added vibrancy. You get more flavor without extra effort. Perfect for weeknight sides. My family devours it every time.
- Enjoy straight from the jar as a low-calorie snack. Grab a fork for quick energy. I reach for it when I’m short on time. It satisfies cravings healthily.
These suggestions make pickled cauliflower a staple in my kitchen. Try them, and see how it elevates your meals effortlessly.
Print
Quick Pickled Cauliflower
- Prep Time: 15 minutes
- Cook Time: 5 minutes
- Total Time: 20 minutes (plus 2 days pickling)
- Yield: 1 quart jar
- Category: Condiment
- Method: Pickling
- Cuisine: American
- Diet: Vegan
Description
A quick and easy refrigerator pickled cauliflower recipe using simple ingredients for a tangy, flavorful condiment ready in just a few days.
Ingredients
- 1 head cauliflower, cut into bite-sized florets
- 1 cup cider vinegar
- 1 cup water
- 1 tablespoon pickling salt (or fine sea salt)
- ½ teaspoon granulated sugar
- 1 tablespoon pickling spice blend
Instructions
- Ensure your mason jar or container with a tight-fitting lid is clean and sterilized.
- Place the pickling spice blend into the bottom of your chosen jar.
- Cut the cauliflower head into small, bite-sized florets. Aim for pieces that will fit comfortably in the jar and be completely submerged in the brine.
- Carefully pack the cauliflower florets into the jar, filling it as much as possible without crushing the florets.
- In a small saucepan, combine the cider vinegar, water, pickling salt (or sea salt), and granulated sugar.
- Bring the brine mixture to a low boil over medium heat, stirring consistently until both the salt and sugar have fully dissolved.
- Carefully pour the hot brine over the packed cauliflower in the jar, ensuring all the florets are completely submerged. Leave about ¼ inch of headspace from the rim of the jar.
- Use a chopstick or a thin utensil to gently press against the sides of the jar, releasing any trapped air bubbles. Add a bit more cauliflower or brine if necessary to maintain submersion.
- Screw on the lid tightly and allow the jar to cool to room temperature on your countertop.
- Once cooled, transfer the pickled cauliflower to the refrigerator. For the best flavor development, let it sit for at least two days before enjoying.
- The pickled cauliflower will keep well in the refrigerator for several weeks.
Notes
- Use a clean, sterilized jar to prevent spoilage.
- This is a refrigerator pickle and should not be processed for shelf stability.
- Adjust spice blend to taste for desired flavor intensity.
- Best enjoyed after at least two days of pickling for optimal flavor.