Skip to content

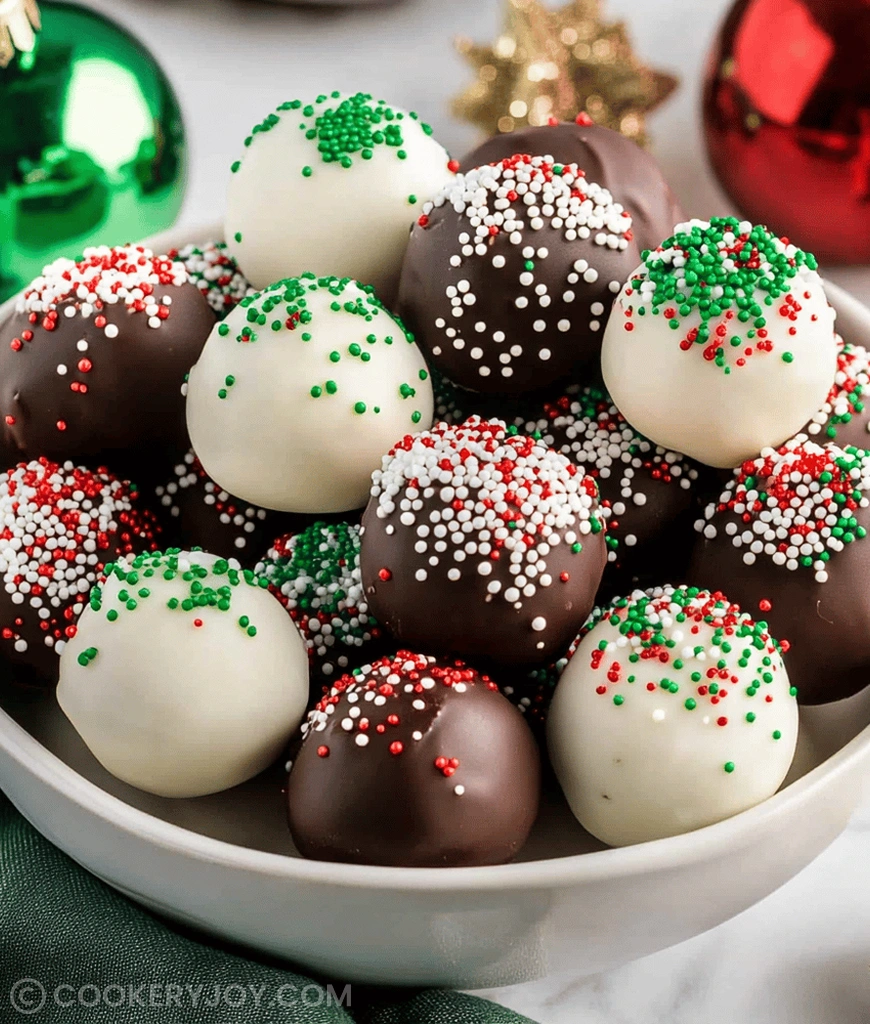
These tiny, festive treats offer the perfect balance of creamy filling and chocolate crunch. Truly, making Christmas Oreo balls brings instant holiday cheer to any kitchen counter. The rich, fudgy interior practically melts the moment it hits your tongue. Furthermore, this recipe requires absolutely no baking, saving you precious oven space.
I often make a big batch of these sweet delights for neighbor gifts. They store beautifully in the fridge, too. Honestly, they are always the first dessert to disappear from the holiday cookie platter.
Why I Love This Recipe
I adore this recipe because it simplifies holiday baking immensely. You spend less time stirring and more time celebrating. Moreover, the flavor payoff is enormous compared to the effort involved. These Christmas Oreo balls taste like pure indulgence, yet they are so simple.
- Speedy Assembly: Ready for chilling in under 25 minutes.
- Crowd-Pleaser: Universally loved by kids and adults alike.
- Make-Ahead Magic: Perfect for busy schedules.
Christmas Oreo balls Ingredients
Building these magnificent little orbs starts simply. It relies on wholesome classics creating something spectacularly festive together. Every component plays a vital role in achieving that signature texture and flavor.
- Oreo Cookies: They form the satisfying, crumbly base layer.
- Cream Cheese: This ingredient binds everything into a perfect, rollable dough.
- Melting Wafers (White or Milk): These create the essential crisp outer shell.
Substitutions and Tips
If you lack standard black Oreos, try using Golden Oreos, perhaps. For a richer coating, I sometimes mix a teaspoon of coconut oil into the wafers. This helps them melt smoothly. Remember to keep all ingredients cool before crushing them. Exact measurements always wait in the card below, dear cooks. Store leftovers airtight in the refrigerator for a week or more.
Kitchen Tools You’ll Need
You won’t need a massive arsenal here. A few simple items get the job done beautifully. Keep things streamlined for faster assembly.
- Food Processor or sturdy resealable bag plus a rolling pin for crumbs.
- Large mixing bowl for combining the dough base.
- Baking sheet lined with parchment paper for setting.
- Small microwave-safe bowl or double boiler for melting chocolate.
How to Make Christmas Oreo balls
Making delicious Christmas Oreo balls is truly straightforward. Follow these steps closely for perfect results every time. Trust me; you’ve done harder things before breakfast.
Preparing the Oreo Base
First, crush those Oreo cookies completely. Use a food processor for the finest results possible. If you lack one, don’t fret at all. Simply place them in a tough zip-top bag. Then, use a sturdy rolling pin to smash them finely.
Next, place the crumbs in your big mixing bowl. Now add the softened cream cheese. Crucially, make sure that cream cheese is truly soft. Beat them together until a firm dough forms easily. It should come together nicely when squeezed.
Rolling and Chilling the Truffles
Now it is time to shape your mixture. Scoop out small portions of the dough mixture. Roll these gently between your palms. Aim for uniform balls about one inch wide. Place these rolled portions onto your prepared baking sheet. These little dough balls need a good rest period. Chill them for at least thirty minutes in the refrigerator. Alternatively, popping them in the freezer works too. Chilling keeps them perfectly firm for dipping later.
Melting and Coating the Christmas Oreo balls
While the centers chill, melt your chocolate wafers slowly. I prefer the microwave in short bursts, stirring frequently. Be patient; chocolate burns easily, so go slow. Remove the chilled balls from the fridge just before dipping. Using a toothpick or dipping tool, submerge one truffle into the melted coating. Lift it out carefully. Let the excess chocolate drip back into the bowl.
Final Decoration and Setting
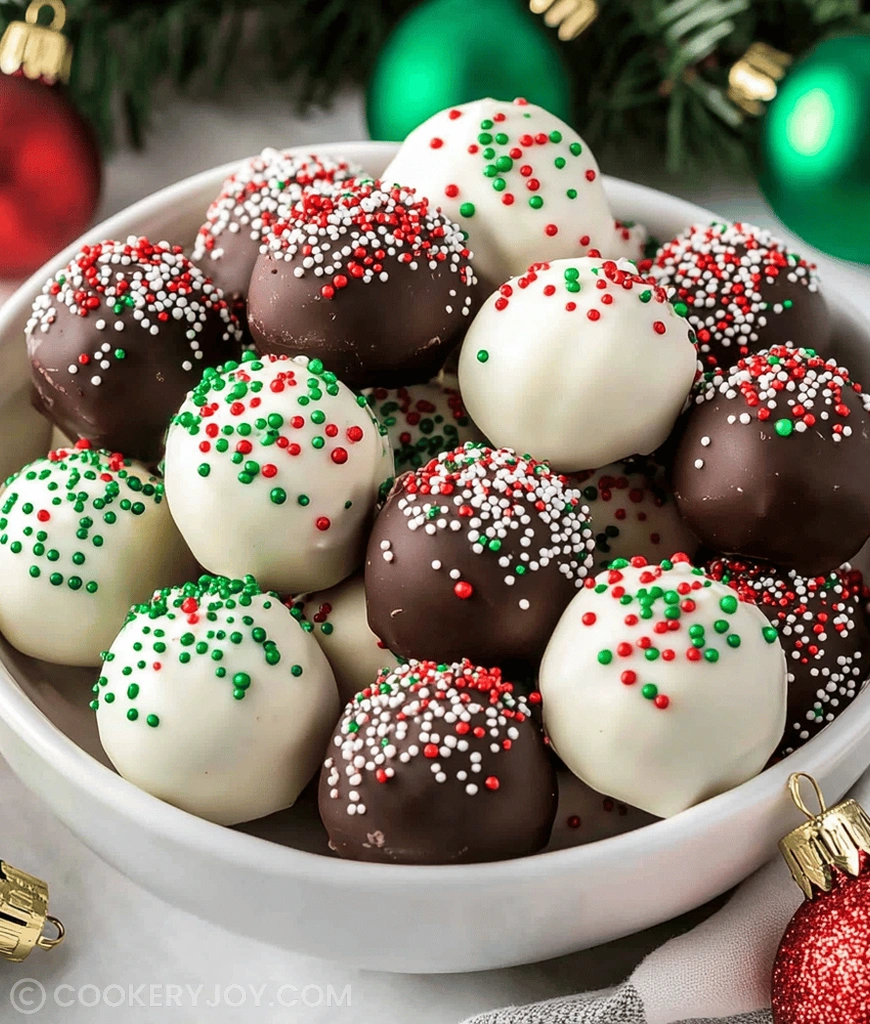
This step requires quick action, so don’t wait long. Immediately after dipping, apply your colorful festive sprinkles. The coating must still be wet for this to work well. Return the coated balls to the parchment-lined tray carefully.
They really need to set up nicely now. Refrigerate the finished Christmas Oreo balls until the chocolate hardens completely. This ensures a clean, crisp shell.
How to Store Christmas Oreo balls
Keeping these treats fresh is key for holiday enjoyment. Store your finished batch in an airtight container. Always keep them in the refrigerator until serving time. They maintain great texture for nearly a full week this way. For longer storage, these delicious little truffles freeze wonderfully. Wrap them securely before placing them in the deep freezer.
Tips for Success
A few simple secrets ensure your success every single time. Follow these quick pointers for the best batch.
- Soft Cheese is Essential: Hard cream cheese results in crumbly dough.
- Do Not Overheat Chocolate: Burnt chocolate ruins the beautiful coating layer.
- Chill, Chill, Chill: Do not skip the important chilling step beforehand.
- Work in Batches: Keep unused dough refrigerated while you dip the first set.
Serving Suggestions
Presentation definitely bumps up the holiday factor significantly. Arrange them attractively on a tiered serving platter. They pair wonderfully with warm spiced cider, for instance. Also, they look great nestled next to dark chocolate fudge. A dusting of edible glitter adds extra sparkle, too.
Print
Christmas Oreo balls
- Prep Time: 20 minute
- Cook Time: 5 minute (pentru topirea ciocolatei)
- Total Time: 35 minute (plus timp de refrigerare)
- Yield: Aproximativ 30-36 de biluțe (depinde de mărimea lor)
- Category: Desert
- Method: Fără coacere (No-Bake)
- Cuisine: American
- Diet: Vegetarian
Description
Rețetă simplă și festivă pentru biluțe de Oreo de Crăciun, perfecte pentru deserturile de sărbători.
Ingredients
- 1 pachet (14.3 uncii) de biscuiți Oreo (aproximativ 36 de biscuiți)
- 1 pachet (8 uncii) de cremă de brânză, înmuiată
- 16 uncii de fulgi de ciocolată albă sau lapte (wafers de topire)
- Ornamente de Crăciun (sprinkles), pentru decorare
Instructions
- Puneți biscuiții Oreo într-un procesor de alimente și pulsați până când sunt mărunțiți fin. Alternativ, puneți-i într-o pungă cu fermoar și zdrobiți-i cu un sucitor.
- Într-un bol mare, combinați biscuiții Oreo mărunțiți cu crema de brânză înmuiată. Amestecați bine până se combină și se formează un aluat.
- Rulați amestecul în bile de aproximativ 1 inch (2.5 cm) și așezați-le pe o tavă tapetată cu hârtie de copt.
- Refrigerați biluțele de Oreo timp de cel puțin 30 de minute sau congelați-le timp de 15 minute, până devin ferme.
- Topiți fulgii de ciocolată conform instrucțiunilor de pe ambalaj (la microunde sau la bain-marie).
- Scufundați fiecare biluță de Oreo răcită în ciocolata topită, lăsând excesul să se scurgă. Așezați-le înapoi pe tava tapetată cu hârtie de copt.
- Imediat, presărați ornamentele de Crăciun înainte ca ciocolata să se întărească.
- Refrigerați până când ciocolata este fermă. Păstrați într-un recipient etanș la frigider.
Notes
- Asigurați-vă că crema de brânză este cu adevărat înmuiată pentru a se amesteca ușor cu biscuiții.
- Puteți folosi orice tip de ciocolată doriți (albă, lapte sau neagră).
- Nu săriți peste etapa de refrigerare/congelare, deoarece ajută biluțele să își mențină forma când sunt acoperite cu ciocolată.