Skip to content

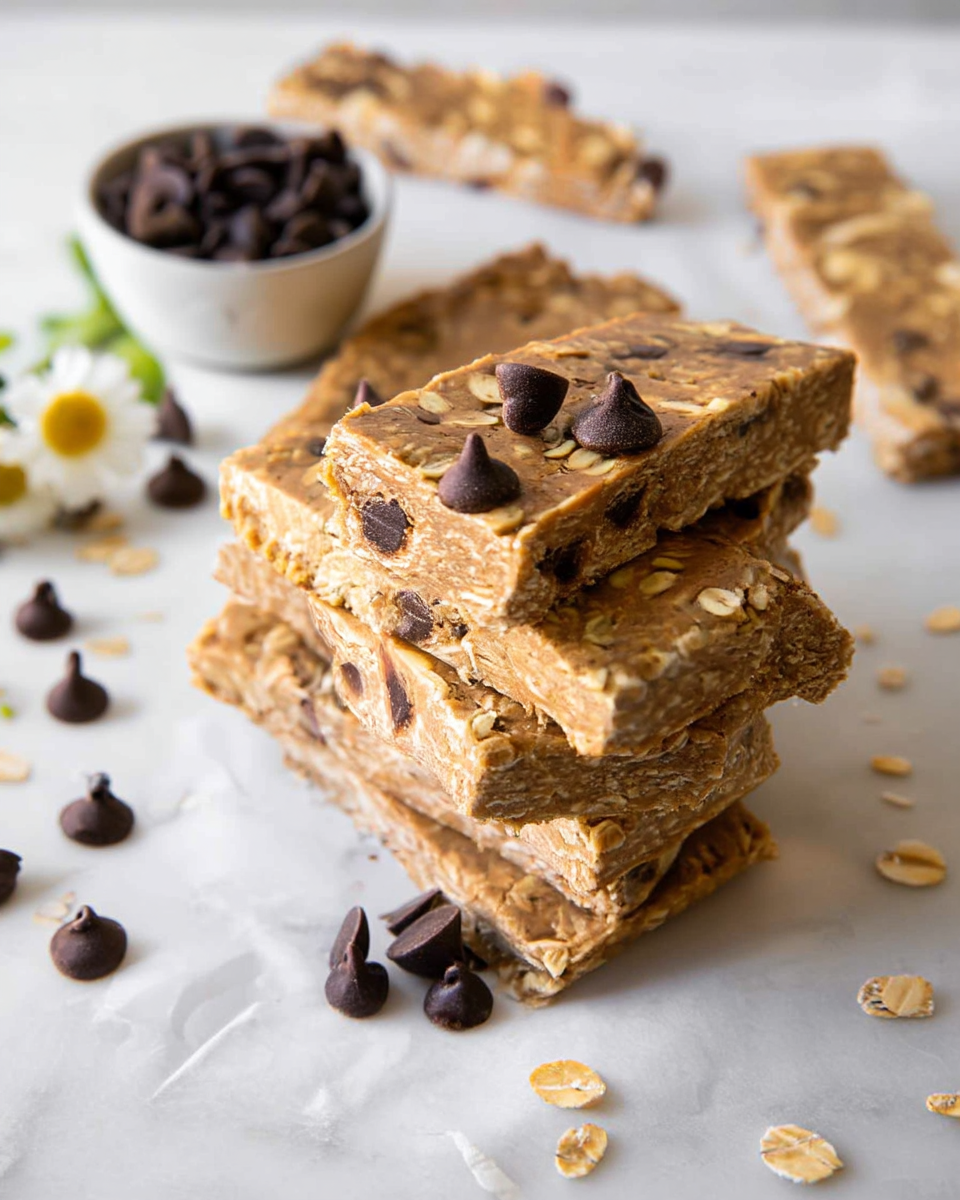
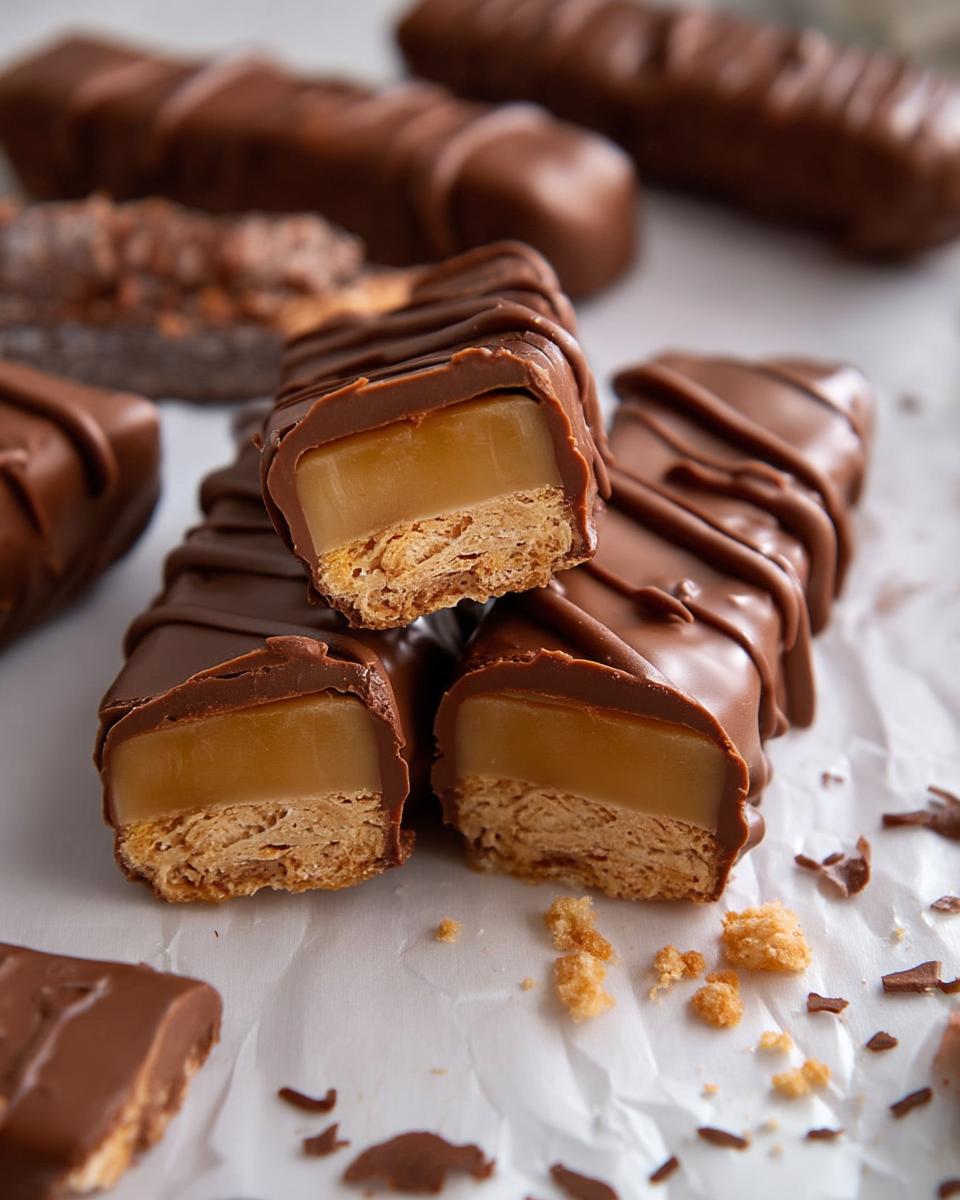
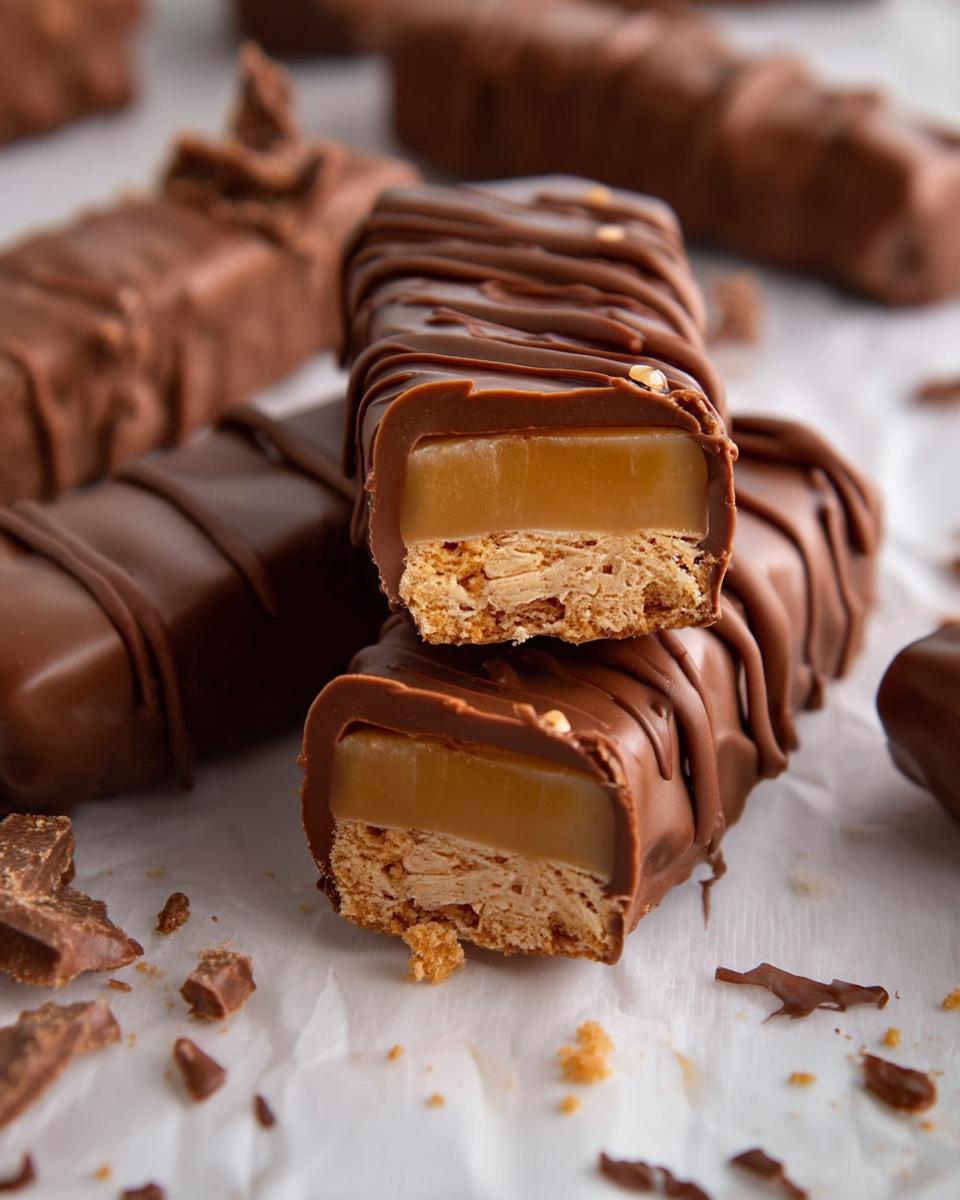
Craving a sweet treat that aligns with your fitness routine, the crisp snap of dark chocolate gives way to a chewy caramel layer in these Homemade Protein Twix Bars. They blend familiar candy flavors with wholesome ingredients. Made without baking, they come together quickly using almond flour for a nutty base and protein powder to boost satisfaction. Their layered texture offers a satisfying crunch followed by creamy indulgence.
These bars fit seamlessly into a busy schedule, whether as a post-workout snack or an afternoon pick-me-up. They hold up well in the fridge for easy grabbing. With about 8 grams of protein per bar from the vanilla protein powder and nut butter, they help curb hunger. They keep sugar in check at just 8 grams. Friends always request the recipe after trying one. They praise how it satisfies chocolate cravings without derailing health goals.
Why We Love This Recipe
- Quick No-Bake Prep: These bars assemble in under 15 minutes of active time. They fit into a packed day without needing an oven.
- Layered Flavor Balance: The nutty base pairs with smooth caramel and rich chocolate. It creates a candy-like experience that feels decadent yet controlled.
- Protein-Packed Nutrition: Each bar delivers 8 grams of protein from whey or vegan powder. It supports muscle recovery and steady energy.
- Versatile Snacking: Enjoy them chilled straight from the fridge as a portable treat. They travel well in lunch bags or gym totes.
Ingredients to Make Homemade Protein Twix Bars
The ingredients in these Homemade Protein Twix Bars create distinct layers. They mimic the classic candy bar while emphasizing nutrition. Almond flour provides a gluten-free foundation. Nut butter adds natural creaminess. Good-quality dark chocolate enhances antioxidants. The protein powder ensures each serving packs roughly 8 grams of protein for sustained fullness.
- Almond flour – forms the sturdy, nutty base that holds everything together without refined grains.
- Vanilla protein powder – adds protein boost and subtle sweetness; use whey for creaminess or vegan for plant-based option.
- Milk – binds the base mixture; any type works, including almond or oat for dairy-free.
- Nut butter – creates the gooey caramel layer; peanut for classic taste, almond or cashew as swaps.
- Liquid sweetener – sweetens the caramel naturally; honey for floral notes, maple syrup or agave for vegan.
- Salt – enhances flavors in the caramel without overpowering the sweetness.
- Dark chocolate chips – coats the bars for a glossy finish; choose refined sugar-free to keep it lower in added sugars.
- Coconut oil – thins the melted chocolate for easy dipping and helps it set smoothly.
Each serving of Homemade Protein Twix Bars provides approximately 8g of protein, 180 calories, and 2g of fiber for a balanced snack.
How to Make Homemade Protein Twix Bars
Step 1: Prepare the tin
Line a small loaf tin or 8×8-inch dish with parchment paper. Leave overhang on the sides for simple removal later. This prevents sticking. It makes handling the layers straightforward as the base sets in the freezer.
Step 2: Mix and press the base
Combine the almond flour, vanilla protein powder, and milk in a bowl. Stir with a fork or spatula until a dough forms that holds together when squeezed. Press this evenly into the bottom of the prepared tin. Form a flat layer about a quarter-inch thick. Then place it in the freezer for 10 minutes to firm up while you make the caramel.
Step 3: Prepare and add the caramel
In a separate bowl, blend the nut butter, liquid sweetener, and pinch of salt until completely smooth and glossy. Adjust sweetness if needed for your taste. Spread this mixture evenly over the chilled base, ensuring full coverage. Return the tin to the freezer for at least one hour until the caramel hardens enough to slice cleanly.
Step 4: Cut into bars
Lift the firm block from the tin using the parchment overhang. Then use a sharp knife to divide it into 16 equal small bars for bite-sized portions that mimic the original candy. Wipe the knife between cuts to keep edges neat. This prevents sticking from the caramel.
Step 5: Melt the chocolate coating
Melt the dark chocolate chips with the coconut oil in a heat-proof bowl over a double boiler. Or use the microwave in 30-second bursts, stirring after each until fully smooth and pourable. This method avoids scorching. It ensures an even consistency for coating.
Step 6: Dip and set the bars
Dip each cut bar fully into the melted chocolate. Use a fork to lift and let excess drip off before placing them on fresh parchment paper. Refrigerate or freeze the coated bars for 15-20 minutes. The chocolate hardens into a crisp shell, ready for storage.
Pro Tips for Success
- Firm Base Press: Pack the almond flour mixture tightly into the tin. This avoids crumbly bars that fall apart during dipping.
- Smooth Caramel Blend: Warm the nut butter slightly if it’s thick. This ensures the sweetener fully incorporates for a pourable texture that layers evenly.
- Even Chocolate Dip: Stir the melted coating constantly to prevent lumps. It creates a uniform shell that enhances the protein content without added fats.
- Chill Before Cutting: Freeze the layered block longer if needed. This makes slicing precise, helping maintain the 8 grams of protein per intact serving.
How to Serve Homemade Protein Twix Bars
Garnishes
I like sprinkling a few sea salt flakes on the chocolate tops right after dipping. It adds a subtle crunch that contrasts the sweetness. Or add crushed nuts like pecans for extra texture without overpowering the layers. A light dusting of cocoa powder works well too. It gives a matte finish that highlights the dark chocolate’s deep hue.
Side Dishes
Pair these bars with fresh apple slices to balance the richness with juicy tartness. Or serve alongside Greek yogurt for a creamy dip that doubles the protein intake. They also complement a handful of berries. The bright fruit notes cut through the caramel’s depth.
Creative Ways to Present
I often wrap individual bars in wax paper for a grab-and-go lunchbox treat. I stack them in a tiered platter for parties to showcase their glossy coating. For a fun twist, break one in half and layer it over ice cream scoops. Let the caramel drizzle add a melty surprise.
Make Ahead and Storage
Storing Leftovers
I keep these Homemade Protein Twix Bars in the refrigerator wrapped in parchment inside a sealed plastic container. They stay fresh for up to a week and maintain their firm texture. This approach prevents the chocolate from softening in warmer spots around the kitchen.
Freezing
For longer storage, I place the bars in a single layer on a baking sheet to freeze solid first. Then transfer them to a freezer-safe bag. This allows enjoyment for a couple of months without flavor loss. Thaw them briefly on the counter before eating to restore the ideal chewiness.
Reheating
I prefer reheating a single bar in the microwave for 10-15 seconds to soften the caramel slightly if it hardens too much. Or warm them gently in a low oven at 200 degrees Fahrenheit for a couple of minutes covered with foil. This avoids drying the chocolate. It keeps the layers intact while making them easier to bite into after freezing.
Print
Easy No Bake Homemade Protein Twix Bars Recipe
- Prep Time: 15 minutes
- Cook Time: 0 minutes
- Total Time: 1 hour 15 minutes
- Yield: 16 bars
- Category: Snacks
- Method: No Bake
- Cuisine: American
- Diet: Vegan
Description
Delicious no-bake homemade protein bars inspired by Twix, featuring a simple almond flour and protein powder base, a nut butter caramel layer, and a dark chocolate coating for a healthy snack.
Ingredients
- For the Base:
- ½ cup almond flour
- ¼ cup vanilla protein powder (whey or vegan)
- 2 tablespoons milk (any kind)
- For the Caramel:
- ½ cup nut butter (peanut, almond, or cashew)
- 2 tablespoons liquid sweetener (honey, maple syrup, or agave)
- Pinch of salt
- For the Chocolate Coating:
- ½ cup dark chocolate chips (refined sugar-free if preferred)
- 1 teaspoon coconut oil
Instructions
- Line a small loaf tin or an 8×8 inch dish with parchment paper, ensuring extra overhang for easy removal.
- For the base, combine the almond flour, protein powder, and milk in a bowl. Mix with a fork or spatula until a cohesive dough forms. Press this mixture firmly into the bottom of your prepared tin to create an even, flat layer. Place in the freezer while you prepare the caramel.
- For the caramel layer, mix the nut butter, liquid sweetener, and a pinch of salt in a separate bowl until smooth. Spread this caramel evenly over the chilled base. Return the tin to the freezer for at least one hour, or until the caramel layer is firm.
- Once firm, carefully lift the block from the tin using the parchment paper. Use a sharp knife to cut the block into 16 small bars.
- Prepare the chocolate coating by melting the dark chocolate chips and coconut oil in a heat-proof bowl. You can use a double boiler or microwave in 30-second intervals, stirring between each, until smooth.
- Dip each protein bar into the melted chocolate, ensuring it’s fully coated. Place the chocolate-dipped bars back onto parchment paper and refrigerate or freeze until the chocolate sets.
- Store the finished protein Twix bars in the refrigerator or freezer.
Notes
- Use vegan protein powder and dairy-free chocolate for a fully vegan version.
- These bars are best enjoyed chilled and can be stored in the fridge for up to a week or freezer for longer.
- Adjust sweetness in the caramel layer to taste.